Wednesday 29 June 2016

Wot???? No colour ??

Hello everyone,

and happy Stampotiqe Challenge Day ! It is Nellie's turn today and she challenged us to only use black and white. As you can imagine that is a real struggle for me as I love, love colour !
This is what she said :

"I challenge you to use only black and white in your project or card". 

Here's mine:


In the end I had fun making this postcard although it wasn't easy. I started with a piece of black card stock and heat embossed the script on it with extra fine white embossing powder by WOW. I made some flags by sticking black and white washi tape on card stock and cutting them into shape. I stapled these to the card with my tiny attacher. Next I stamped 'Checkers', and cut him out leaving a small white border all around so he would stand out more. I adhered him onto the card. 
Lastly I typed the sentiment, went around it with a fine tipped pen and adhered it to the card too. The black panel was then adhered onto a white postcard base. 

I only used two stamps for this :

Thank you so much for stopping by today ! I hope you will play along with us. You might just win a $30 gift certificate for the Stampotique Online shop HERE.
Just remember : NO digi's and only one entry per person per challenge. 
Good luck ! 


Friday 24 June 2016

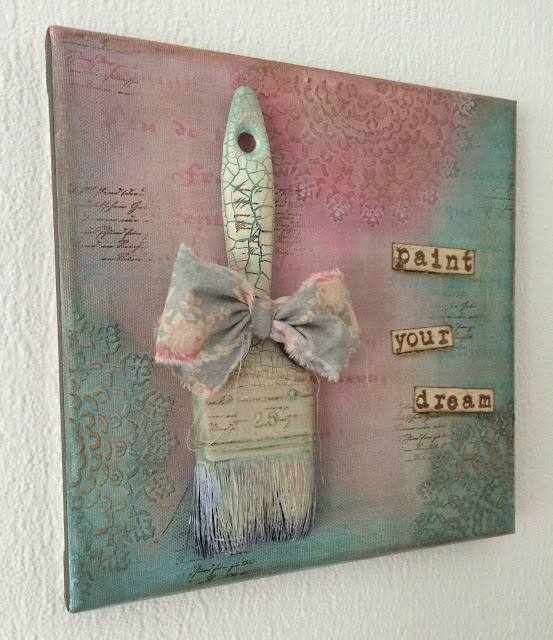
Paint your dream

Hello everyone,

Today I have a little canvas to share. It was such fun doing this as it was so different to anything else I usually do. I might have to do this sort of thing more often..


This canvas is 10" x 10" or 25 x 25 cm. I started by putting on the modelling paste through a stencil called 'Doily'. After it had dried I layered lots of paint on it using  Fluid Acrylics in the colours Cobalt Teal Hue & Primary Magenta both mixed with Titanium White. When this had dried I thought it looked way to fresh so I used Antiquing cremes (Raw Umber and little bit of Patina Green) to make it look a little bit old. 


After I was happy with that I added some more stencilling with the same colours of paint but undiluted. The stencil I used was "Old French Script" by Americana Decor. It is very subtle.  Also I used a rubber stamps by Paperartsy and some bronw ink to add  more script. That was the background finished..


The paintbrush was a really old one that was lying around in my craft room. The hairs were really hard so I decided to use that. I gessoed it first and then put a layer of crackle paint on it. Next I painted it with Fluid Acrylic paint in the colour Titan Buff and when that had dried I applied the same antiquing creme to make it look old. Next I tore some fabric from my stash and made a bow around the handle of the paintbrush with it. 
The sentiment was stamped with rubber stamps by Stampotique on a piece of paper painted with Titan Buff, antiqued with Raw Umber antiquing creme and stamped with the same script stamp as the canvas. I also went around the paper strips with the ink pad. 

Lastly I adhered everything to the canvas. 


Here is a close up of all the yummy texture from the modelling paste. 

I have used all DecoArt products for this canvas.  

Thursday 23 June 2016

Enjoy the little things

Hello everyone,

and welcome to my blog where today I have the second helping of inspiration for the challenge over at Country View Challenges. The theme is 'crackle' and it was chosen by the lovely Evelyn !
I did a mini art journal spread with a little tutorial and this is the finished project :


And here is how I made it :


I painted the pages with Dylusions paints using a blending tool.


This is what that looked like..


Next, I painted Distress Crackle paint over the dried pages. 


While that was drying I stamped the mouse to add to the page. I had coloured this cat on holiday with my coloured pencils so I coloured the mouse in the same way. I later added the milk bottle...


After the Distress Crackle had dried I painted over it with Paperartsy Crackle Glaze, hoping I would get some big crackles... 


While that dried I stamped the milk bottle and coloured that too. 


Unfortunately the second layer of Crackle didn't work so I went back to the Distress Crackle and put another layer of that over the top and that did seem to work.


I accentuated the crackles with DecoArt antiquing cream.


Next I used a Tim Holtz stamp set (CMS260)  and some brown Archival Ink to add some more interest.


This is how it looked; I also went around the edges with the same ink pad to grunge it up a little more. 


Next, I decided it needed some white so I took this Tim Holtz stencil (Dot Fade) and some Deco Art Crackle paste and added that to both pages. 


It didn't crackle very much but I was happy with how it looked. 


The mouse (by Katzelkraft) and the cat (Crazy Cats by Tim Holtz CMS251) were stamped on the page to get the little details like the whiskers. You can then cut these off the stamped images you have coloured. 


Of course it didn't stamp very well on the white dots but it looks OK in the end. Here I have added some more stamping using the other stamp from the Tim Holtz set (CMS260) and some orange Archival & Distress Inks. 


After adhering the cat, mouse and bottle to the pages I added some shading underneath using a Faber Castell Big Brush marker. 


And this is the finished result ! I added a sentiment from an Eclectica stamp set by Paperartsy (EKD02).

Thank you for stopping by today. I hope you will play along with us this month ! 


Try to be different

Hello everyone,

For my DT post for Katzelkraft today I have made a clean and simple card.


On a piece of Bristol card stock I stamped the giraffe with Archival Jet Black Ink. I coloured him with Zig Clean Color Brush Markers. I only recently purchased these and wanted to try them out. They work very well. 

I used three different sentiments to create a new one. I also used a black fine liner to add some lines and doodled x's around the card and the sentiment. The panel was then adhered on a white card.

I used the following stamps:


Thank you so much for stopping by today !


Wednesday 22 June 2016

May you touch dragonflies...

Hello everyone,

It is my turn on the VivaLasVegaStamps! Blog again and today I have an art journal spread to share with you. I have written a short tutorial for this page :


This is the finished page which I shall cut in half and glue into my mini journal.. 


I started with a piece of paper that was used for rolling of my brayer and cleaning my stencils when I was gelli printing. I often find that these pages are just as nice as the ones you plan and make. 


I cut out the bit I wanted to use and decided to add some pink. I used my small round Gelli Plate for this. I applied the tiniest amounts of pink and white paint, rolled it out and pressed a rubber stamp in it to create texture and then stamped it on my page. 


Here is the result, cool eh ?


Next, background stamping... I use whetever ink has the right colour. Not bothered about it being Archival or Distress or any other kind. 


This is what that looked like. Now time to add black... 


...using some script and the birds. After this is was time for the focal image...


I chose this lovely forest critter... 


here she is in her full glory ! 


Time to add everything to the page... 


and here is the result. I love those colours together... 

I used the following stamps:


Thank you so much for stopping by today !


Hello Summer !

Hello everyone,

and happy Wednesday ! Another Wednesday, another challenge over at Stampotique Designers' Challenge. This week it is Jackie's turn to host and she chose the theme : 'Butterfly and flowers and things garden'. This is what she had to say about her theme:

'Now Summer is almost here it's time to spend time in the garden and enjoy the nature and flowers". 

I have made a card. It is a one layer piece apart from the sentiment which was typed on separate paper and cut out and adhered to the card. 


I stamped the butterfly first and then made a mask. Next I stamped the flowers, again using a mask as to not stamp them over each other. I then coloured everything with Copic Markers. I stamped the sentiment, cut it into strips and adhered it to the card. I went around it with a fine tipped pen. 
Lastly I adhered the panel to a white card base. 

I used two stamps for this card:


I hope you will play along with us this week. You could win a $30 voucher for the Stampotique online store HERE. Just remember: NO digi's and only one entry per person per challenge... 

Thank you so much for stopping by today ! 


Tuesday 21 June 2016

Live in the moment

Hello everyone,

Welcome to my blog and this post for Visible Image. I decided to do an art journal for this post and this is what it looks like :


These pages were started by painting 2 layers of Gesso. When this had dried I applied some model paste through a Tim Holtz stencil. Next I used 3 different colours of Lindy's Spray Inks, 2 blue and 1 green) and sprayed them mainly over the model paste.  I let it drip towards the spine of the book. I also added some drips over the whiter part of the pages for some more interest. 

Next I stamped one of the 'Scratch the surface' stamps 3 times right over the model paste on each side. I used VersaMark for this and then used a white WOW embossing powder and melted it with the heat gun. These were the 'platforms' for the dragonflies to sit on.

Around the areas of colour I stamped one of the stamps from the 'orbital' set with dark blue Archival Ink. The dragon flies were stamped on white card stock with StaZon ink and then painted with Silks. These are very translucent so you'll still see the stamped lined. I added holographic embossing powder over the wings and clear powder over the bodies of the dragon flies and heat embossed. I think they look absolutely fabulous ! 
The were then cut out and glued down on their little platforms... the wings were left unglued. 


A detail of the dragon fly. Love all the sparkle ! 


And another detail photo

I used the following stamps :


Thank you so much for stopping by today ! 

Social Media, Blog and monthly Challenge details :

Show & Tell Monthly Challenge details: http://visibleimage.co.uk/challenge 


Monday 20 June 2016

De Craftorij Zomerchallenge - CZC 2016 Day 16 - 20

Hello everyone,

Here are my cards for De Craftorij Zomerchallenge (postcard a day) Challenge, day 16 - 20...


Day 16 - Monochromatic. A gelli print with a butterfly that was stamped seperately and coloured with watercolours. The sentiment was stamped directly on the card. 


Day 17 - Board game. Naughts and crosses. Another gel print with collaged naughts & crosses. They were stamped on patterned paper, cut out and adhered. The black lines are thin strips of black card stock. 


Day 18 - Use markers with different points. 
Another gelli print. I fished this one out of the bin (pardon the pun) as I didn't like it originally but I saw the potential with these fish.... The fish were stamped on the gelli print with green ink, the sentiment with black ink and then added details with different markers... 


Day 19 - Bucketlist. Another gelli print.... yes  I know, I am addicted. Especially after doing the workshop with Birgit Koopsen, so wonderful ! Anyway, added some stamping to this one. Drew the circles and added the sentiment; sums life up I think ! 


Day 20 - men
You guessed it, another gelli print. I stamped the background a little, white embossing the circles. The man is a stamp from Carabelle Studio. I restamped the part of his chest where the heart is on white card stock, coloured the heart, cut it out and adhered to the one on this card. I then stamped the sentiment (same stamp set) , cut it apart and adhered it to the card as well. 

Thank you so much for stopping by today !! 


Friday 17 June 2016

De Craftorij Zomer Challenge - CZC 2016 day 11 - 15

Hello everyone,

This is the third helping of my postcard a day challenge.. I am really enjoying this although I find it more difficult than last year to keep up !


Day 11 - Create a card with a flap. My flap is made of acetate; in the top photo it is over the card, in the bottom photo it is not. This card was created with Vera Lane Studio Digital images, coloured with Copic Markers on a piece of gelli printed paper. 


Day 12 - Use a quote of saying. I chose this fab stamp from Carabelle and a quite from Lewis Caroll that comes in the same set.  The background is a gelli print, the image was coloured with Copic Markers. 


Day 13 - Christmas in June. Base coloured with Distress Ink after white embossing the snowflakes. Father Christmas was coloured with Copic Markers. 


Day 14 - Use a Newspaper headline. I didn't have a newspaper in the house but I did find a reproduction one in my stash dating to 6th of June 1944 from which I cut this head line. The little boy is by Stampotique, coloured with Copic Markers; the balloons are from a Tim Holtz set and they were also coloured with Copic Markers. 


Day 15 - The weather. I stamped the brollies (Katzelkraft) , coloured them with Copics and added a Stampotique quote. 


Thank you for stopping by today !!