Thursday 27 February 2020

This week at Vera Lane Studio

Hello everyone,

Happy Thursday !

For today's Vera Lane Studio post I have made a postcard and a mini journal page.


Isn't she fabulous ! She's called "Femme Forte" and you'll find her in the SHOP

I used a stencil and Distress Oxide ink to make the background. I randomly stamped it and added some ink around the edges. I printed her, coloured and cut her out. I then adhered her together with the sentiment on the card. I also added some washi tape for her to stand on. 

This little page is made with the set "Joyful" and you can find her also in the SHOP.

I tore a page out of this little journal and cut it a little smaller. I then added Distress Oxide ink and water to my craft sheet (yellow and orange) and smooshed the paper into it. 
I added some stencilling using white acrylic paint and used what was left of the paint splatter.
She was printed, coloured and cut out. I adhered her and the sentiment to the page. I then glued the page back into the book. 

Thank you so much for stopping by ! 

Tuesday 25 February 2020

Look cute

Hello everyone,

and welcome to this week's AALL & Create project which is a mini Art Journal page.

And here's how:


I stamped and coloured this little guy and gave him a hat ! I then cut both images out and glued the hat to his head. So cute ! 


I used a brayer and added some beige paint. I then rolled over the blue paint and used this stencil and a baby wipe to add more interest. 


Because I wanted to add some more paint, white this time I tore the page out of my book because it was easier to roll the brayer over. I also used the same stencil as a stamp over the top with Distress Oxide Ink to make it stand out more. 


Next I added some pieces of book paper and then used the Reverse Dotz stamp to add some stamping around the edges and over the book paper. 


When I die cut these fab dies, I keep the numbers that fall out as well. These were white and I simply coloured them by smooshing them onto the same blue Distress Oxide ink. I adhered them to my page. 


I stamped the sentiment and cut it into 5 pieces because I think and odd number of pieces works better. I stamped it onto the same book paper but without words on this time. You can just use the edges of the pages for this. 


and here it is all put together. I also added some shading under the boy,  the numbers and around the word strips. I used a normal graphite pencil for this. 


I have used the following stamps:

#300 - Look cute by Janet Klein
#316 - Oh boy by Janet Klein
#284 - Hat drama by Janet Klein
#313 - Reverse Dotz by Autour de Mwa

Stencil:
#88 - Ring the changes by Autour de Mwa

Die:
#12 - Code by Bipasha BK 

For more information about all the fabulous AALL & Create products as well as a worldwide stockist list, please visit:


Thank you for stopping by today ! 

Thursday 20 February 2020

This week at Vera Lane Studio

Hello everyone,

Happy Thursday and indeed it is a happy Thursday as today I will be going on holiday ! Yay!

I have made something for today though and it is an art journal spread with a VIDEO.


This set is called 'Lil bit of heaven' and you'll find her HERE

I hope you'll enjoy the tutorial:


Thank you so much for stopping by today ! 


Tuesday 18 February 2020

A mini book for AALL & Create

Hello everyone,

and welcome to this weeks AALL & Create post for which I have made a mini book using pieces of torn Mixed Media paper which I sewed back together and rolled it onto an old thread reel.


And here is how:


I started with tearing some pieces of mixed media paper and then sewing them back together. I added some acrylic paint with my fingers using just 4 colours; pink, orange, lime and turquoise. Next I used these stamps with Distress Oxide inks to add more interest. I inked up the stamp with the same colours as the paints and then spritzed it with water before stamping. 


To add contrast I used this stamp with black Versafine ink. 


Using elements from these stamp sets I added some more stamping. I used the cloud from the set on the left and the butterflies from the set on the right. I stamped straight on the pages and coloured them in with water colour markers. 


Next I stamped all the little people I was going to use and coloured them with Copic markers. I cute them out and was then ready to put the book together. 


And here is the whole thing after I glued all the little people in the book. 


Some detail photos. I added some of the words after I glued the little people on the pages. 


I had this reel lying about for ages and finally managed to use it. I glued the left edge of the strip onto the reel and then carefully bent the paper around it. I used a bit of garden twine to keep it together; this was attached to the right hand edge with some staples.  


Another view.


Unrolled ..


I hope you like my project; it was certainly fun to make ! 

I used just stamps this time,  lots of stamps but no stencils and no dies. 

Stamps by Autour de Mwa:

#308 - Knobbly bobbles
#309 - Pom pom flowers
#313 - Reverse dots

Stamps by Janet Klein:

#295 - Adventurer
#296 - All good things
#297 - Simple but significant
#298 - The giving heart
#299 - Tremendous Friend
#300 - Look cute
#301 - Flowers and sunshine
#315 - Go fish
#316 - Oh boy 

For more information about all the fabulous AALL & Create products as well as a list of world wide stockists please visit:


Thank you so much for stopping by today !  


Saturday 15 February 2020

Remember this

Hello everyone,

welcome to the second post this month for Country View Challenges. There is still time to play along with our challenge for February which is all about 'splatters, splashes and drips'.  Just make sure to read the rules first. You will find them and all the other information about it HERE.
I have made an art journal page for this but it was not without trouble. I couldn't seem to add any of the splatters as it all seemed to soak straight into the paper I used. But in the end you can see the splatters and some of the drips so it is all good.


For a full VIDEO tutorial please click HERE or on the pic below. 


Thank you so much for stopping by today ! 


Thursday 13 February 2020

This week at Vera Lane Studio

Hello everyone,

Happy Thursday and welcome to my blog where today I have made a mini art journal page and a postcard for Vera Lane Studio. I have used older images today because I they are still great I think.


I create the background first by dunking this piece of paper into watered down Distress Oxide inks. I used Tumbled Glass and Faded Jeans. Next I added white embossing and stamping. I then printed, coloured and cut out Tweedledum and added him and the sentiment from the same set. 

You'll find him HERE.

I also made this postcard:


This background came from my stash. It was made with the gelli plate and a stencil. I added some Inktense pencil along the left edges of the circles to make them stand out more. I then added a little stamping and doodling along the edges. 

Next I printed, coloured and cut out "Penpal" and adhered her onto the card. The sentiment is from the same set. 
Penpal is still available upon request. 

Thank you so much for stopping by today ! 


Wednesday 12 February 2020

Don't be an idjit

Hello everyone,

For today's VivaLasVegaStamps! post I have made a tag with some of the latest release stamps.


..and here's how:


I cut a tag out of a gelli print from my stash. It was made with blue and green acrylic paint and a stencil. 


Next I coloured Sasquatch with Copic Markers and cut him out. I set him aside until I was ready to use him. 


I stamped the sentiments I was planning to use. 


I stamped the background of the tag and also stamped Sasquatch again. I do this so if I don't cut out the coloured image perfectly, it will still look perfect when I glue it over top. The tag is now ready for finishing.


I started with splatters which I added with a paint pen. Just shake it at the tag.
I glued Sasquatch down and added some washi tape for him to stand on. I glued the sentiment in place and added some lines and doodles with a graphite pencil. 


I think it turned out great ! 

I used the following stamps:


Other materials:

Gelliprint 

Archicval inks:
Jet Black - Aquamarine and Leaf Green

Distress Oxide Ink:
Tumbled Glass 

Paintpen
Graphite pencil 
Copic markers

Thank you so much for stopping by today !


Tuesday 11 February 2020

Limited edition

Hello everyone,

Welcome to this week's AALL & Create project that is a 6" x 6" journal page.


And here's how I made it:


I made a gelli print with this stencil. I rolled yellow paint on my plate, took a print, rolled a very, very thin layer of orange on the plate, placed the stencil, rolled over some more with the brayer, took the stencil off and pulled a print. This is the result. 


Next I took an orange Inktense pencil and added some shading onto the circles. 


I then stamped the background and added some black acrylic paint along the edges. I used Distress Oxide Ink, Archival and VersaFine to stamp. I just choose the colour, not the brand or type. 


Next I stamped these flowers, coloured them and cut them out. I didn't like the white left on the stems so I cut if off later. 


I had some bits left of a die cut that I did a while ago and decided to use it. 


Everything put together looks like this. I added white splatters with a paint pen and some dark shadows around the flowers to make them stand out more. I used a watercolour pencil and a water brush for this. Lastly I added the sentiment. 


I used the following stamps:

#281 - Happiness & Nature by Tracy Evans
#292 - Scripts by Bipasha BK
#302 - Going postal by Tracy Evans
#304 - Heartfelt by Tracy Evans

Die:
#12 - Code by Bipasha BK

Stencil:
#87 - Totally Dotty by Autour de Mwa

For more information about all the fabulous AALL & Create products, including all the new release and a list of international stockists, please visit:


Thank you for stopping by today ! 


Thursday 6 February 2020

This week at Vera Lane Studio

Hello everyone,

Happy Thursday ! For today's Vera Lane Studio post I have made a postcard and a journal spread.


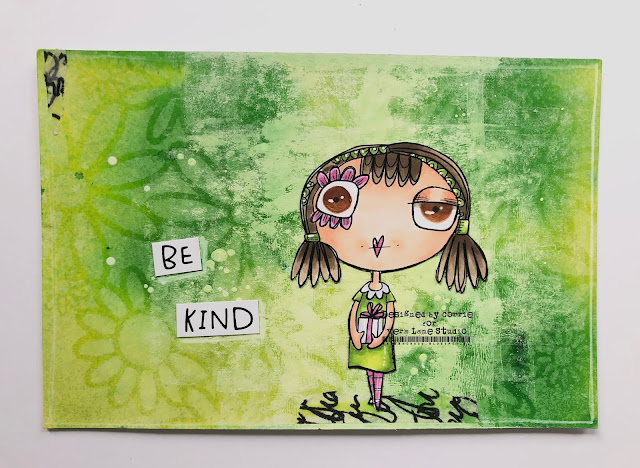
This postcard was made with the newly released "Be Kind" set. I printed, coloured her and cut her out. I then placed her on this card which was from my stash. By the looks of it I used spray inks and a stencil to make it. I used a brayer to add some white paint to place her on so she stands out better. I added some splatters, washitape and the sentiment. She was coloured with Copic markers. 

You'll find 'be kind' HERE


This spread started with a stencil and a blending tool. I randomly added some stencilling with Distress Oxide ink. I didn't like it, so I painted over it with white paint. I then added the brown along the edges and the pieces of book page. A little stamping was added and then the page was ready for Contessa. She was printed, coloured with Copic Markers and cut out. 
The sentiment is a snarky sticker by Tim Holtz. 

You'll find Contessa HERE


Thank you for stopping by today ! 

Wednesday 5 February 2020

My life feels...

Hello everyone,

and welcome to today's post for VivaLasVegaStamps! which is an art journal page made with stamps from the latest release.


I have used the following stamps for this :


Other materials :

GelliArts Gelli plate 6 x 6 

Acrylic paints:
Dina Wakley - Magenta - Lime and Turquoise

UmWow stencil:
Hexagon

Distress Oxide Inks:
Twisted citron - Worn Lipstick and Broken China

Versafine Clair - Nocturne

Archival ink - Watering can

Thank you for stopping by today