Thursday 30 January 2014

Imagination

Hello fellow Crafters,

Over at the Tag Along blog the theme is set by Mark and he wants us to make something using favourite techniques. Well, that's easy, I like everything so I made this :

I painted a tag with turquoise acrylic paint and then sprayed Dylusions Ink Spray in three places while the paint was still wet.  (Favourite technique : Experimenting, lol) I like the result. I then did a bit of background stamping with a script stamp and used a stencil and white ink for the roman letters. Put some rub ons on and stamped Stampotique's Mela on white paper, coloured her and clear embossed her. I cut the wings from a collage sheet from Deviant Scrap, Hidden Vintage studios and coloured them a little bit more. I glued wings and Mela on script patterned paper and cut around it. Also used a bit more of the paper to put some strips on the tag. A bit of ribbon finished it off. 

Thanks for stopping by ! 

Hope you like it….

Journal 52 - week 4 - building character

Hello fellow Crafters,

This week the prompt for Journal 52 is 'Building Character'. The idea is to create a character with paint, collage or words. However you want. I decided to try and paint one. Boy, this is way, way out of my comfort zone but I suppose that is what it is all about. So here goes my first attempt at painting a face:


I painted the face with acrylic paint. After I finished I painted the left side of the page blue, also with acrylic paint. I did some background stamping with grey and blue inks and wrote the sentiment. I usually use stamps of sticky letters but today I thought I write it. Lastly I tore the definition of 'character' out of a dictionary and glued it on the page. 

Thanks for stopping by !

Hope you like it ...

Wednesday 29 January 2014

Ideas create the story - Round Robin

Hello fellow Crafters,

I made these pages in Monika Sleypen's journal for the Round Robin that is currently being done via the Craftorij Facebookpage.


I used separate paper for this as I used Dylusions sprays and I didn't want them to go everywhere.
The colour is actually more turquoise than blue. The circles were made with modelling paste and coloured with gold paint which I rubbed with Archival Sepia ink because it was too yellow for my liking. I did some background stamping and doodling and used a photo on a scalloped mat. The saying was a freebie from the Art Specially event from last year. A bit of twine and some staples and brads finished it off. 
Lastly I glued the pages in the journal.

Thanks for stopping by !

Hope you like it….

I'm an angel..

Hello fellow Crafters,

It's Wednesday again and that means a new Challenge over at Stampotique ! The theme is Winged and was set by Arwen.
This is what she said:

"Hey Sweeties
Wings have something mystical for me.
Angels have wings, fairies, my favorite animal: the bat :)
Love and positive feelings give wings.
Today I would like to see what gives you wings.
I am very curious about your creations <3

xx Arwen"


Do you know that you can win $30,-- worth of those quirky, wonderful stamps when you participate in a Challenge, any Challenge. There is a new one every Wednesday and every month there are two winners !! So why not have a go !! 
I made an Art Journal this time:


Santa brought me a Moleskine water colour journal and I love it. I started colouring the page with water colours and then used my homemade polka dot stencil (overhead projector sheet and circle punch!) with Picked Raspberry Distress Ink. I also used a Roman Script stencil with white ink. At that point I thought it needed something around the edge and didn't want to use ink so I doodled around the page with a black marker. I used the following Stampotique stamps:
Daniel's hearts (only one)
Daniel's Tree Topper (just his wings)
I stamped all images on white card stock and coloured them with alcohol markers. As usual, I also clear embossed them. I decided to use washi tape to anchor Mr. Stripes and Smile on and because the right side of the page was quite empty I decided to put the sentiment, for which I used letter stickers, on washi tape too.
Thanks for stopping by !

Hope you like it.....


Saturday 25 January 2014

Altered calendar...

Hello fellow Crafters,

I got this idea to change a calendar into a bit of art from a friend. Thanks Paulien !!! I will show you what it looks like without and with it's week calendar on. The idea is to take the calendar itself off and embellish the base of it. You then put the calendar back, use it for a year and then at the end of the year you are left with a bit of art. So here goes :


This was my second attempt at this because the first thing I did to it, I hated so I started again. I glued some dictionary paper on the base after which I painted it lightly with gesso.  I then put some Pan Pastels on in yellow, orange and a tiny bit of red. I did some background stamping, used a stencil with white ink and put some washi tape on. I used a TH blueprint stamp for the alarm clock; this was stamped on the same dictionary paper as I put on the base and so were the wings. Both images were also clear embossed. I used three Stampotique stamps as well: 


I stamped Eric and Carol's flower on white paper, coloured them and clear embossed them. I also stamped Eric onto the base. You get all the little details when you glue your coloured, cut out image over the top of the one on the base. The hanging hearts were stamped directly onto the base and coloured some of them in with alcohol markers. I then put everything together and put the sentiment on with sticky letters. The last thing was to put the calendar back; I embellished that also with a bit of washi tape and a flower along the top. 

Thanks for stopping by ! 

Hope you like it…..


Friday 24 January 2014

Ice Queen

Hello fellow Crafters,

Over at the Tag Along Challenge blog the theme this week is Snow and Ice and was chosen by the lovely Carol. This is what I made :


This is a #8 Manilla Tag which I painted with white acrylic paint. I then glued some bits of tissue paper on it, which have script on it. I went over it with white paint again in certain spots. I did some background stamping with grey and blue Archival inks and also took the blue ink pad and dragged it along the edges of the tag. I used India ink to make the rings and the splatters. I then stamped the snow star from Tim Holtz twice, coloured it and embossed it, first with sparkly powder then with clear. Shame the effect doesn't show on the picture. The little figure is from the Octopode Factory and I coloured her in blue and grey shades and clear embossed her.  I also gave her a little crown which I cut from black card stock and embossed with the same sparkly embossing powder. The letters are from Tim Holtz. I finished the tag off with a bit of blue ribbon and some white which was kindly given to me by Jackie Payne.

Thanks for stopping by !

Hope you like it….

Thursday 23 January 2014

Danger, keep out...

Hello fellow Crafter,

This week Coby challenged us to make a door hanger with Stampotique stamps. I came up with this:


I cut the door hanger out of card board. I used a template from the internet. I painted it with acrylic paint and destressed it with Distress Inks. I used some stamps for the background and used my favourite old top for making the rings. Little Head was stamped on white card, coloured and clear embossed. I used 2 stamps from a Crafty Individuals set; 'danger' and 'keep out' and stamped them in text paper. The words 'crafting in progress' were made with sticky letters. I doodled around those letters with a white pen. I decided to put a few embellishments on and that was that !

Thanks for stopping by !

Hope you like it.  

Wednesday 22 January 2014

Love with your whole heart - You can never have too much happy

Hello fellow Crafters,

I recently took part in an international ATC swap organised by Nikki Woodward on the Stampotique FB Page. I would like to share with you what I received and what I made:

This one was sent to me by Jackie Payne from the UK. She is one of my team mates on the Stampotique DT.  Isn't it lovely. She also enclosed a little baggy with lots of bits of ribbon. Thanks Jackie !!! It will come in handy.


I made this one; I posted it off to Janna Williams in the U.S.A. The theme was 'beloved' which I found to be very difficult. So I decided to go for my most loved colours, one of my most loved stamps, my most loved materials and a sentiment that I really liked. So it became a beloved ATC in that way. 


I used Pan Pastels for the base colour. DId some background stamping. The black swirls are TH rub ons. Heartthrob was stamped on white paper, coloured and clear embossed. I gave him a 'happy' hat. Lastly I made the sentiment with TH mini letter stickers. 
Thanks for stopping by !

Hope you like it….

Journal 52 - week 3

Hello fellow Crafters,

Today I made another page in my Journal 52. The prompt this week: You make me smile.
Anything that makes you smile can be used. So I used a stamp that always makes me smile; also Art Journaling makes me very happy. So you can say that I sat In my room smiling away while making this page.

I gessoed the page and coloured it with two shades of pink Pan Pastels. After using a fixative and drying it, I used some stencils and stamps to create a bit more interest. I also went around the page with a black ink pad. I used all Dylusions Stamps today. The banner is from the set 'Bags of Bunting'. The flowers from 'How does your garden grow' and the girl is called 'Pondering Petunia'. (She is the one that makes me smile). I stamped everything, except the banner, on white paper, coloured it and clear embossed it. 
I used pale pink pattern paper for the banner, stamped the flags with Archival ink and used a white pen to fill in some bits. 
I glued everything on the page and decided to just put the word SMILE on.  And that was it.

Thanks for stopping by!

Hope you like it….

Twinkle, twinkle...

Stampotique Designers Challenge #130 Stars part 2

Hello fellow Crafters,

This is the second week of the Stampotique Designers Challenge themed Stars by Sam. Did you know you can win $30,-- worth of those amazing stamps if you participate in any of the challenges. They happen every week on Wednesday and if you follow the blog you will get a notification! So no excuses !!

I made this tag :


I used a # 8 Manilla tag which I gessoed and then used Pan Pastels in dark blue and purple. I used gold around the star to create the illusion of light. The star itself was drawn on patterned paper, cut out and I used a marker to create some shadow on the edges. I did some background stamping using black Archival Ink and the stamp 'Fax to Wolfgang'.  Little 'Gog Lin' was stamped on white card, coloured with alcohol markers and clear embossed.  I then gessoed some book text and used sticky letters to create the sentiment. I then put everything together and lastly used some jewels and matted the tag on some kraft paper. A bit of ribbon finished it off.

Thanks for stopping by !


Hope you like it .......

Tuesday 21 January 2014

Sunshine, moonlight….

Hello fellow Crafters,

I have an Art journal page to share today. I used my medium sized Moleskine watercolour journal.


Again the quality of the photo is not brilliant. The photos look great on my phone but as soon as I transfer them onto my MacBook they look horrible. I will have to spend some time to see what I can do about that. 
Anyway I painted this page with watercolours in green, blue, yellow and orange. I cut the stars from paper from a magazine which is about engineering, hence the drawings, and coloured them. The main figure is "Jammin'" and he is from Stampotique. I stamped him on white paper, coloured him, clear embossed him and glued him on the page. I used some washi tape to stand him on. The black rings are made with India Ink and a cookie cutter. Lastly I glued on the sentiment which is of course part of a song by the Jacksons.
Thanks for stopping by !

Hope you like it. 

Monday 20 January 2014

Hello...

Hello fellow Crafters,

My third and last project for today was dress up a page in my tiny Moleskine that already had pink paint on it.

I only used one stencil with white ink to create the blocks. The black stripes were made with a credit card and black ink. I used the same ink to age the edges. I used two Stampotique stamps :


The Altered Hello was stamped directly on the page with Versafine Black ink and while the ink was still wet I poured clear embossing powder over it and heated it. Wilbur was stamped on white card, coloured with alcohol markers and clear embossed. I glued him on the page on some Washi Tape. And that was it.

Thanks for stopping by ! 

Hope you like it….

Cake solves everything..

Hello fellow Crafters,

My second project for today was this Art Journal page. I bought some Octopode Factory stamps a while ago and today I thought I would use one of them.


I glued some book paper around the edged of the page and painted it with Mermaid PaperArtsy Fresco Paint. I used some background stamps and stencils to create an interesting base. Jolee is from the Octopode Factory. I love this image, I think she is very cute. I stamped her with Memento black ink, coloured her with alcohol markers and clear embossed her.  I found a sentiment on the internet saying: sleep solves everything. I thought it might be fun changing this to : Cake solves everything. 
I used sticky letters to put the sentiment on the page and placed Jolee on some washi tape. Lastly I doodled the border around the page.

Thanks for stopping by !

Hope you like it...

Love card..

Hello fellow Crafters,

I've spent a very enjoyable day in my craft room today and made a few things. The first one is a card.
This is it :

I thought this 'Stacked Love' stamp, designed by Roc Nicholas and sold through Stampotique, is very suitable for using with black and white. And that is what I did. First I stamped the 'Flying Heart', also by Roc, in light pink ink as a bit of interest in the background. I then stamped 'Stacked Love' 4 times and used a black marker to colour in parts of the letters. I then coloured the hearts red and doodled the border and that finished the card. 

Thanks for stopping by !

Hope you like it…. 

Saturday 18 January 2014

Winter trees

Hello fellow Craters,

Over at the Tag Along Challenge blog the theme is 'winter trees'. I made this:


This is a #8 Manilla tag and I painted it with Paperartsy Fresco paint in Ice Blue. I made the top darker with DI and the bottom lighter with white chalk ink.  I used a border punch with a lacy pattern on white paper and used the bits that fell out as snowflakes. The tree is from Stampotique, I took off the leaves and put a little bird on one of the branches. He came from the 'just be U' stamp from Stampotique designed by Roc Nicholas. The edged were distressed with Cobalt Archival ink. I found the quote on the internet; I thought it was very nice. I used sticky letters to put it on the tag and lastly I put a bit of lacy ribbon through the hole.

Thanks for stopping by !

Hope you like it……. 

Friday 17 January 2014

Journal 52 - week 2

Hello fellow Crafters,

Today I made the second page in my Journal 52 book. I use a Dylusions journal for this but only one page at the time as it is a bit much to fill a double spread. The prompt was 'somewhere, a simple place'.
This is what I made:


You'll have to excuse the bad quality of the photo but is was very dark in my craft room this afternoon. I painted the page first with the darker shade of blue and then used different lids from spray bottles etc. to stamp Versamark Ink on the painted surface. I then sprinkled UTEE on it (first time I used it) and melted it. I then painted the lighter blue over the top and let it dry. The next step was to put some paper over the top and iron it to melt the UTEE again so it comes off the page together with the top layer of paint. So the first layer will be visible again. The biggest circle is my 'simple place' and I placed Stampotique's 'Midge' in it. I also used 'Hanging Hearts' by Stampotique. I doodled around this ring with white and black pens and also around the page with just black.  I used one background stamp and one stencil. The black rings were made with my favourite tool : a top from an empty tube. The sentiment was made with sticky letters. 

Thanks for stopping by !

Hope you like it….


Wednesday 15 January 2014

I like the night !!

Hello fellow Crafters,


The lovely Sam is hosting today's  Stampotique's Designers Challenge and the theme she chose is 'Stars'.  This is what she said : 

"I don't know one person who doesn't enjoy looking at the stars. Stars fill us with a sense of fascination and wonderment. Earliest societies mapped and traced stars. The speed of light is 186,000 miles per second and because stars are so distant, many of them millions of light years away means we look in to the sky from the distant past. Therefore I am inviting you to use stars in your creation this week, as the main image or as an accent. I can't wait to see what you make, have fun!"

f you would like to win $30,-- worth of those wonderful Stampotique stamps then why not have a go and play along !


I made a triptich and this is how I made it: I cut three pieces of cardboard. I just used some old packing material. I glued dictionary paper all over it, then gessoed it and used a perforator to cut the holes. I coloured it with Pan Pastels in two shades of blue. I had to apply two layers and fixated it in between. So that was the background done. The stars are silver and I glued them on next. I put a little gem in the middle of each. The stamps are all from Stampotique and they are:
I coloured all the images with alcohol markers and then clear embossed them, put them on double sided tape and cut them out. The sentiment came from the internet and was made with a computer printer. Lastly I used some ribbon as hinges.

Thanks for stopping by !!!

Hope you like it…..


Tuesday 14 January 2014

Birthday card

Hello fellow Crafters,

Here is the second card I made for the Birthday Swap that is organised by Sonja over at the Craftorij Facebook page :


On a white card I glued some pink polkadot paper, slightly smaller then the card base. I did distress the edges a bit with pink ink. The images are all from Stampotique; I used:
The dog and the banner were stamped on book texts and cut out. The sentiment was stamped on the reverse of the polkadot paper and also edged with pink ink. 

Thanks for stopping by ! 

Hope you like it…...

Monday 13 January 2014

Round Robin (2)

Hello fellow Crafters,

This is the second Art Journal I have made for the Round Robin organised by Sonja Boom via de Craftorij.


I gessoed the pages and painted them blue with acrylic paint. I used some background stamps and a stencil with white and black ink. I also splattered some India Ink over it. The main image and the sentiment are from two different Tim Holtz stamp sets and the spider is from Stampotique. He was just added for a bit of fun. 

Thanks for stopping by !

Hope you like it…..

Saturday 11 January 2014

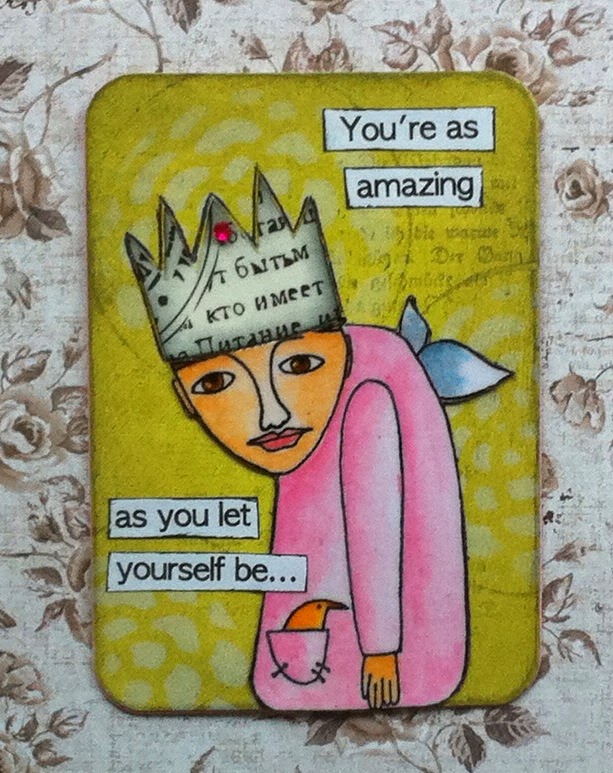
You're as amazing as….

Hello fellow Crafters,

I also made an ATC today. I love making ATC's, they are like miniature works of art I think. Anyway this is what I made:


I used green Pan Pastels to colour the card. I is actually a little bit more limey green. My camera refuses to capture green properly. I then did some background stamping and used a stencil with white ink. It is very subtle but you can just about see it. I used Bird Lady from Stampotique, designed by Roc Nicholas. I think this stamp is adorable and I just can't stop using it. I stamped her on white paper,  coloured her with colour pencils and a water brush and clear embossed her. The crown was cut out of pattern paper and the edges aged with black Distress Ink and also clear embossed. I glued on a jewel as well. The sentiment came from the Internet and was printed on white paper, edged with a black marker and glued on.

Thanks for stopping by!

Hope you like it….

Home sweet home

Hello fellow Crafters,

Over at the Tag Along Challenge Blog the theme is home sweet home. This is what I made :


Instead of painting a Manilla tag, I cut a tag out of pattern paper. This particular one has text on it and was white to start with. I used a pale blue Pan Pastel to give it a bit or colour and then used Distress Inks to darker the edges. I stamped Stampotique's Home Sweet Home stamp on red and white pattern paper and paper pieced it. I coloured with windows with alcohol markers. Toto the dog, also from Stampotique was stamped on white paper and coloured with different shades of grey. Lastly I punched a little heart out of the same red paper. After putting some washi tape on, I glued everything on the tag, dripped some white ink paint on it and added a flower and some ribbon. That was it !

Thanks for stopping by !

Hope you like it….

Thursday 9 January 2014

Journal 52 - Week 1

Hello fellow Crafters,

I put my name down for the free Journal 52 workshop and today I made my first one. The theme is up, up and away. I used my brand-new Octopode Factory 'Witch' stamp with her flying broom !


I used a Dylusions Journal for this. I still had a brand new one because the old one filled up really quickly so I bought another one.  I then discovered the Moleskine ones and sort of forgot about the Dylusions one, mainly because the 2-page spreads are very big. I decided to dedicate my brand-new one to the Journal 52 workshop and only use one page at a time.

I started with Gesso and then my beloved Pan Pastels. I did some background stamping and also used a stencil with white ink. The hot air balloons are from Tim Holtz' Tiny things and so are the postage stamps.  I then used my white paint pen to put some splatter on the page.  I stamped 'Witch' on white card stock and coloured her with alcohol markers, cut her out, coloured the cut edges with a black marker and glued her on the page. Lastly I made the sentiment with sticky letters. 

Thanks for stopping by !

Hope you like it….

Wednesday 8 January 2014

Something new !

Hello fellow Crafters,

For today's challenge over at the Stampotique DT Challenge, the theme is set by Kaz and this is what she wrote:

'I am just a little bit nosey, so for this challenge I'd like you to use something that Santa brought you! Don't worry if you didn't get crafty stash, just use something that you recently bought for yourself. If you really want to, you could make something with the theme of something new as well. Just make sure you enjoy making it'.

Did you know that at the end of each month you can win $30,-- worth of those yummy stamps if you participate in the challenge so why not have a go ! Anyway, this is what I made :


This is an Art Journal page in my Moleskin journal. I started with Gesso to prime the paper. I use Liquitex because it has a gritty finish on which Pan Pastels work really well. So after it dried I used Pan Pastels in blue and green. I did some background stamping and then started stamped the images on white paper (apart from the bushes which were stamped on patterned paper) and coloured them with alcohol markers. I also clear embossed everything.
I used the following Stampotique stamps : Folded tags (background)
                                                                   Bushes
                                                                   Banner
                                                                   Birdy up
                                                                   Carousel (new stash)
I made some 'coffee cup' marks with a top of an old bottle and also did some stencilling with a polkadot stencil and white ink.

The sentiment was made with little letter stickers.


Thanks for stopping by !

Tuesday 7 January 2014

Three

Hello fellow Crafters,

Over at the Craftorij, Coby has set the first Stampotique Challenge of 2014 as 'three'.  I played with my Art Journal and came up with this :


I coloured the page with Pan Pastels in  two tones of yellow and brown around the edges. I still aged the edges with Archival Ink in the colour Coffee because I thought it needed a bit more definition. I then used number stamp, the 3 of course, to stamp the background with Vintage photo Distress Ink. to keep it subtle I stamped it off once first before putting it on the page. I also used a script stamp with the same ink without stamping it off first. I then took 3 manilla Tags and stamped Teddy on there. (The photo doesn't do him any justice actually). It looks better in real life. I coloured Teddy with alcohol markers and did some background stamping with a swirl stamp in Scattered Straw Distress Ink. I aged the edges of the tags with the Scattered Straw Distress Ink and with Vintage Photo. I put some Raffia Ribbon through the holes and lastly put the word 'three' on with sticky letters. 

Thanks for stopping by !

Hope you like it….

Sunday 5 January 2014

Birthday card swap….

Hello fellow Crafters,

This year I am also taking part in a birthday card swap. It's being organised by Sonja Boom via de Craftorij. This is the first card I made; it was for Gerrina and her birthday was last Friday. So I can show you the card I made for her:


I started with a bit of card stock that was slightly smaller then my card front. I gessoed it with Liquitex Gesso because it is a bit rough and forms a nice base for Pan Pastels. They were next in 2 shades of pink. I used some black India Ink to stamp the circles and make the splatters. I stamped the Bingo card stamp with gray Archival ink and the number stamp with white ink. I also aged the edges of the paper with some black Archival ink. The main image was stamped on pink patterned paper and cut. The sentiment was made with a label maker and placed on some more patterned paper and stapled on the card front which I then adhered to the card.

Thanks for stopping by !

Hope you like it….

Teatime

 Hello fellow Crafters,

Today I made this ATC; I wanted to use my new stamp called 'Stacked Cups' designed by Roc Nicholas and sold through Stampotique.


I gessoed the ATC card and then coloured it with Neocolors. These are water-soluble wax pastels. I used Cobalt Blue and Emerald Green. I then distressed the edges with a Archival Inkpad in Cobalt blue. I used a little plastic tube to create the white circles. I then stamped the image on white card,  coloured it with alcohol markers and clear embossed it. After cutting it out I went round the cut edges with a black marker so the white card doesn't show it you didn't cut it our perfectly ! I decided to put the image on some gessoed dictionary paper and thought it would be fun to use the bit that explains what tea is. Lastly I used some sticky letters to put the word 'teatime' on.

Thanks for stopping by !

Hope you like it…..

Friday 3 January 2014

Life is a one time offer...

Hello fellow Crafters,

Today I made a tag for the 19th challenge over at Tag Along. The theme is tickets and this is what I made:


I started with a #8 Manilla tag which I painted with Distress paint. I did some background stamping with a PaperArtsy swirl and a ledger like stamp. I used blue and coffee coloured Archival inks for this. I then aged the edges with the same brown Archival ink and put on the rub-ons. The little girl came from a collage sheet which is called Sibling Rivalry from Hidden Vintage @ DeviantScrap.com.  I used a stamp for the tickets, I stamped two on kraft paper, crumpled them up and coloured them with Vintage Photo Distress ink. They were stapled onto the tag over the photo. I made the sentiment with the computer, distressed it with the same Vintage Photo ink and glued it on. A bit of cream ribbon and a turquoise mat finished it off. 
As the light was very bad today I had to use the flash for taking the photo. I got a lot of glare from the picture of the girl so I had to take it at an angle. That's why it looks a bit funny. 

Thanks for stopping by !

Hope you like it….

Do I look like ….

Hello fellow Crafters,

I am taking part in an Art Journal Round Robin. It's been organised by Sonja Boom via de Craftorij.
This is my first spread:


I used a stencil and model paste to create the polkadots. I then coloured the pages with Pan Pastels in what seem to be my favourite colours at the moment: yellow, orange and a tiny bit of red. I used a PaperArtsy Mini to stamp the swirls around the edges and a top and some india ink for the circles and the splatters. The main figure is Karin is she is from Stampotique as is her pet Kitty
They were placed on some washi tape. The sentiment is from Stampotique Originals also and you will find it HERE. I stamped it on book text, cut it apart, distressed the edges and glued it on the page.

Thanks for stopping by !

Hope you like it…..


Wednesday 1 January 2014

My first posting as a Stampotique Designers Challenge DT member !!

Hello fellow Crafters,

First of all I wish you all a very happy New Year !!


This is my first official posting for Stampotique as a member of the Design Team. The theme is 'Anything goes' so why not have a go and you might win $ 30,-- worth of those wonderful Stampotique stamps.


I coloured the pages with Pan Pastels and used a few stencils to make the background a bit more interesting. I also used a Stampotique stamp for the background; it is called 'Fax to Wolfgang' and you will find it HERE. I used a top from an old toothpaste tube and some Archival ink to stamp the rings. I used Angelboy as the main image and you can find him HERE.
He was coloured with Alcohol Markers and embossed. I used clear for his body and head and sparkly for his wings as you can see in the detail photo. I used a variety of stickers, rub ons and sticky letters for the new years wish.
I put Angelboy and the sentiment on gessoed booktext.

Thanks for stopping by !

Hope you like it .....

Happy New Year !!

Hello fellow Crafters,

This is my first posting as DT member for Roc Nicholas ! As today is the 1st of January I thought what better than a New Year's card. I have used my beloved Bird Lady ( available via Stampotique ) again and put her in a festive mood by giving her a party hat and some fire works.


I cut a piece of card stock, slightly smaller then the card base. I used a stencil with some model paste for the stars. I then gessoed over that, dried it, and coloured the whole front with Pan Pastels in two shades of blue. Bird Lady was stamped on white paper, coloured with alcohol markers and clear embossed. The fireworks were hand drawn and given the same treatment. I cut her hat and the scalloped border at the bottom from book text. Note the word 'new' on her hat ! Lastly I put the 'happy new year' on with sticky letters. 

Thanks for stopping by !

Hope you like it…..