Friday 30 January 2015

Why hello

Hello fellow Crafters,

I am having so much fun with the stamps of VivaLasVegaStamps! that I can't stop playing with them!
So I made a little mini art journal that I would like to share with you all:


This journal is very small and by Moleskine, I love it. I started off with painting the pages light yellow (I used PaperArtsy Fresco Paint in the colour Cheesecake for this). Next i used a Tim Holtz stencil (Rays) and Distress Inks in Orange and put the rays on the pages, flipping the stencil for the other side. 
I then stamped the background with a variety of stamps (list down below) and orange and grey Archival inks. I also used a dark red Distress Ink to stamps the "Tape X" stamp and didn't like it so I had to cover it up, hence the washi tape....


The next thing I did was stamp the girl with the phone on white card stock and coloured her with my Copic Markers. I filled in her glassed with Glossy Accents. 
So now I had to find a way to get rid of 'Tape X' and I thought, why not use real tape so I got my washi tapes out and just put some over the top. I did doodle around them with a black fine tipped pen. 
Next it was time to adhere the girl in the middle of where the two stencilled rays meet. 
Lastly I stamped the sentiment. 
I used the following stamps:


Thanks for stopping by !

Hope you like it and got inspired !

Wednesday 28 January 2015

Our little comfort zone

Hello fellow Crafters,

and happy Wednesday to you. Today it is my turn to host the Challenge over at the Stampotique Designers' Challenge blog and I chose 'Painted background in any form' as my theme...
My first love in crafting is paint. So today I would like you all to use paint in your background. Doesn't matter what paint or how you apply it. Just have fun ! 

I made something completely different today :


I used a shop bought heart for this, I think is is MDF. I painted it with black gesso and when that had dried I applied a coat of crackle medium. I dried this with the heat gun and then put PaperArtsy Fresco paint over the top. The colour I used is 'Stone'. I love watching the crackles appear.. 

Over the top of the paint I used a Deco Art Antiquing creme in black and rubbed that down again with a baby wipe when it was dry. It gave me this 'dirty' worn look. Isn't it lovely. Next I used some bits of wood which I bought a few years ago. They have been made old and came in a big plastic bag. I chose a few bits and put them together with wire. I brushed this lightly with gesso. 
I adhered the little bundle to the heart with gel medium and let it dry overnight. 

Next I did some stamping on the background with the 'French Journal page' and brown ink; you can hardly see it. 'Comfort zone' is part of a Stampotique stamp and I stamped it directly onto the heart. I added 2 Tim Holtz Chit Chat stickers to it, to form the sentiment.

I then found a metal heart in my stash and put it on the wood with some more wire which I bent in little rings.. I did the same with a bit of wire for the top to act as a hook for the twine to hang it up with. Both were also dry brushed with gesso. 

The last thing was stamping the birds, colouring them and cutting them out. I used Copic Markers for colouring. I adhered the little birdies to the wood with tacky glue. 

I used the following Stampotique stamps :

I hope this gave you some inspiration to get your paints out ! 

Don't forget you can win a $30,-- voucher for Stampotique.com at the end of the month, just remember: only one entry per challenge and no digi's.


I will also enter this little project into the Craft Stamper's January "Take It Make It" Challenge "Take a Stamp"! Fingers crossed ! 


Thanks for stopping by ! 


Tuesday 27 January 2015

Seize the day

Hello fellow Crafters,

For my DT post for Lost Coast Designs Stamps I created this postcard.


The paper was sprayed with Ink and then I put the model paste on through a stencil. After this dried I put some more ink on. I then used the Dream Dictionary Stamp and the smallest of the Butterfly Set to stamp the background. I also doodled a few lines around the edge with a fine liner. Next I stamped the little girl; she is called Flying Ballerina. I coloured her lightly with Copic Markers, put some glitter on her wings, which you can't really see, and then cut her out and adhered her on the card. 
Lastly I used a sticker sentiment and doodled around that as well and that was it ! 

You can find these stamps at www.lost-coast-designs.com or if you live in Europe at www.Inkadinkadutches.nl.

Thanks for stopping by ! 

Hope you like it...

Monday 26 January 2015

Imperfection is beauty.

Hello fellow Crafters,

For the second challenge at the PaperArtsy Blog with the theme of 'Shiny stuff' I made an Art Journal spread.

I went for a grungy look. I started with putting Grunge Paste through a stencil and then painting over the whole thing. I used Fresco paints in the colours Sage, Concrete, Snowflake and Stone. 
I aged the whole thing by putting turquoise Antiqueing cream all over it and when this dried I went in with a baby wipe and removed most of it again. Next I used a Big Brush Marker to shade the chevrons so they stand out a bit more. 

For the 'shiny stuff' I used some glass glitter in between the chevrons. I also used glitter to bling up my embellishments. 


The butterfly is metal and was silver embossed and partly dipped in glitter.


The heart is a metal PaperArtsy heart which was also silver embossed and dipped in glitter; to make it even more shiny I put a layer of UTEE over the top. 

I put my finished embellishments aside and started stamping the background. I used all PaperArtsy stamps for this spread. I will list them at the bottom. 
Next I stamped the hearts, the sentiment and the photo of Marilyn. I thought this all went well together. 
I also used some Plaster bandage, which was coloured with Sage Fresco paint and some Patterned paper form 7 Dots Studio (Destination Unknown) which was also partly painted with the same paint. I used some metal staples to keep everything together before adhering it to my pages with double sided tape. I then took the Big Brush Marker again and shaded all around all the elements. 

I hope my spread is Shiny enough for this second topic ! 

I used the following stamps: 

Eclectica3 ESN11
Backgrounds - Plate 3
Man of Numbers 2 set - MON2

Thanks for stopping by ! 

Hope you like it and got inspired  ! 

Being a lady ..

Hello fellow Crafters,

Yesterday afternoon I had a great time in my craft room ! I made this postcard:


This stamp is one of my newer ones and I wanted to use it. I started with a piece of card stock that I coloured with Neocolors. I always do this in the same way : Scribble the colours on liberally, blend with a baby wipe. Scribble again and then blend with my fingers. That way you get good coverage. This time I painted a layer of clear gesso over the top, just to see what would happen. Not much, lol... The colours starts moving a little bit but not much. 
Anyway, next I used a stencil and some background stamps. I also splattered white ink on it and added some washi tape here and there. 'Moth Fab' was stamped on the card and on white card stock. I coloured the one on the separate card stock with Copic Markers and then cut her out. I adhered her on top of the other one on the card. That way you don't have to cut out all the details. I typed the sentiment and doodled around the words, cut them out and adhered them. 

I used all Stampotique Stamps :


Thanks for stopping by ! 

Hope you like it....


Sunday 25 January 2015

Beautiful

Hello fellow Crafters,

I have made a tag today for the Challenge over at the Tag Along blog where the theme is 'spots and dots'. So here's my spotty tag :


I cut this tag out of watercolour paper and the first thing I did was stamp "Glimmering Hope" with Versamark and embossed her with black embossing powder. Next I coloured her face with Copics and her skirt with purple Distress Ink and a water brush. 
I then coloured the whole tag with Distress Inks, carefully avoiding the image. I used two shades of green, two shades of blue and purple. The green was done with smooshing the ink pad on my craft sheet and using a water brush, the rest I did with a blending tool. I dripped some water on it to get some lighter spots. 
Next I stamped all the dots with the same colours and the eraser on the back of a pencil. I used a small bottle cap and white ink to stamp the rings around some of the dots. I then thought it needed something else and I decided to stamp the "Splattered Mug" in two places. I also went around the tag with my blending tool and black Distress Ink. Lastly I took one of my new chipboard sentiments, white embossed it and glued it on the tag and put a ribbon throught the hole.

Thank you for stopping by ! 

Hope you like it.....

Friday 23 January 2015

Whassup?

Hello fellow Crafters,

Just a quick one today; I've had so much fun creating these art journal pages that I wanted to share them with you. I used all VivaLasVegaStamps! Most of these from the wonderful Background Plate, I also used the butterflies, the sentiment 'Whassup?' and of course TweedleDee and TweedleDum...


This page started out a total disaster as I sprayed it with Dylusions (Green/Lime and black),  hated it and put it aside. The model paste was also already on it. Today I thought I should try and salvage it..  So I painted clear gesso over it and of course it was an even bigger disaster ! lol So I got out the Acrylic paints and painted over it.. Much better. I did a lot of stamping and used an eraser on top of a pencil to stamp the white dots with gesso. TweedleDee and TweedleDum were stamped on a blank page out of a book and quickly coloured with pencils. I cut them out and adhered them on top of some washi tape. I also adhered some washi tape randomly around the pages. Lastly I stamped 'Whassup?', first with white ink and then in black overtop.

These stamps are available from www.vlvstamps.com or if you live in Holland at http://thestampingcottage.nl.

That was it ! 

Hope you like it.....

Wednesday 21 January 2015

Some days...


Hello fellow Crafters, 

and happy Wednesday to you. The lovely Kathi is hosting this week's Challenge over at the Stampotique Designers' Challenge blog. She chose the theme 'funny and/or punny'. This is what she said :

e.e. cummings said, "The most wasted of all days is one without laughter." Puns and word play always make me smile. Really good puns make me laugh. Create a project that makes YOU smile, then share it with us! As always, have fun with this challenge!


I decided to make a postcard this week and I hope you all find it funny ! I you would like to have a chance at winning one of the $30 vouchers at the end of the week then why not play along with us. Just no Digi's and only one entry per person per challenge. 


I painted a piece of white card stock with pink and orange acrylic paint. When that had dried I used an almost dry baby wipe and rubbed gesso all over the card to give it that worn look. Next I took a black ink pad and dragged it around the edges.  I stamped the background with a variety of stamps and inks. (A list of all the stamps I used is at the bottom of this post). To make the background a bit more interesting still, I used some small bits of pattern paper which I adhered on top of some doily bits. The woman was stamped on white card stock and coloured with Copic Markers. I thought it would be funny to give her some undies, so I drew a pair of knickers and glued them on her bottom. The sentiment probably came from the internet; I have collected pages and pages of them.... I typed it on my old trusty typewriter and adhered it to the card. That was it I think... I hope you like it and it made you chuckle... 


I used the following stamps :


I will also enter this little project into the Craft Stamper's January "Take It Make It" Challenge "Take a Stamp"! Fingers crossed ! 

Thanks for stopping by ! 


Tuesday 20 January 2015

Road trip...

Hello fellow Crafters,

Today it is my second posting as a DT member for VivaLasVegaStamps!  and I am still very excited to be on the team... I have chosen to make a postcard for today's posting and I have explained how I made it.

It is going to be a long one so get a cup of coffee and join me !

This is the end result :


Let's get started ! 


Start with a postcard cut from white card stock and colour with Distress Inks and a blending tool. I used : Tumbled glass, Salty Ocean, Faded Jeans and Chipped Sapphire.


Start building your background starting light at the bottom and darkest at the top, go back the other way to blend it all together. Drip some water over it; Distress Inks react with water so you get some nice lighter spots. Next tear some patterned paper (I used Kaiserkraft "Now Boarding") and adhere to the bottom of the card. Add some sewing around this piece. 


Pull the ends of the threads through and secure on the back of the card. 
Next stamp the background randomly (sorry forgot photo, but you can see it in the photo underneath). 
I used the following stamps for the background :


Next I rubbed my Archival ink pad around the edges of the card. 


Stamp the sign on patterned paper (the same I used for the bottom) and cut out. Set aside.
Stamps main image on white card stock and also on the card. That way you have all the details of the stamp without having to cut them all out. I also stamped the sentiment at the bottom of the card saying 'road trip'.

Stamps:


 Now the fun part begins: Colouring the image. I used Memento Tuxedo black ink for stamping as I was going to use my Copic Markers. This ink works very well with these markers. 
Get 3 or 4 shades of brown ready and start with a base colour which is the lightest. Next start adding a darker colour in the areas where the shadows are. VLVS! stamps are very good for colouring as many of them have the shadow areas already. Repeat with an even darker colour but don't go all the way over the medium colour. Next go back the other way, so medium to light, blending the colours together. Keep repeating until you are happy with the result. Finish colouring the whole image this way doing little bits at a time. 


This is the finished result of colouring the dog...


I coloured the little car in the same way. I used 3 shades of red.


Next, cut out the image. All the white edges will be gone when you go around the cut edges with a black marker. So it doesn't matter if you don't cut it out perfectly.


The finished, cut out image, isn't he cute !!! 
Now put all the elements together on the card and see if you are happy with the end result. I wasn't and added some more white stamping with the Coffee Rings.


 Here is another look at the finished result. 

Thank you so much for visiting today, I hope I gave you some inspiration to dust of those stamps and get crafting !


Friday 16 January 2015

Fragile papers

Hello fellow Crafters,

I like a challenge and until now I haven't played the PaperArtsy one. This time it is all about fragile papers; so book paper, tissue paper etc. I like using stuff like that so I decided to give it a go !
Here's what I made :


I cut a heart out of card board and then glued tissue paper on it. I painted it with my fingers and Fresco Paints in different shades of turquoise. Next I stamped some text on it. I used a text stamp from the Hot Picks HP1302 set. I also adhered some tissue paper to some card stock and stamped the fish and the anchor on that. I coloured those and cut them out. 
Next I used another PA stamp and some white paint to stamps on the heart a bit more. The fish, the anchor underneath and the anchor on the heart came from the Hot Picks HP1201 set. 
Next I replaced the rope on the anchor image by some garden twine, which I also used to hang the whole thing up. It was then time to put the whole thing together ! 
A few metal trinkets and a sentiment sticker finished this wall hanging off.

Thanks for stopping by ! 

Hope you like it...

Another little postcard

Hello fellow Crafters,

I am totally addicted to making postcards and I have another one to share today !


I am one of those people that never throw anything away and when I found this piece of coloured paper in my stash I knew I wanted to make another colourful postcard. The model paste was also on there, probably put on it when I did something else and had some paste leftover. It was a bit yellow because it took on the colour from the base card. I think it was done with Dylusions but I am not entirely sure. Anyway, I took some gesso and tried to whiten the numbers but they kept going yellow so I put Versamark on them and white embossed them. I also doodled around them and also around the card. Next I stamped the background with one of the circles from the 'Circles Cube' and 'Fax to Wolfgang'. Next I stamped 'Unicorns cousin' and the balloons from 'Romek'. The images were all coloured with Copic markers, cut out and adhered on the card. Lastly I drew the lines from his hand to the balloons...
I used the following stamps (all by Stampotique)

Romek (just the balloons)


Thanks for stopping by ! 

Hope you like it ....

Thursday 15 January 2015

Ride the waves

Hello fellow Crafters,

Although I don't use an awful lot of Designer Paper I do regularly buy some. When I saw this paper pad named Destination Unknown) from 7 Dots Studio I knew I had to have it... and a set of stickers and some stencils.... lol
When it all arrived I was thrilled and only then did I discover that DeeDee Catron from VivaLasVegaStamps! has designed it ! So I decided to make a little postcard using her paper and some of the gorgeous VivaLasVegaStamps!


As said I used a piece of the Destination Unknown paper pad as a base. I did some background stamping making the waves with the smear/smudge stamps from the fabulous background set. I will list all stamps underneath with links to the VLVS! shop. 
I cut another piece of the DP and adhered one of the sticker sentiments to it. I then stamped the paperclip and heat embossed it with silver embossing powder. Of course it was almost invisible so after lots of messing about with markers etc. I managed to make it look like a rusty paperclip. 
The ladies are happily floating about; they were stamped with Memento tuxedo black ink and coloured with Copic Markers. I cut them out and adhered them onto the sea ! 
That was it ! 

I used the following stamps :

Thank you for stopping by ! 

Hope you like it....

Wednesday 14 January 2015

Create your own sunshine

Hello fellow Crafters,

and happy Wednesday to you. Today the lovely Kaz is our hostess and she chose 'Colour Splash' as her theme. This is what she said :

'I'd like to see some bright colours to cheer us up in the dim days of January'


So this is what I did...


I used acrylic paints in yellow and orange and then added some pink here and there. Next I used a chevron stencil and pink Distress Ink. A polkadot stencil and white ink were next..
The background was then stamped with "fax to Wolfgang'; my favourite background stamp by Stampotique... I also drew some lines around the page with some doodles. 
I stamped the 'Scalloped lace border on some scraps of paper that had the same basic colours and used a white paint pen to add some details. I cut them out and adhered them randomly around the page. I decided to use 'Mary' today as she had been in the drawer for too long. I coloured her with Copics and cut her out. I adhered her on the left page on top of the border. The sentiment came from the internet and was hand written by me ! I hope you will have a go this week and have a chance of winning one of those $30 vouchers to spend in the Stampotique on-line shop. Just remember: NO digi's and only one entry per person per week ! 

I used the following Stampotique stamps :


Thanks for stopping by ! 

Hope you like it.....


Tuesday 13 January 2015

Three little ATC's

Hello fellow Crafters,

For this week's DT post for Lost Coast Designs Stamps I made a little series of ATC's. This is them:


I used a gelli print as the base and stamped the 'Dream, Love, Magic dictionary' randomly on the cards. I only used the top part of the stamps. Next stamped some of the girls of the 'Gibson Girls Faces Plate' on the ATC's and also on some white card stock. This way you can colour the images, cut them out and adhere them on their twins on the card without having to cut out every single strand of hair. Easy. The rings were stamped with a bottle cap and black and white India Ink. I also drew a line around the cards and doodled a bit on this line. Lastly I adhered the coloured girls on top of the stamped ones on the ATC's and that was that !

These lovely stamps are now available in the Netherlands/Europe at www.Inkadinkadutchies.nl or at
www.lost-coast-designs.com.


I will also enter this little project into the Craft Stamper's January "Take It Make It" Challenge "Take a Stamp"! Fingers crossed ! 


Thanks for stopping by !

Hope you like them.....

Monday 12 January 2015

My first workshop !

Hello fellow Crafters,

Yesterday was the day that I taught my first workshop. It was an "Artjournaling for beginners" class and I am please to say that it went really well.

I was held at the "De Scrapheap" shop (www.descrapheap.nl) in Sprang Capelle and all 8 ladies seemed to really enjoy it !
Here are some photo's:

Work in progress 

Dirty fingers !!!


Keeping an eye on everyone ! 

Busy, busy, busy !

Maybe some clean water would be good ???

Going well ! 

This was one of the samples I made; Acrylic paint, book pages, stencils, stamps... 

The second sample; made with Dylusions sprays, stencils, stamps, book pages...

Unfortunately there was no photo taken from the end results but I managed to fish these two off FB, these were made by one of the participating ladies. Aren't they cool !!! 
(I hope you don't mind me borrowing your art, Annelies !)


That is it for today ! 
Thanks for stopping by ....

Saturday 10 January 2015

Be brave

Hello fellow Crafters,

Over at the Tag Along Challenge blog the theme is washi tape and since I (and you as well, I assume) have lots of it I thought I would play this week.


This tag was die cut from Pattern paper (Kaiserkraft). I inked the edges with Distress Ink and a blending tool and then stamped the Splattered mug on it. The butterflies have been cut out from some washi tape. I also used some gold polka dot washitape. The sentiment came from the same paperpad. 
Frida was stamped on creme plain pattern paper from another pad and I intended to leave her like that just stamped. But I didn't like it so I coloured her with my Copics which looked much better I thought. I glued her on the tag and then used a scalloped edge to frame her. I can see now that the scalloped edge is slightly crooked. This edge came from the Kaiserkraft papered also. 
Lastly I put some ribbon throught the hole and stapled it with my tiny attacher. 

The stamps I used are all from www.Stampotique.com 

Thanks for stopping by ! 

Hope you like it..

Wednesday 7 January 2015

I am perfect...

Hello fellow Crafters,

First of all I would like to wish you all a very happy, crafty and, most importantly, healthy new year !

Welcome to the first Challenge for 2015 ! It is Claudine's turn to host and her theme is "New Year's Resolutions". This is what she said:

"Most of us always create a new Years Resolution at the beginning of the new year. For 2015 try your hand at making something with your new years resolution in mind"


I have made a little Art Journal:


The pages were coloured with Brusho's. I thought it was too bright and painted some gesso over it. Much better.. I used Tim Holtz's Gothic stencil and white piment ink around the pages and didn't like the effect so I remembered buying some blue embossing powder from WOW and decided to pour that over it and heat emboss it. I really like the effect, especially because the bottom of the page has the same colour brusho. I used "French Journal Page" and "Bla bla bla" to stamp the background. I is very subtle. Next I stamped "Karin", coloured her and cut her out. I also stamped her on the page and then adhered the coloured one on top. I do not make New Years Resolutions, not because I am perfect like Karin but because I find that most of them only last 3 weeks.... 
I found this sentiment on the internet. I was in a speech bubble in a cartoon. I just printed it, cut it out and adhered it to the page. I think it is perfect for Karin ! 

Thanks for stopping by ! 

Hope you like it....

Tuesday 6 January 2015

Happy New Year

Hello fellow Crafters,

and happy new year to all of you ! I would like to thank you for all your support in 2014 and I hope you will keep following me in the new year.

I made this little art journal with Lost Coast Designs stamps. These lovely stamps are now available in the Netherlands via www.Inkadinkadutchies.nl.


I painted the pages with acrylic paint and used some of my fingerprinted circles, which I glued on with gel medium. I used a bottle cap to stamp some more circles with black and white ink and also made some splatters. I drew to lines around the page. I stamped the baby and his hat on white card and coloured him/her with colour pencils. The year was stamped on white card also, cut out and adhered to the page. I made some little flags from more party hats.. 
I also used one of the dictionary stamps to get some more interest... 

Stamps I used : Party Baby set
                          Magic dictionary 
                          License plate alphabet 

Thanks for stopping by ! 

Hope you like it ....


Sunday 4 January 2015

I look at the man in the moon

Hello fellow Crafters,

I am taking part in an ATC swap this month and although I couldn't show them until now because I didn't want to spoil the surprise, I am going to share them now..
What is really funny is that they seem to fit into the latest VivaLasVegaStamps! Challenge ! Funny, because I created these in early December !


The cards were coloured with Distress Inks; 3 shades of blue and black. I did mask of the moon but later on decided to change the way I made the moon so that was a wasted effort ! lol
I then cut some pieces of patterned paper and used my sewing machine to attach them to the bottom of my cards. Next I stamped the faces on tissue paper and glued them to some creme coloured paper. I did this because this man was looking the wrong way so I had to reverse him. I then used a circle punch to punch out the moons and adhered them on the masked area on the cards. Next I stamped the man and had to use a black Copic Marker to make him blacker.. I also did some background stamping. Lastly I typed the sentiment on my old typewriter,  adhered it to the cards and doodled around the words. That was it...

I used only VivaLasVegaStamps! :


Thanks for stopping by !

Hope you like them...

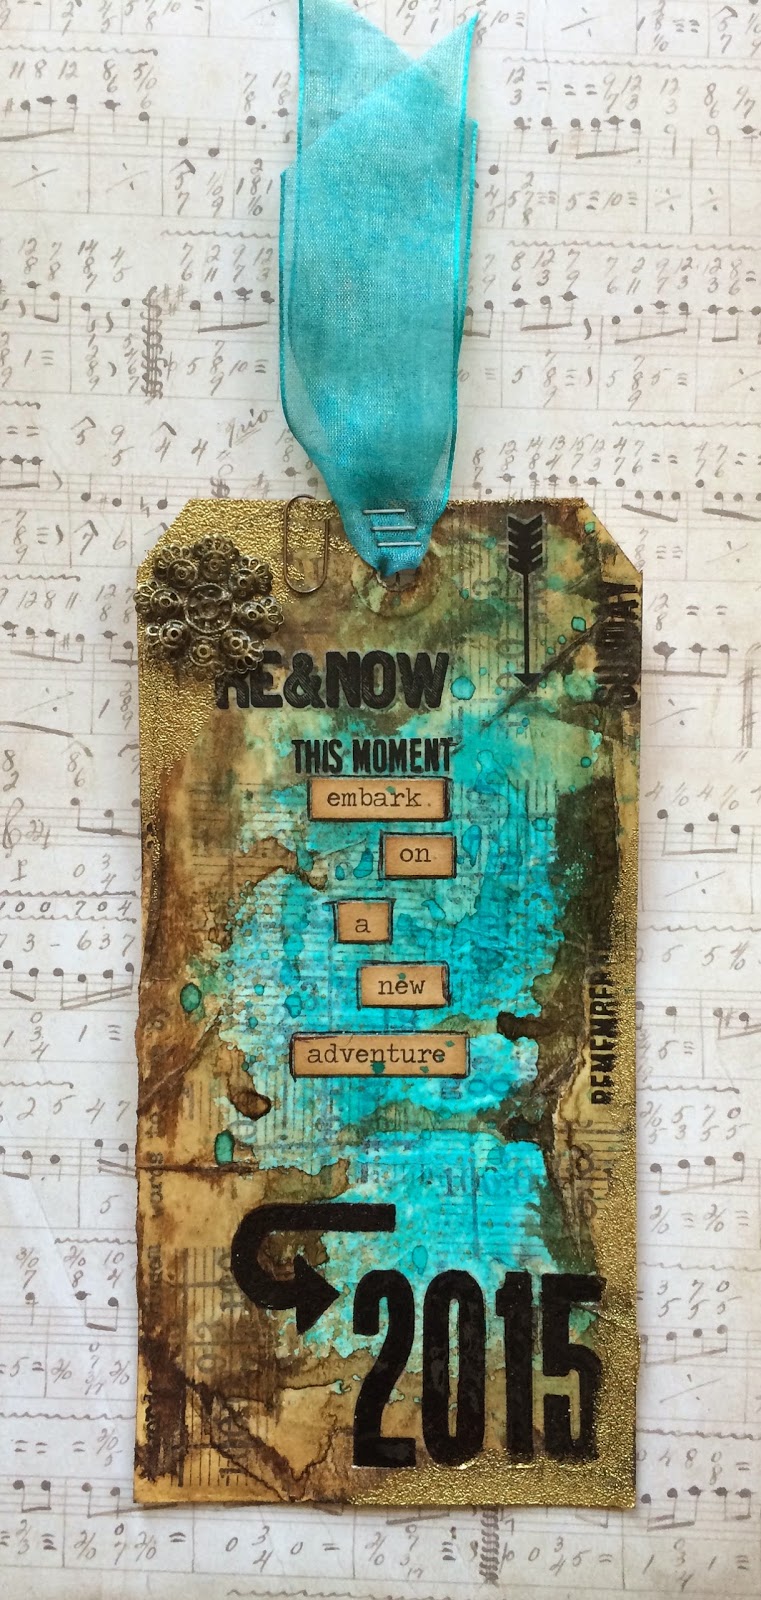
Tim's tags of 2015

Hello fellow Crafters,

For something totally different I have decided to take part in the 12tags of 2015, organized by Tim Holtz. Here's January's :


I didn't have the materials Tim used but I think it is good to have to improvise; after all it doesn't have to be an exact copy, does it ? I used rub-ons and stamps straight on the Manilla tag and then glued tissue paper over the top. I sprayed this with two colours of Spray ink. After this all dried I added some more rub ons, the 2015 are rub ons too. I then used a blending tool and some Distress Ink around the edges. When this was still wet I  dipped some of the edges in gold embossing powder and heat embossed it. I think that looks really good. I then added some more rub ons and a metal embellishment and a Tim paperclip. Next were the chit chat stickers and some more ink splattered over the top. Lastly I used the same blue spray ink to colour the ribbon and attached this with some staples and the tiny attacher. 

Thanks for stopping by ! 

Hope you like it....