Wednesday 30 November 2016

Naughty or nice

Hello everyone,

And welcome to the first week of the "Naughty or nice"  (#262) challenge of Stampotique! I made a Christmas card; just need to determine who of my friends and family is the naughtiest !!!


We would love it if you played along with us... You might win one of two $30 vouchers at the end of the month. Just make sure to read the rules on the SDC blog! 

I have used the following stamps for this:


Thank you for stopping by today ! 


Tuesday 29 November 2016

Let's get lost...

Hello everyone, 


and welcome to my blogpost for UmWow Studio.  I had fun making this little wall hanging. 


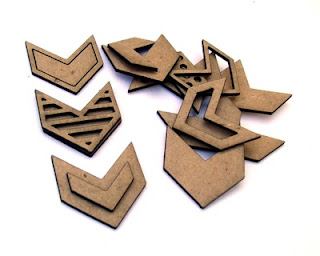
I used the "Layered Chevrons" for this but I used them un-layered and grouped them in the middle of my panel. 


Here are a few close ups...


Apart from the Chipboards, I used some paper flowers, modelling paste, scraps of fabric, brads, micro beads and rubber stamps by VivaLasVegaStamps! 


The lace bow was added as an afterthought, but I think it looks nice. 


Here is a close up of the chipboards I have used. How I got them to look like this ? Click on the link to YouTube underneath and I will show you ! 


I did add some stamping after I adhered them onto my panel. I didn't film this. 


And here is is again, I like how it turned out. 

I have used :

Layered Chevrons


I hope you enjoyed your visit today ! 


Until next time ! 

Monday 28 November 2016

Bleach techniques for PaperArtsy !

Hello everyone,

and welcome to my blog where today I am sharing a sneak peek of a small part of my project that I was invited to do for the PaperArtsy blog. So if you want to know what is is and how I made this, hop over to the PaperArtsy Blog HERE.


Thanks for stopping by today ! 

Sunday 27 November 2016

Embrace the journey

Hello everyone,

Today I have an art journal spread to share.

A little while back I won a die to make a Christmas ornament in a give away by Monika Gulya's and although I like the idea I always try to use my stash in different ways. So in this journal I have used three die cuts from the die that I won.


I started out with die cutting three of the Christmas Ornaments and glued them on my pages with Gel Medium. I then used Distress Crayons to colour the pages. After I had finished I rubbed the ornaments with a wet cloth to make them more visible. I then stamped and stencilled the background using Tim Holtz stamps and stencils.  I chose the old man for my main image because I think he must have travelled a lot in his life and fitted the sentiment I chose fabulously ! 
After gluing him down I added a little shading under him to make sure he wasn't floating. 

Thank you so much for stopping by today. 

Friday 25 November 2016

And I am unanimous in that ! A NEW VIDEO !

Hello everyone,

and welcome to my post for VivaLasVegaStamps!  today. I have made an art journal and I have filmed the process so you can all see how I do things... Here's is picture:


I have used the following stamps:


Here's the link to the YouTube tutorial; enjoy ! 


Thank you for stopping by today !


Thursday 24 November 2016

I'm different

Hello everyone,

Today I have a postcard to share. I made this as my DT project for Katzelkraft.


I really like this grumpy cat. So I used him again today. On a gelli printed card I stamped some script which I heat embossed with white WOW embossing powder. I added a doily die cut (Sizzix by Tim Holtz) and stamped the cat on white paper. I coloured him with Copic Markers and cut him out. I adhered the doily to the card, stamped the cat (not straight :o( ) and adhered the coloured one on the top. I added some shading using a coloured pencil and a back gel pen. 
Lastly I stamped the sentiment (part of) and adhered it on to the card. A little doodling finished it off. 

I used the following stamps:


Thank you so much for stopping by today ! 


Wednesday 23 November 2016

Whatever..

Hello everyone,

and happy Wednesday. The Stampotique Design Team has a week off for Thanksgiving. But we over in the Netherlands do not celebrate Thanksgiving so I made something anyway !

To my American friends that are reading this : Happy Thanksgiving !

I have made card:


I've had this big mushroom for ages but hadn't used it yet. So today was the day... I used a piece of gelli printed paper and created this little scene on it... The images were stamped separately on white card stock, coloured with Copic Markers, cut out and adhered to the card. Before all that I did stamp the little flowers on the background and coloured in the petals with a Big Brush Marker. 
I have used the following stamps:

3 Dwarfy gnomes (I used just one)

Thank you for stopping by today ! 

Tuesday 22 November 2016

Express yourself.... and a new VIDEO !!

Hello everyone,

and welcome to my blog for my DT post for Visible Image UK. I have made an art journal page today and filmed the process.


I think this is my favourite Visible Image stamp! 

Here is the link to the YouTube tutorial. I hope you enjoy watching it ! If you do, please SUBSCRIBE to my channel. I would appreciate it ! 


I have used the following stamps for this page:


Social Media, Blog and monthly Challenge details :


Show & Tell Monthly Challenge details: http://visibleimage.co.uk/challenge 


Saturday 19 November 2016

La dolce vita

Hello everyone, 

Over at Stampotique we recently started promoting word stamps/quote stamps and although I don't own very many, I have a few and the one I used here is one of them. 


The background of this journal page is a mop up gelli print. I added some white embossed stamping to lighten it up a little. The Flamingo is one of my more recently acquired stamps and I had to used it! The funny thing is that it is quite an old stamp and I never liked it until I saw it used. 
Anyway, I coloured the bird with watercolours and cut it out. As I thought it didn't stand out enough on this darkish background, I die cut a circle from pattern paper and went around the edges with a light blue marker. I adhered it behind the flamingo. I used the back side of the same paper to stamp the sentiment on; that way it is the same colour. I also went around the words with the same blue marker.  I then thought it needed something else so I stamped the crown and coloured it with Copic Markers, cut it out and adhered it on the head of the bird. 
 A black line around the page finished it off. 

I used the following stamps:
La Dolce Vita (the one I am showcasing here) 

Thank you so much for stopping by ! 


Friday 18 November 2016

Atlantic Ocean

Hello everyone,

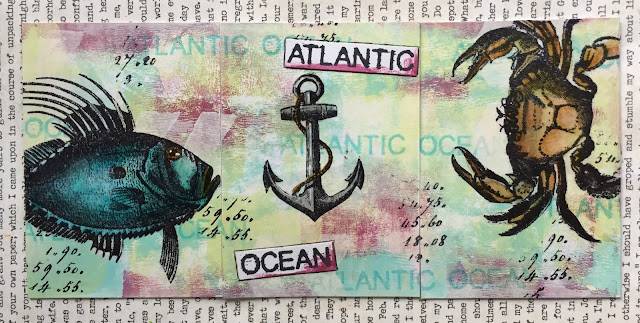
Today I had a lovely day in my craft room just playing ! I got out my PaperArtsy stuff and made this trio of ATC's.


They fit nicely together but you can also look at them separately :


#1


#2


#3

And here's how I made them :


I used a brayer to get colour on my ATC's which were kept together with a few pieces of painters' tape. I used the Fresco Finish Acrylic paint in Teresa Green, Professor Plum and Mermaid. 


After I finished brayering (I did use some white (Snowflake) as well) I randomly stamped the background. I used two set of Hotpicks for these ATC's : HP1201 and HP1302.


Next I stamped the images on tissue paper as I wanted to flip the fish and I only wanted the anchor and the crab, without the 'bits' around them. This way I could just cut the images out and adhere them to my ATC's. I used gel medium for gluing. After they were dry I used some Big Brush Markers by Faber Castell to lightly colour in the images. 

The sentiment was stamped on white card stock and on painted card stock because I didn't know which one would look the best. In the end I used the white and added some of the Professor Plum paint around the edges. 


And there you have it ! 

Thank you so much for stopping by today ! 


Thursday 17 November 2016

Always know in your heart..

Hello everyone,

I watched a video from the very talented Jenn Engle on YouTube and she used a die cut over another piece of paper to add texture to her art journal. I thought this was so cool that I had to try it out too.
If you want to see Jenn's video click HERE 


I diecut the flourishes first in opposite corners and then adhered it to another page. I then added a layer of gesso.
Unlike Jenn I didn't use any paint in this page. I coloured it with Distress Crayons only. I have had these for ages and I don't really use them. I scribbled them on and then smudged them with my fingers.  I sealed the page by rolling gel medium on to the gelli plate and 'printing' it onto my page. I then did some random stamping. 
I chose my main image, stamped her, coloured her lightly and cut her out. I adhered her on some washi tape so she isn't floating. The sentiment was stamped, cut into strips and adhered also. Lastly I doodled around the page and the words and that was it ! 
All the supplies I used are by Ranger/Tim Holtz. 

Thank you so much for stopping by today ! 


Wednesday 16 November 2016

Party animal

Hello everyone,

and welcome to the second week of the 'Human with animal head' Challenge over at the Stampotique Designers' Challenge Blog. I have made another art journal this week and here it is:


I have used the following stamps for this page:


Why not play along with us. You could win one of two $30 vouchers for the shop ! Just make sure to read the rules on the SDC page first. 

Thank you for stopping by today ! 

Tuesday 15 November 2016

She was happy... A NEW VIDEO !

Hello everyone,

I had to play today. I have all these lovely PaperArtsy Rubber Stamps and I hardly use them. So today it was the day. It was cold and wet outside, I was nice and cosy tucked up in my craft room and I had a little time so I thought I'd film the process !  Excuse the plaster (band aid) on my thumb. I cooked a meal for my mother last week after she'd had an accident and sliced a piece of my thumb off in the process. Ouch... Luckily it didn't end up in the stew !

Here is my journal :


I have used all 4 (!) Everything Art Sets, an Emma Godfrey set and a stencil by Clare Lloyd. The paints I used were Fresco Paints in the colours : Beach hut, Mermaid, Tango and Snowflake. 

I hope you enjoy watching the video. If you do, please SUBSCRIBE to my channel ! 


Thank you so much for stopping by today ! 


Monday 14 November 2016

Mailart Monday with VivaLasVegaStamps!

Hello everyone,

and welcome to Mail Art Monday for VivaLasVegaStamps! I have painted and stamped an envelope.


This is the front. 


Back of the envelope. 

I used acrylic paints to colour the envelop (which is a ready made envelope). I used light yellow, green and light blue Amsterdam Paints. I then stamped all over it using a variety of VLVS! stamps and different colours of Archival Ink. Some of the stamps were coloured or doodled for which I used my Big Brush Markers and a white paint pen. 

I have used the following stamps: 


Thank you so much for stopping by today ! 


Thursday 10 November 2016

Dreams

Hello everyone,

and welcome to my two weekly blogpost for Katzelkraft. I have made an art journal today.


The pages are made with left over paint from another project and I have just brayered this on. I did add some extra white. Next I stamped and stencilled the background using a variety of inks. The swirls on the right have been heat embossed with white powder by WOW. I stamped the birds onto white card stock and then used a die to cut them out. I added some die cut flowers for more interest. The sentiment was stamped, cut out and adhered on the page after which I added some colour with a pencil. Thank was it !

I used the following stamps: (links take you directly to the shop !)


Thank you for stopping by today ! 


Wednesday 9 November 2016

Live the life you imagined

Hello everyone,

There is a challenge blog called 'A Vintage Journey' and as some of you might know I really love vintage. So after looking for quite some time I finally decided to play along with November's challenge which is called "Cracking up !" And no, they are not all mad; it is about crackle... I happen to love crackle so I crackled my heart out on this project which is an art journal.


I used crackle paste and a stencil on the background and painted it this pastel blue when it was dry. The crackle was accentuated with antiquing cream and Distress Ink. I added some stamping and some splattering too. I added crackle paste to the little panel and treated it in mostly the same way. I added some torn ribbon, some book text and a die cut doily to make the panel a little more interesting. I also added a number plaque and the photo is one of a pack of Tim Holtz, I think they are called lost relatives or something. I coloured her a bit with pencils. 
Lastly I put everything together and added the sentiment. 

Thank you so much for stopping by today ! 

Discombobulated

Hello everyone,

and welcome to yet another new Challenge over at the Stampotique Designers' Blog. The theme for the next two weeks is "human with an animal head".  How fun is that !  We would love you to play along with us. Just remember to read the rules on the SDC page first. So here's mine:


This is an art journal page and it was started on a piece of Mixed Media paper. I gessoed it before painting it. I used Dina Wakley's heavy body acrylics. I added some stencilling in orange and black for more contrast and some subtle stamping as well. 
Next I stamped Ghostie and Grumpy koala, coloured them both, cut them out and adhered them to the page using Ghostie's body and Koala's head. I also added some washi tape for him to stand on. The sentiment was stamped on white card stock, cut out, inked and adhered to the page. 

I used the following stamps:

Thank you for stopping by today ! 

Tuesday 8 November 2016

Laugh, smile, love

Hello everyone,

For my DT post for Visible Image I have made a fairly simple card today. Sometimes it is just nice to do that. Here it is:


I used Bristol card stock which works great with the Zig markers that I used to create the rainbow. I made the colours blend a little with a water brush. I scribbled on my craft mat with the same colours and used the water brush also to make the splatters. 
Once everything was to my liking and dry, I stamped this fabulous sentiment stamp on the card with VersaMark ink an sprinkled it with white WOW embossing powder. I then melted the powder with my heat tool.
The card panel was then matted on dark red card stock and the whole thing was adhered to the card. 

I used this stamp set:


Social Media, Blog and monthly Challenge details :


Show & Tell Monthly Challenge details: http://visibleimage.co.uk/challenge 


Thank you for stopping by today ! 


Monday 7 November 2016

Wonderland

Hello everyone,

Today I am sharing another inspiration piece for Country View Challenges. The theme is stars and I have made a card. I filmed the process and hope you will hop over and have a look. Give me a thumbs up if you like it and maybe subscribe to my channel !! Thank you !


I will enter this card into the Craft Stamper TIMI challenge for November ! Wish me luck ! 


Here is the link to my YouTube Channel :


Thank you for stopping by today ! 


Saturday 5 November 2016

Making memories

Hello everyone, 


Today I have an art journal to share for UmWow Studio. It is a little Vintage. I love bright colours but I also adore Vintage. So when I found a pile of old family photographs in a junk market I was very happy. I have used one of these photos in my Journal page today. 

First I will show you which of the fabulous Chip Boards I used: 


It is called Fancy Background and here is what I did with it: 


First I cut the middle bit out so I had two halves... 


A layer of gesso and then they are ready for the sand paste. 


This is what that looks like, now to turn it into rust.... 


I used two colours of acrylic paints for this. I learned this technique in a workshop by Andy Skinner a few years ago. I think he has developed a new technique to make rust in the meantime.


This is what it looks like when finished... Isn't that cool ! 

And here is what I did with the finished piece.. 


I used crackle paste, acrylic paint and antiquing cremes to create the background. I also used some embossing powder and all the stamps I used are by VivaLasVegaStamps! 


A close up of the flourish...


and another one....

I hope you enjoyed my post today and that I have been able to entice you to use some of those fantastic chip boards ! 

Until next time, 


Wednesday 2 November 2016

Starry night

Hello everyone,

It is week 2 of Stampotique's 'Outer Space' (#260) challenge; you still have time to play along. You could win a $30 voucher for the shop. Make sure to read the rules over at the SDC blog HERE though.

I while ago I became a member of the Dutch Artjournal Group on FB and the first thing I did with them was make a little journal. I used old book pages for the inside and today I tested it to see if the pages would stand up to my way of journaling... and they did ! Yay !


So this is what I did. First a layer of gesso which I dried with my heat tool. Next I made the moon and the sky with Pan Pastels... I hadn't used these in ages and came across them looking for something else... lol After I used a fixative over the top to make sure it stayed put I got some white paint, thinned it down with water and with a brush I made the splatters to represent the stars. I also added some with a white paint pen. These three little cute guys were stamped both on the page and on some marker paper. I coloured them, cut them out (even the little antennas) and adhered them to the ones on the page. The sentiment was typed on my old typewriter and hey presto, that was it. Quick and easy ! 

I used 3 stamps for this : 


Thank you so much for stopping by today ! 
Tuesday 1 November 2016

The whole universe ...

Hello everyone,

and welcome to my blog where today I am showing a project made for Country View Challenges. It is the 1st of November and that means that a new challenge starts today ! Why not play along with us and have a chance of winning a GBP 20,-- voucher for the shop. Just make sure you read all the rules first... You'll find them on the CVC blog.
Anyway the theme for this month was chosen by the lovely Rachel and she went for "stars".

Here is my art journal page :


And here is how :


I started with a piece of white card stock. Not sure what is is but it is very smooth. Smoother than normal card stock and not as smooth as glossy card stock. I stamped the stars (the stars are from a Dina Wakley set called Grungy Stars)  with Versamark because I wanted to heat emboss them with white powder. This will act as a resist when I apply the ink. 


This is what that looked like... if you can see it, lol...


Here is what it looks like with all the inks applied. 


Next the centre piece, stamped with archival ink on the same paper and heat embossed with black powder so it is nice and black. 


Here is what it looked like after ink was applied.


This is the finished article. I added some background stamping with a script stamp from PaperArtsy from the Eclectica set ESN11 and grey ink. I matted the orange star on black paper to make it stand out more and added some sewing thread under it for more interest. I added a quote from a pack of 'small talk' stickers by Tim Holtz and doodled around the words and the edge of the page... 

That was it ! Thank you so much for stopping by today !