Showing posts with label Zig clean color markers. Show all posts

Tuesday, 4 August 2020

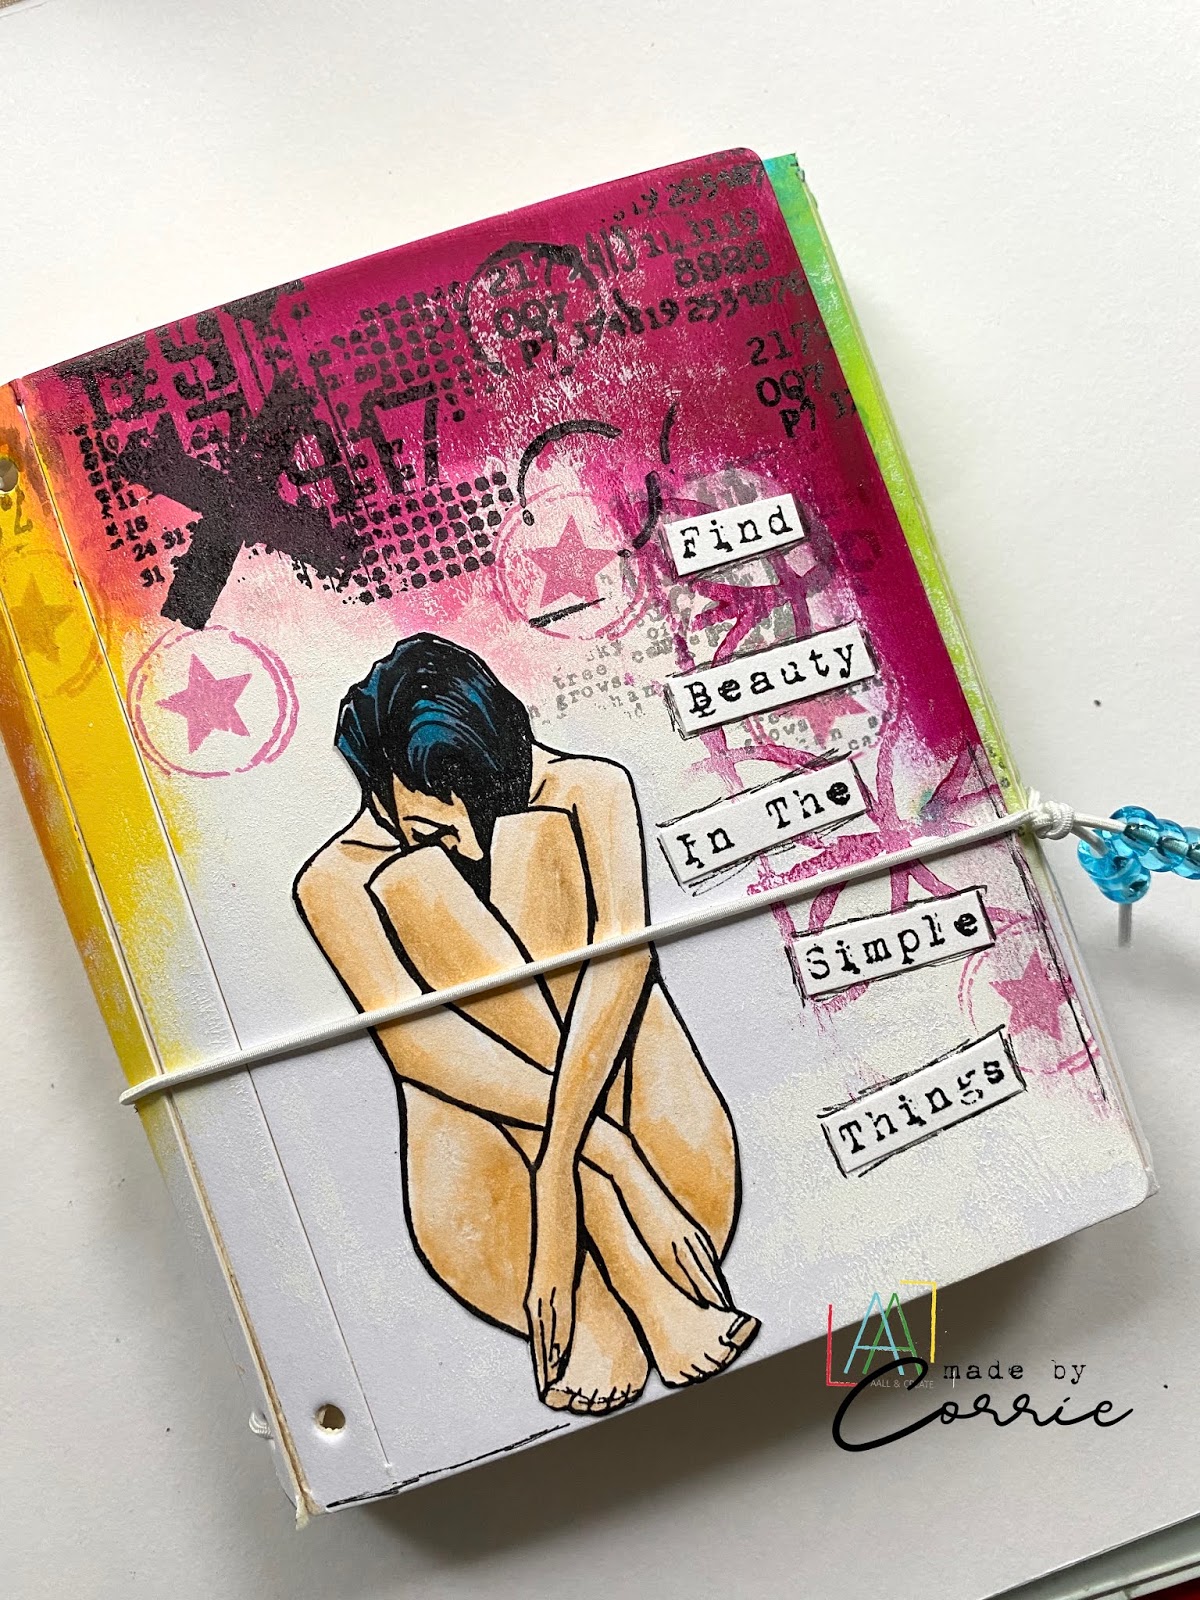
Mini book for AALL & Create

Hello everyone,

Welcome to my blog where today I am sharing a mini book I made for AALL & Create. I used mostly the new release but also some old favourites!


And here is how I made it:


I used the Eileen Hull Passport die to cut this book. I added colour with my fingers; using Dina Wakley Acrylic paints. When I was happy I added stamping in the same colours using Distress Oxide inks. There is a list of all the stamps I used at the bottom of this post. 


Next more stamping with grey and black inks. I used Versafine Clair. 


Still more stamping... once I start I can't stop. lol But now I thought it looked really nice. So, time for the focal point:


I love this image by Olga, I stamped her and coloured her with watercolour markers this time. I then cut her out and adhered her to the front cover of the book.


There she is.. 


Lastly I used this set by Tracy for the sentiment. 


And here is the cover all finished. I added a little doodling here and there and I cut some pages for inside the book and used elastic to add them in. 


Front cover of the book..


Back of the book...


This side goes under the cover when the book is closed. 

I added a piece of elastic around the book to keep it closed.


I have used the following stamps:

#338 - Background Noise by Janet Klein
#364 - Intersecting circles by Autour de Mwa
#366 - Roundly by Autour de Mwa
#367 - Take Flight by Olga Heldwein
#370 - The great outdoors by Tracy Evans
#372 - Textural Elements by Olga Heldwein

For more information and a list of international stockist of AALL & Create products, please visit:


Thank you for stopping by ! 

Wednesday, 24 June 2020

Why fit in..

Hello everyone,

Welcome to my blog where today I am sharing a journal page that I made for VivaLasVegaStamps!


and here is how I made it:


I got the new Distress Oxide Speckled Egg this week and had to try it out.. So I made this page with it and really liked it. I just smooshed the ink pad on my non stick craft sheet and spritzed with water, I then dunked the paper in, drying it between dunking. 
I used Speckled Egg, Ground Espresso and Antique Linen. 


Next I added some modelling paste through a stencil. 


I then used another stencil as a stamp and printed it here and there on the page. I used the Ground Espresso ink again. You smear it over the stencil, spritz with water and print on your page. 


Next I stamped the page here and there. You'll find a list of stamps used at the bottom of this post.


She is sooo cute, sitting in her box... lol, I stamped her and coloured her. When I was done I cut her out. 


And here it is all put together.. 


I used the following stamps:

Other materials:
Mixed Media paper
Distress Oxide Ink - Speckled Egg, Antique Linen and Ground Espresso
(I also used these same inks for stamping)
Versafine Clair ink to stamp the image
Zig Clean colour brush Markers
Grunge paste
Stencils by AALL & Create

Thank you so much for stopping by today ! 


Friday, 16 November 2018

The Darkside

Hello everyone,

Welcome to another post for Katzelkraft. I was in a naughty mood today and made, soon to be, murderscene. I had great fun making this !


First of all to get this scene I had to mirror one of the images because they were looking at each other. Because the criminal has numbers on his shirt (the numbers would be the wrong way around) I chose to flip Sherlock. I used tissue paper for this. You just stamp your image on it and glue it down the 'wrong' way on some white card stock. I used clear gesso to glue it because that works reasonable well with Zigs. The paper is really thin so you still have a perfect image, only the other way around. 
I coloured him with Zig Clean Colour Real Brush Markers. 
Because I wanted them both to look the same I stamped the criminal on tissue too but glued him down right way around. 
I then cut them out and found this pattern paper which I thought was great as a backdrop. I added some stamping to the left side and adhered my two images towards the bottom. 
Lastly I made up the sentiment from a word stamp also by Katzelkraft. 


I think it came out super cute ! If not murderous ! lol 

I have used the following stamps:

Thank you for stopping by today ! 


Thursday, 8 February 2018

Wonderland

Hello everyone,

Welcome to my blogpost for VivaLasVegaStamps! where today I am sharing a set of three ATC's. I thought another Alice project was long overdue so that is what I did !


These ATC's were made in the same way. I started with stamping the background and heat embossing it with WOW embossing powder. I then coloured the backgrounds with Zig Clean Color Real Brush Markers in rainbow colours.  I inked the edges then stamped the images and sentiment. I used pages out of an old book. It has oriental letters but I have no idea what language it is or what it is about. I bought it especially to use in my projects. Next I cut out all the images and adhered them onto the ATC's after I added some washi tape on each of them. 
When this was all done I thought it needed something more so I stamped the background with a text stamp and that was it ! 

Here are some close ups:


I have used the following stamps for this project:

Thank you so much for stopping by today ! 


Saturday, 1 April 2017

I am happiest...

Hello everyone,

For today's post for Roc Nicholas' Rubber Stamps I have made a postcard:


This card was made by rubbing dry Brush powders into a piece of card stock and then stamping over the top with water. It leaves a faint impression of the stamp. I then spray a tiny bit more water over the top and this is the result. To be honest, this is the only way I can deal with Brushos as used otherwise they are too uncontrollable for me and freak me out... 
next I stamped heart vine and white embossed it along the left side of the card. I cut a circle of pattern paper and then stamped Birdlady and Vic the dog on white Bristol card stock. I coloured them with Zig watercolour markers and cut them out. The whole think was then assembled and a Tim Holtz small talk sticker added. That finished it off nicely I thought ! 

I have used these stamps :


You will find all Roc's fantastic stamps HERE and her blog HERE. 

Thank you for stopping by today ! 

Wednesday, 15 March 2017

Come fly with me

Hello everyone,

and welcome to yet another Challenge at the Stampotique Designers' Challenge Blog ! This coming fortnight it will be all about tags. You can make one or put one on your project. If you play along with us you might win a $30 voucher at the end of the month. Just make sure to read the rules first !
I've made a tag:


This was a simple project, I cut this tag out of white card stock and stamped the plane and the sentiment on it with Archival ink and then coloured everything with a variety of materials like pencils, watercolours and even some alcoholmarkers.. I added some faux stitch lines and a piece of ribbon and that was that. 

I used the following stamps:


Thank you for stopping by today ! 

Friday, 10 February 2017

Follow your dreams

Hello everyone,

Today I played with one of my new PaperArtsy Zini's.. I love them. They are soo cute. I made a CAS card :


I stamped him on a separate piece of paper and coloured him. In hindsight I could've just stamped him straight on my card panel... duh.. not used to doing one layer stuff... I coloured him with Zig Clean Color Real Brush Markers. 
I added some washi tape for him to stand on and a sentiment from another PaperArtsy set. 

I will be entering this card into the Craft Stamper TiMi Challenge for February. 

Thank you for stopping by today ! 


Wednesday, 1 February 2017

Comfortzone

Hello everyone,

We are very excited here over at Stampotique because we have new stamps ! From now on Stampotique will have 6 new images each month ! How about that !

Also today, a new challenge starts and it is called : "Love bugs". So I have used one of the new stamps and added a bug ! Spider girl's spider is loving this tree and so are the birds ! This piece actually very nearly ended in the bin because I messed up the background. After a lot of faffing about I managed to make it look like this :


I was determined to make a one layer journal page. So I started with stamping the image which is called "Communitree" and is by Jill Penney. I coloured her with my Zig watercolour brush pens. I though I could also do the background with this so I started adding blue around the image and using a water brush to spread it and when I touched the image it started bleeding into the blue. 

I ended up using a small brush and white gesso to paint the bleeding out. After I gave the rest of the page a coat of gesso I used acrylic paints to colour the background. It worked out OK in the end. I added stencilling and stamping and a sentiment and that was that ! 


Here is a close up of this new stamp. Note: I added the spider; it doesn't appear on this image. 

I used the following stamps:


You can find all 6 new designs for February HERE.


We hope you will play along with the challenge but before you do make sure to read the rules on the Stampotique DC page. 


Unleash yourself

Hello everyone,

and welcome to my blogpost for Roc Nicholas Rubber Stamps! For today I have made a tag:


I cut this tag out of white card stock then painted it with Gesso. Next I added green acrylic paint. I thinned it down quite a bit so it would drip down the tag. I added some splatters with the same paint and with a blue Lindy's ink spray. Next I took a brayer and rolled over some orange to brighten it up. 
I added a piece of pattern paper at the bottom for "Monster" to stand on and then adhered him on top. I had already coloured him with my Zig Clean Color Real Brush Markers and cut him out. 
I then stamped the sentiment and coloured the letters with watercolour marker again (Zigs). I also added some doodling before adhering it to the tag. 
A piece of ribbon finished the tag ! 

I used the following stamps:


You'll find all Roc fabulous stamps 

Thank you for stopping by today ! 

Sunday, 29 January 2017

Ugh...

Hello everyone,

and welcome to another blogpost. It is 'Word Up Weekend' (this is all about promoting word and phrases stamps) again at Stampotique and I have a little something to share too today. It is just a panel and could be used as a mini art journal or it could be a card panel..


I have used Marsha here and she feels a little disgusted I think ! lol...
The base is another one of my never ending pile of gelli prints. It is time I got through them so I can make some more ! Marsha was stamped with Archival ink and coloured with Zig Real Brush water colour markers. 

I used the following stamps for this :

Phrase cube (which has 4 phrases) 

Thank you for stopping by today ! 

Monday, 16 January 2017

She flies with her own wings.

Hello everyone,

and welcome to my Challenge Inspiration post for VivaLasVegaStamps!   This is the mood board for this month :


The words are : foliage, flowers, weeds, nature, bugs, moths, butterflies, wings, numbers, script, invoice, background stamps, vintage, tan, black, white, brown, distressed, grungy.


and this is what I have made and I think I have used quite a few of the elements mentioned in the words. I just couldn't resist to add a little colour ! 


If you want to know how I made this you'll have to hop over to YouTube 


I have used the following stamps to make this:


I have also used a piece of pattern paper from 7Dots called 'Cloudy' from Nature Walk as the base for my journal page. 

Thank you so much for stopping by today !!! 


Wednesday, 11 January 2017

What to do with a Cheese Board ??? A wallhanging for Country View Challenges

Hello everyone,

Today I have a nice little project to share with you. Well I think it is nice.... lol. I got a wooden board with some delicious pieces of cheese on it for Christmas and you know these things always end up cluttering your cupboards when you have finished with the cheese. So I thought I'd turn it into a wallhanging...  I filmed the process and hope you will hop over and have a look. I have to apologise for the shaky footage here and there. It seems my camera cannot deal with me moving and there is no solution for this as far as I know. Hope you don't get seasick !!! lol

I made this as an inspiration piece for the "Anything Goes" Challenge over at Country View Challenges. Why not play along with us and you could win a GBP 20,-- voucher to the shop !


Here is the link to YouTube ! If you like my Videos please SUBSCRIBE to my channel. I really appreciate it ! 


I have used quite a few materials for this :

Clear gesso and model paste both by Prima 
White gesso

PaperArtsy Chalk Acrylic Fresco Paints in the colours:
Teresa Green
Beach hut
Inky Pool
Snowflake

Stencils:
Flourish by Tim Holtz
PS023 by PaperArtsy (Clare Lloyd)

Stamps:
Whimsy girl Three by StarTrish Design 
MN23 Mini by PaperArtsy
SideShow CMS263 Stampers Anonymous

Archival Inks:
Jet Black
Cobalt
Viridean

Zig clean colour Brush Markers

I am entering this project in the CraftStamper TIMI Challenge for January. 


Thank you so much for stopping by today !

No matter how long the winter..

Hello everyone,

and welcome to the second week of the 'anything goes' challenge at the Stampotique Designers' Challenge blog. I have made a postcard this week. You can still play along with us and we would love it if you did. You could win one of two $30 vouchers to the shop at the end of the month. Just make sure to read the rules on the SDC blog.

As some of you perhaps know, I really do not like winter. I hate the cold and love the warm summer weather a lot more. So that is why I made this card:


Here's how I made it. I cut a piece of white card stock to size and then used the 'Baroque Background' stamp and Versamark ink to stamp it twice. It fills the card front. I then heat embossed it with fine white WOW embossing powder. Next I sprayed some dark blue Lindy's ink on my craft mat and dragged the paper through it. I think the result is great. 
Next I stamped 'Winter' and coloured her with Zig Clean Color Brush Markers and a water brush. I used watercolour paper for this. After I finished colouring I cut her out. I also stamped her on the card but when I put her down I thought she didn't stand out enough. So I painted a little white paint on the spot where she was going to go, re-stamped her and adhered her on top. I added some washi tape under her to 'ground' her. I fount the sentiment on the internet and typed it up on my old typewriter, cut it into strips and added some colour. I then adhered the strips to the card. 
That was it ! 

I used only two stamps for my postcard:


Thank you so much for stopping by today ! 


Wednesday, 4 January 2017

Did I just say that ?

Hello everyone,

and Happy New Year to you all !

Welcome to the first Stampotique Designers' Challenge of 2017 ! The theme for the next fortnight  is 'Anything goes' (#264). I have made an art journal for this Challenge. I hope you will play along with us and if you do you might just win one of two $30 vouchers at the end of the month. Just make sure to read the rules before you play. You'll find them on the SDC blog.


I have made a whole new person this week, well they did say that anything went !!! lol
This page is a gelli print. I added some stamping with black and green inks, some heat embossing and splattering in white and when I was happy I stamped the pieces for my person. The head is just the head and the body is a whole person stamp; I just discarded the head. 
I coloured them with Zig Clean Color Brush Markers and a water brush and cut them out. Next I adhered both pieces onto the gelli print to make a whole person again. Next I stamped the sentiment and cut it into strips, coloured some of the edges and adhered to the page too. Lastly I added some shading under her feet and some doodling along the edges of the page. 

I used the following stamps:

Jillian (head)

Thank you so much for stopping by today ! 


Sunday, 1 January 2017

Happy New Year !

Hello everyone,

Happy New Year and welcome to the first Challenge for Country View Challenges for 2017.  The awesome and hugely talented Brenda has chosen the theme of 'anything goes' and we hope you will play along with us ! You could win a GBP  20,-- voucher for the Country View Crafts shop !! Just make sure you read the rules on the blog !

I have created a new year's card for today !


If you would like to know how I made this then hop over to my YouTube Channel and have a look ! If you like it please give it a 'thumbs up' and maybe SUBSCRIBE to my channel ? Thank you so much ! 


Happy watching... 

Thank you for stopping by today ! 


Sunday, 18 December 2016

Comfortzone

Hello everyone,

It is 'WordUp Weekend' at Stampotique. This is an event where we share some of the best quote and word stamps. I chose one by France Papillon this week.
As a main image I chose the flamingo by Jo Capper-Sandon; I seem a little obsessed with this stamp at the moment....


For the background I used Lindy's Stampgang Sprays and then stencilled the letter over the top with similar colours Art Anthology Sorbet paints. They are a little thicker and have a little sparkle in them. Very pretty.. Next I used an old creditcard and white paint to add some lines. 
I also used some white embossing powder to create the circles. 
Flamingo was stamped on watercolour paper and on the page. I coloured him with Zig Clean Color Brush Markers and a water brush, cut him out and adhered him to the one on the page. 
The text I chose is by France Papillon, I stamped it, cut it out, coloured the edges and adhered them to the page. 

I used : 

Thank you so much for stopping by today ! 


Thursday, 15 December 2016

A freaky little thing

Hello everyone,

I had a little play this afternoon and made a small art journal page just for fun.


The base has crackle paint, Lindy's spray inks and Art Anthology sorbet paints on it... I then stencilled with white paint and stamped randomly. All stamps I used are by VivaLasVegaStamps! by the way. You'll find all 20.000+ HERE. 

The stars were stamped on book pages, cut out and adhered to the page. I used the edge of the page to stamp the sentiment on. 
The little girl (is it a girl??? lol) was stamped on water colour paper and I coloured her with my Zig Clean Color Brush Markers and a water brush. I adhered her on the page after I stamped her there as well and added some washi tape for her to stand on. 

Thank you so much for stopping by today ! 

I will be back tomorrow with a trio of ATC's and a new VIDEO ! yay ! 


Wednesday, 14 December 2016

Happy Holidays

Hello everyone,

and Merry Christmas ! Welcome to our Christmas Challenge over at Stampotique !Yes that's the theme for the rest of this month ! Why not play along with us and you might win one of two $30 vouchers at the end of the month. Just make sure to read the rules on the SDC blog.
Here's my contribution:


This simple card was very easy to make.
I stamped the penguins on a piece of watercolour paper, cut slightly smaller than the card I was going to use. I used my Zig Clean Color watercolour markers and a water brush to colour them in and to add colour underneath them. Next I stamped the stars with Distress ink (Tumbled Glass) and added the sentiment on top. 
The panel was then glued onto a blue card.

I used the following stamps:

Thank you for stopping by today !

Thursday, 8 December 2016

Keep calm... A NEW VIDEO

Hello everyone,

I have a quick card for Katzelkraft to share today. I used another one of my gelli printed backgrounds. It is so easy to have a stack on hand !
I also filmed the process and have placed the link at the bottom of this post if you want to hop over to YouTube and have a look.


I love how grumpy he looks.

I have used the following stamps for this card:

KTZ159 - for the background rings with stars and the sentiment
KTZ145 -  for the penguin

Here is the link to the YouTube Video:


Thank you so much for stopping by today !