Friday 30 November 2018

I meant to behave and a new VIDEO !

Hello everyone,

For today's Katzelkraft inspiration I have made an art journal spread. I have also filmed the process for those of you who would like to see how I made this.


I have used the following stamps for these pages:


For the video click HERE or on the pic below. I would appreciate it if you'd subscribe to my channel! Thank you ! 


Thank you so much for stopping by today ! 

Thursday 29 November 2018

Today at Vera Lane Studio

Hello everyone,

Happy Thursday to you ! It is Vera Lane Studio Day again today and I have a postcard and an art journal page to share.


This is a simple piece of Kraft Card stock on which I glued a strip of designer paper and did some heat embossing. I then added some white paint around the edges. Ragamuffin was coloured with Copic Markers and cut out. I adhered her onto a strip of washi tape. I added the sentiment from the same set and that was that ! 

You'll find Ragamuffin HERE.

image 0


This AJ page was made with a piece of Designer paper on which I brayered white and violet paint. I added Frida from the Frida Kahlo Collage set and a heart from the Dia de los Muertos Collage set. The sentiment is a Frida quote. I also added some folded book paper and topped that with a scrap of the background paper. 

You'll find Frida HERE


image 0

The DIa de los Muertos Collage sheet is HERE 

image 0

Thank you for stopping by today ! 

Saturday 24 November 2018

Playing chess

Hello everyone,

I have another project for AALL & Create to share with you. I have made a set of 6 ATC's with the lovely Chess Pieces set by Bipasha.


And here's how:


The products by AALL & Create I used. 


First I made a gelli print using some of these stamps to add interest to the print. 


Next I brayered white paint over the page and when I was happy I cut it into 6 pieces of card to the size of ATC's. (3,5 x 2,5 inch). I then took this fab stencil by Abs (Autour) and used it as a stamp with Oxide Inks. 


 I then used this set by Louise Nelson to stamp the background. 


The Chess Pieces were stamped on the ATC's and on white card stock. This way I could colour the pieces on the white card and cut them out to adhere on the ATC's. 


This is how that looks ! I did add some washi tape by Dina Wakley and typed the names of the Chess Pieces again to adhere over the washi tape. Lastly I doodled a little here and there. 

I have used :

Stampsets:
#133 - Makers Marks by Louise Nelson
#122 - Chess Pieces by Bispasha BK
#117 - Organics by Louise Nelson
Stencils:
#45 - Digital Bubbles by Autour de Mwa
#39 - Lotza Dots by Autour de Mwa

For more information about these products and a list of stockists please visit:


Thank you for stopping by ! 


Friday 23 November 2018

Be quiet

Hello everyone, 

A little while ago we were asked by the lovely France Papillon to make samples with her new stamps. The reason for this was that she would be featuring them on Hochanda TV ! How exciting ! I made 4 samples with the yummy new stamps, stencils and stickers and I will be sharing them with you here on my blog. 


This page was made with a piece of Mixed Media Paper that I cut into a tag shape. I added DecoArt Americana Deco Chalky Finish paints until I was happy with the result. Next I used the stencil "Warp Grid Small" with DecoArt white gesso to add more interest. I also scraped some black DecoArt Fluid Acrylic black paint around the top left and bottom right corners. Next I stamped the background randomly using stamps from the sets: '1800', 'How shall I put it' and 'Rock'n Rust'. I used Archival Inks and white fluid acrylic paint by DecoArt. Next I stamped Kevin from the set 'Kevin and so' and coloured him with Copic Markers. I then cut him out and glued him onto the tag. The sentiment is from the stamp set 'How shall I put it'. Lastly I doodled around the tag and the sentiment. 

If you are interested in the lovely products by France you will have to visit her shop HERE. You'll love what she has to offer ! 

Thank you for stopping by today ! 

This is all very amusing

Hello everyone,

I would like to share a CaS card for Katzelkraft with you today. Sometimes CaS cards make a nice change from all the busy Mixed Media stuff that I normally do. So here it is :


I stamped the pig first and masked it; then I stamped the violinist. I coloured both figures with Copic Markers and added some ground underneath them, also with Copics. The sentiment came out of a book. 

I have used these stamps today:


Thank you for stopping by today !


Love. Repeat.

Hello everyone,

and welcome to my second November post for VivaLasVegaStamps! I have made a very small art journal page today. I had this piece of paper in my stash that I had gelli printed on and wanted to use it today. It is 10 x 15 cm which is aprox. 4 x 6 inches.


I did add some stencilling on the right side to repeat the pattern of the left side. I then added white paint in the middle and some splatters. I doodled the same words as from the stamp onto the whitish spot in the middle. Next I stamped this fab stamp by Tina Walker, went around with a white pen and filled in the heart with a pink paint pen. I then stamped the sentiment as a background stamp and also separately on a strip of white paper which I edged with a pink marker. I adhered the strip underneath the woman image. Lastly I added a line around the sentiment and around the page. 

I have used the following stamps:


Thank you for stopping by today ! 


Thursday 22 November 2018

Merry Christmas

Hello everyone,

welcome to my blog and happy Thursday !

Today's post for Vera Lane Studio is a card with the new Mr. & Mrs. Claus, a postcard and an ATC which I already shared on the VLS fb page because it is for this month's swap.


A CaS Xmas card with the newly released Mr. & Mrs. Claus.

You'll find them HERE

image 0


This lovely girl was coloured by me to send with the ATC below. We swap ATC's every month over at Vera Lane Studio FB page. The theme this month is 'coffee and/or tea'. My make is below. 

This lovely girl bathing in her cocoa is HERE

image 0


This is the ATC for this month. I love Calacas. He is an older image but I think he is great. You'll find him HERE


image 0


Thank you for stopping by today ! 

Wednesday 21 November 2018

Beautiful friends


Hello everyone, 

A little while ago we were asked by the lovely France Papillon to make samples with her new stamps. The reason for this was that she would be featuring them on Hochanda TV ! How exciting ! I made 4 samples with the yummy new stamps, stencils and stickers and I will be sharing them with you here on my blog. 


This page was made with a piece of Mixed Media Paper. I added gesso and once it was dry I used some DecoArt Americana Deco Chalky Finish paints for the background. Next I used the stencil "Honeycomb Large" by France with some of the same paint. Next I added more paint with my fingers along the edges to sort of frame the page. When I was happy with the result I added some stamping with Archival Inks (in similar colours) and the stamps from set "1800" and with Black Archival ink and a script stamp from set "London-New York". The main image is a stamp from the set "Kevin and so" which I stamped on white card stock and coloured with Copic Markers, I then cut them out and adhered them to the page, grounding them on a torn "Butterfly Whispers" Mixed Media Sticker. Lastly I added some doodles around the page and a sentiment made up from stamp set "How shall I put it". 

If you are interested in the fabulous products by France then visit her shop HERE.

Thank you so much for stopping by today ! 

Tuesday 20 November 2018

Magical

Hello everyone, 

A little while ago we were asked by the lovely France Papillon to make samples with her new stamps. The reason for this was that she would be featuring them on Hochanda TV ! How exciting ! I made 4 samples with the yummy new stamps, stencils and stickers and I will be sharing them with you here on my blog.   


I love how this tag turned out. I started with cutting a tag shape out of Mixed Media Paper. I then added a layer of gesso and when that had dried I finger-painted the page with DecoArt Fluid acrylics. When all this had dried I added some stamping in the background using Archival Inks and white paint. Just a reminder: if you use paint with your stamps, make sure to wash them immediately after use ! I used stamps of Frances sets "1800" and "Rock'n Rust" for this. Next I stamped the horses from set "1800" on book pages and painted a layer of Matte Medium on them. I did this so I could colour them with my Faber Castell Big Brush Markers. These are permanent but if you use them on top of Matte Medium you can move the colour around for a little while. I then cut the horses out and adhered them to the tag, cutting off the excess. Lastly I added a tiny bit of doodling along the sides and a sentiment stamped from the set "How shall I put it". 

If you are interested in any of Frances fantastic products then have a look HERE

Thank you for stopping by today !

Monday 19 November 2018

More Artist Trading Coins

Hello everyone,

It is time for the second inspiration post for Country View Challenges and we are still making Artist Trading Coins ! Why not play along with us ! You might win a £20 voucher for the shop, just read the rules first ! Here are mine :


There is also a process video on my YouTube Channel HERE or you can click on the pic below.


Thank you for stopping by today ! 

Sunday 18 November 2018

Love to read poetry


Hello everyone, 

A little while ago we were asked by the lovely France Papillon to make samples with her new stamps. The reason for this was that she would be featuring them on Hochanda TV ! How exciting ! I made 4 samples with the yummy new stamps, stencils and stickers and I will be sharing them from today !  This art journal page is sample number one : 


I started with a piece of Mixed Media paper and put a layer of gesso on it. I then added the model paste through France's new stencil called 'honeycomb large'. When all this had dried I used DecoArt Fluid Acrylics to add colour. I watered it down a lot to get this almost translucent effect. Of course you don't have to use turquoise, I just happen to love this colour and use it a lot. When all this had dried I added some darker colour with a Stabilo All pencil. This is water soluble.  The next step was to add some stamping. I used the new stamps from the set "1800" for this and Archival inks in turquoise and black. When I was happy with it I added the doodling around the page. For the main image I used one of the images of the set "Kevin and so" and stamped him on white card stock, coloured him and cut him out. I placed him on a torn "Butterfly Whispers" Mixed Media sticker. The last thing I added was the sentiment. Partly "Butterfly Whispers" Mixed Media sticker, partly book text and partly stamped with set "How shall I put it".  

If you are interested in the fabulous products by France then you will find them all HERE.

Thank you so much for stopping by today !

Saturday 17 November 2018

A mail art envelope

Hello everyone,

It's my turn again to show you some inspiration with the lovely AALL & Create stamps and stencils. 
I have made a Mail Art envelope for today. 


Here's how:


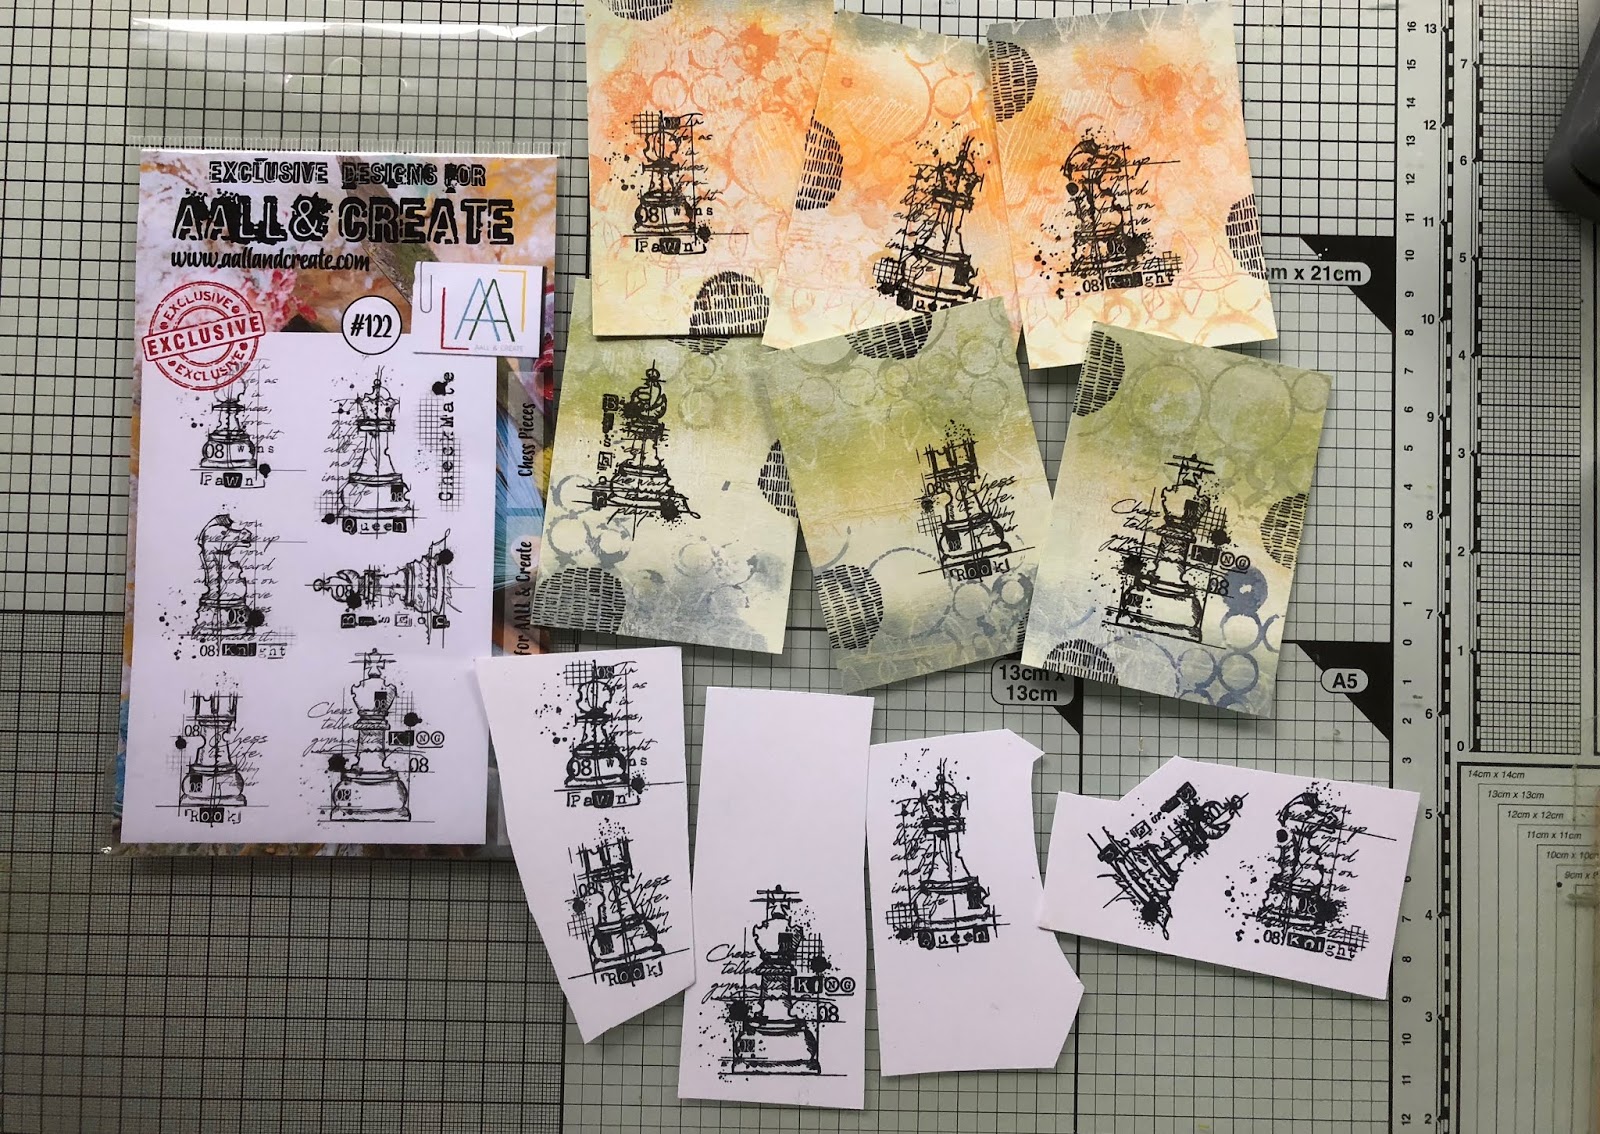
These are the stamps and stencil I am going to use. 


I started with masking off the place for the address. I then brayered lemon yellow acrylic paint over the envelope, from and back and when it had dried I added turquoise, also with the brayer. Next I took the stencil and a baby wipe and took some of the paint off thought the stencil. Nice effect I think. I did this front and back. 


Next, I stamped one of the borders from this set by Fiona and heat embossed it with white embossing powder. Later one I decided it didn't stand out enough so I filled the little shapes in with a white paint pen. 


I then used this fab new stamp set by Louise to make a kind of bouquet of flowers. I used Distress Oxide inks to stamp and then heat embossed them with clear powder to make them permanent. I also used a marker to colour ing some of the shapes, here and there. After this had all dried I went around some of the shapes with a white pen.


As a border I used Stamp set #118 by Louise Nelson. I didn't take a picture here but you can see the set in the supplies photo up top. Finishing touches are the Dina Wakley washi tape pieces, the doodling around the address part and the postage stamp in similar colours. I used the postcard stamp from set #125 and stamped it over the postage stamp for a bit of fun. 


I added some of the elements to the back of the envelope too, to make it a little more interesting. I hope you enjoyed this mini tut. I will have to take more photos next time. So sorry ! I get carried away while I am crafting and then completely forget about taking pics. 


I have used the following stamps: 
#93 by Fiona Paltridge
#118 by Louise Nelson
#125 by Ada Domisiewicz
#133 by Louise Nelson

Stencil: #11 by Autour de Mwa

For more information about all the AALL & Create products and a list of international stockists please visit: 


Thank you for stopping by today ! 

Friday 16 November 2018

The Darkside

Hello everyone,

Welcome to another post for Katzelkraft. I was in a naughty mood today and made, soon to be, murderscene. I had great fun making this !


First of all to get this scene I had to mirror one of the images because they were looking at each other. Because the criminal has numbers on his shirt (the numbers would be the wrong way around) I chose to flip Sherlock. I used tissue paper for this. You just stamp your image on it and glue it down the 'wrong' way on some white card stock. I used clear gesso to glue it because that works reasonable well with Zigs. The paper is really thin so you still have a perfect image, only the other way around. 
I coloured him with Zig Clean Colour Real Brush Markers. 
Because I wanted them both to look the same I stamped the criminal on tissue too but glued him down right way around. 
I then cut them out and found this pattern paper which I thought was great as a backdrop. I added some stamping to the left side and adhered my two images towards the bottom. 
Lastly I made up the sentiment from a word stamp also by Katzelkraft. 


I think it came out super cute ! If not murderous ! lol 

I have used the following stamps:

Thank you for stopping by today ! 


Thursday 15 November 2018

Ninette and her sisters

Hello everyone,

and Happy Thursday to you all !

For today's inspiration I have made two little projects. The first is an Ultra CaS card and the second is an Art journal spread.


Sometimes I really enjoy making CaS cards but because it is really out of my comfort zone it takes me almost as long as a full blown AJ page. lol 
In this case I coloured the lovely Ninette, cut her out and placed her on a cluster of a strip of design paper, some washi tape and a Tim Holtz Chit Chat sticker. I think it works !

You'll find Ninette HERE


For the second one I painted the background of a journal page, added some stencilling and then used some of the girls from past releases to make this page. These are the pre-coloured ones that come with their colourful dresses. I coloured the rest of them.

You'll find all the girls HERE:


Thank you so much for stopping by today ! 


Tuesday 13 November 2018

She could believe

Hi everyone,

I have a new video today. I wanted to play last week and thought why not put the camera on, so that is what I did.


Here is the link to the VIDEO

Or you can click on the pic:


Thank you for stopping by today ! 

Saturday 10 November 2018

Make today amazing

Hello everyone,

Welcome to my blog where today I am sharing another AALL & Create project. I have made it a little grungy...


and here's how :


I started off with stamping and colouring these fab flowers by Tracy Evans.


Next I worked on my background. I brayered on some acrylic paint and then used this fab stencil by Autour with some white paint. I then went over it again with the brayer and the same yellow paint. 


Next I used this stencil and some Distress Oxide ink to 'stamp'. I rub the inkpad onto the stencil, spray it with water and lay it on my background. 


Next I used this A4 Stamp by Tracy Evans to randomly stamp the background. 


and here is it all complete, with all the stamps and stencils I used. 


I have used the following stamps and stencils :

Stamp set #140 - Doodled blooms by Tracy Evans
Stamp set #110 - numbered botanical by Tracy Evans
Stencil #45 - Digital bubbles by Autour de Mwa
Stencil #41 - Mickle Muckle by Autour de Mwa

For more information about the stamps and stencils and other products please visit:


Thank you for stopping by today !