Friday 31 May 2019

A card for Katzelkraft

Hello everyone,

I have a card to share today. I made this one for Katzelkraft.


This is an almost one layer card. I just glued on the sentiment. I stamped the rabbit and then
I heat embossed the leaves with white embossing powder by WOW.  I used Zig Clean Color Real Brush Markers to colour the whole card front. When it had dried I added the sentiment. 

I used the following stamps:

Thank you so much for stopping by today ! 


Thursday 30 May 2019

This week at Vera Lane Studio

Hello everyone,

For this weeks Vera Lane Studio Post I have made 2 postcards.


This one was a doddle ! I used patterned paper for the background. I added some white paint, cut out one of the 'pretty ladies' from the collage sheet, added a tiny word and that was that ! 

You'll find the Pretty lady collage sheet HERE


This little gal is from the Super Girl set. I thought she looked like she was telling somebody off so that is why I added the snarky sticker ! lol 
She was printed, coloured with Copic Markers and cut out. I used a gel print as a background and added some strips of patterned paper. 

You will find her HERE


Thank you so much for stopping by ! 


Wednesday 29 May 2019

In her own skin

Hello everyone,

and welcome to my blogpost where today I am sharing a MM project that I made for AALL & Create.  It is a 6" x 6" panel and I love making them. They are not too big and the fact that they are loose panels makes working on them so much easier than when you work in a book. (Which I enjoy too).


I really like this naked lady.. and I simply had to use her again. Here's how I made it:


I coloured my panel with Distress Oxide Inks and then toned it down with white paint and a brayer. Next I stamped a part of this gorgeous flower stamp over top. I inked it up with the same inks in the same colours so you get a lovely tone on tone effect. I also embossed it with clear powder see detail below. 


Next I stamped my lady on white card stock and on my panel. I used Archival ink on the panel to get a good impression over the embossing powder. I used a stamping tool too. 


Next I stamped the background and also some flowers which I planned to use. I coloured the lady and the flowers and then put it all together.


I think it turned out lovely ! I really like these rubarb and custard colours. 


I have used the following stamps:

#109 - Blossomed numbers
#140 - Doodled Blooms
#146 - Kings and Queens
#175 - Her own skin

For more information about the AALL & Create product please go to :


Thank you for stopping by today ! 

Friday 24 May 2019

Smile

Hello everyone,

For today's Katzelkraft post I have made a quick art journal spread. I had fun making it too !


I started with colouring the pages with Distress Oxide Ink in Tumbled Glass. I then used a brayer and added some white acrylic paint. Next I stamped over the top with DOInk in the same Tumbled Glass and Ground Espresso. I also used the ground espresso to go around the edged. I stamped the sheep on the page and on white card stock and coloured him. I cut him out and placed him on the left page. I added some washi tape here and there and then stamped the sentiment, inked it and glued it onto the pages. 

I used the following stamps:

KTZ222 - Relax
KTZ218 - Carte Postale 
KTZ208 - La Ferme des Animaux

Thank you for stopping by today ! 


Thursday 23 May 2019

This week at Vera Lane Studio

Hello everyone,

Happy Thursday ! For today's Vera Lane Studio post I have made an Art Journal spread and an ATC. I also have a YouTube tutorial for the Art Journal !


This was fun to make..  I have used the set that was released this week and it is called : Lighting Bug, how sweet is that !  If you'd like to know I made this how click HERE or on the pic below :


You'll find the Lighting bug set HERE.

image 0

The second (mini) project is an ATC:


This ATC sized piece of painted paper had been in my stash for years, yes, years and every time I saw it I thought : I must use this because it is nice... lol And today I came across it again and thought that Peekaboo would be perfect to go on here. 

I coloured her with Copic Markers, cut her out and adhered her and the sentiment to the ATC. Added some more shadow and that was that ! 

You'll find Peekaboo HERE.

image 0

Thank you so much for stopping by today ! 


Wednesday 22 May 2019

Comfortable in her own skin

Hello everyone,

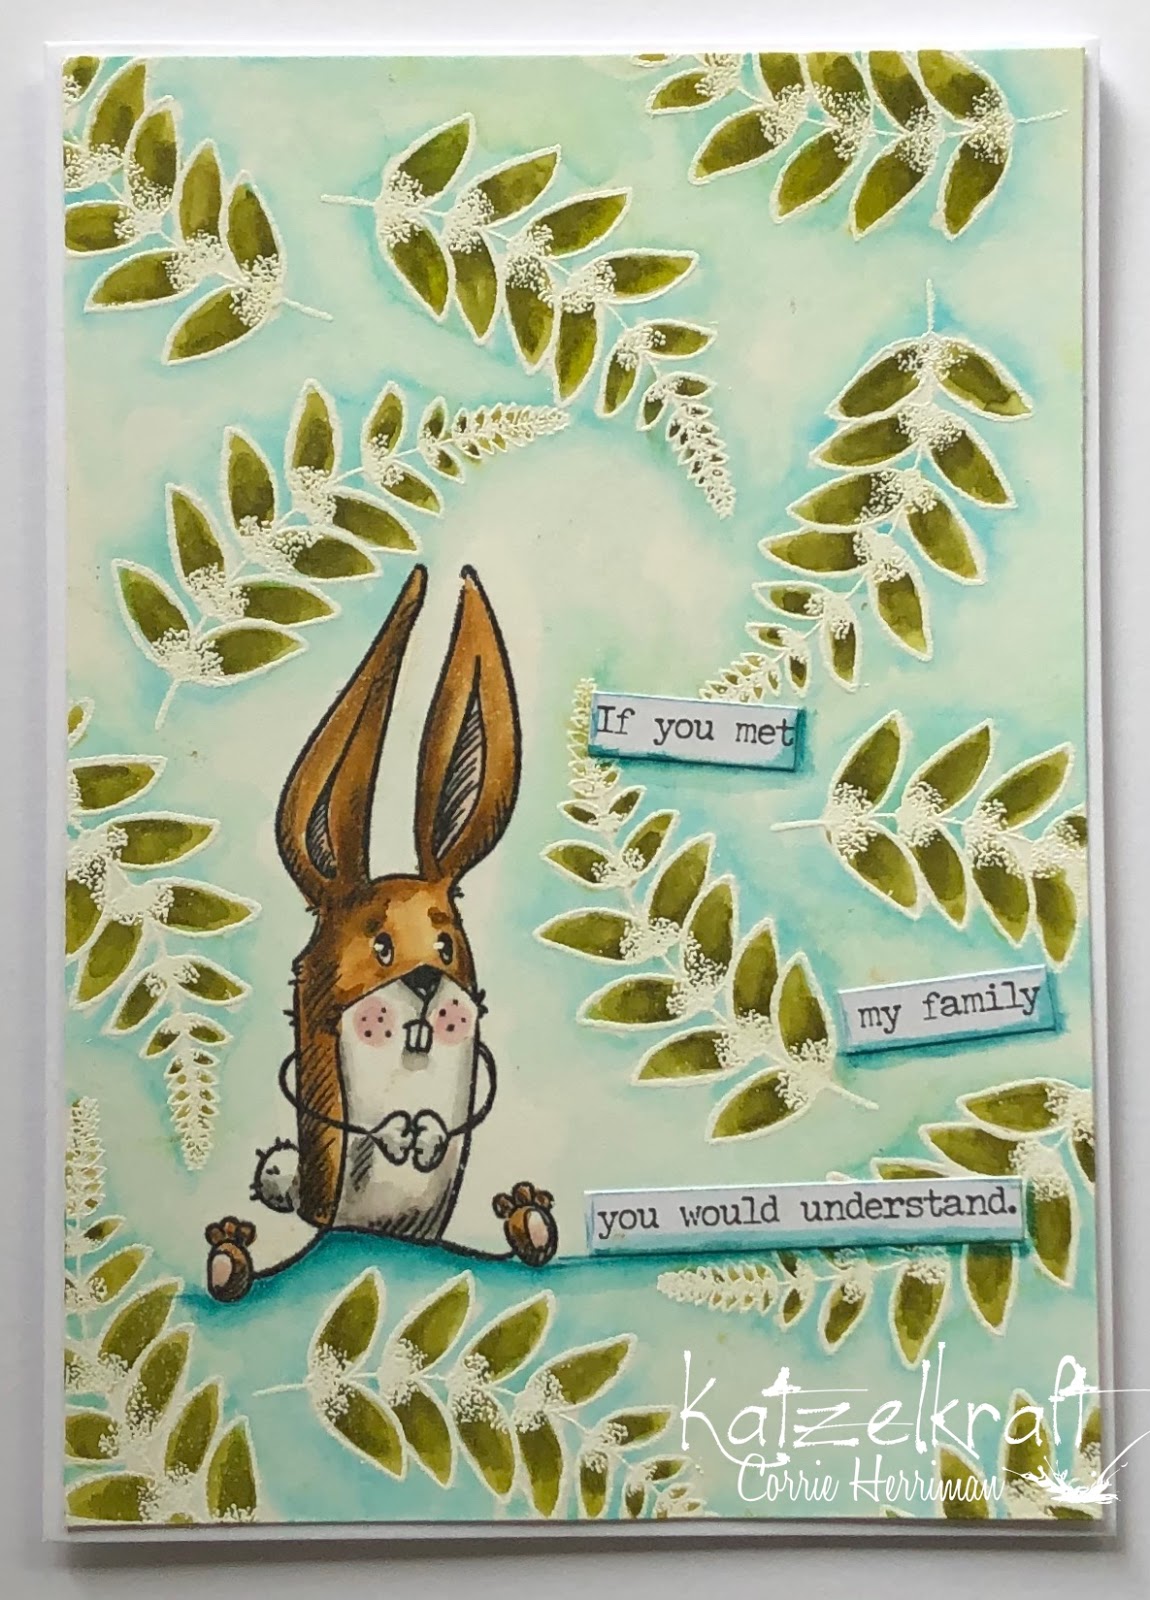
and welcome to my GDT post for AALL & Create. I have decorated a notebook this week and this is it:

And here's how:


I gelli printed a piece of paper and used this stencil to add some interest. 


Next, I got a plain note book from my stash and added some Dina Wakley washi tape over the spine. I used extra glue to make sure it stays put. I then cut the gel print to size and adhered it to the cover of the note book. 


When that had dried, I started adding interest with these two stamp sets. I stayed in the same-ish colours and added some black too. 


Here's a better view of some of the stamping. 


I also added some modelling paste with the same stencil and then stamped this beautiful girl on a piece of tissue paper. I planned to stamp her again on card stock and colour her but the tissue paper stayed fairly white so after I had made the edges disappear I decided to colour the image straight on the book. I used my Faber Castell Big Brush Markers for this. These are great as you can move the colour while wet but it is permanent when dry. 


And this is it ! I added part of the sentiment from the stamp set. 


Here she is again... 

I have used the following stamps :
#175 - her own skin by Kaitlin Paltridge
#23 - by Bipasha BK
#134 - Dot Matrix by Louise Nelson
Stencil #59 Weathered tiles by Autour de Maw

For more information about all the fab products by AALL & Create please visit :


Thank you so much for stopping by today ! 

Tuesday 21 May 2019

City morgue

Hello everyone,

For today's project I have made a journal spread. I only just noticed that I used almost the same colours as for my last project.


And here's how:


I used a brayer to apply these colours on the pages. This paint is very chalky so you don't have to use any gesso. 


I did the same with these two colours. 


Next, I collaged some dictionary paper on the page. 


Some stamping.


and some stencilling.


My focal images, stamped on tissue paper. 


And here it is put all together. I doodled around the edges and the sentiment with a pencil. I also coloured the doctor and the skeleton with Faber Castell Big Brush Markers. 


I have used the following stamps:


Other materials:
Archival inks:
Magenta pink - Viridian - Aquamarine - Jet Black - Watering can

Distress Oxide Ink:
Weathered wood 

A Tim Holtz zig zag stencil 

PaperArtsy Fresco Chalk Acrylics:
Sage - Teresa Green - Mermaid - Snowflake

Faber Castell Big Brush Markers:
Cold grey and Raw Umber 

Ranger Distress Collage Medium 

Thank you for stopping by today ! 


Friday 17 May 2019

It's one of those days

Hello everyone,

Welcome to my blogpost for Katzelkraft where today I am sharing a clean and simple card.


Sometimes it is really nice to make clean and simple cards. This was was fun to make and quick too. I stamped the girl with the umbrella and the sentiment, coloured the girl with Copic Markers and lengthened the line under her feet to go across the card. I added some colour underneath it too.  

I used the following stamps:


Thank you for stopping by today ! 


Thursday 16 May 2019

This week at Vera Lane Studio

Hello everyone,

Happy Thursday !

Today I have an art journal spread and a card to share which I made for Vera Lane Studio.


I coloured the pages with Distress Oxide inks and then stencilled the flowers onto them, also using Distress Oxide Ink and a blending tool. I added some stamping and some paint around the edges to frame the pages. The girl is new this week and is from "Pretty Ladies", so is the sentiment. I coloured her with Copic markers and cut her out. 

You'll find the Pretty ladies HERE.

image 0


I also made this card with the collage sheet "Fat Cats". I used some pattern paper, washitape and a sentiment from another set to complete the card. Lastly I drew a line around the card. 

You'll find the Fat Cats HERE.

image 0

Wednesday 15 May 2019

Happy freaking everything

Hello everyone,

welcome to this post for AALL & Create. I have made a card this time and there is a process video if you'd like to see how I made it.


and here's how, scroll further down for the video ! 


I brayered yellow and turquoise paint on the card, then used a babywipe and this stencil to wipe some of the turquoise paint away. 


Next I toned it down by brayering white paint over it and then added stamping. 


I stamped the cat on white card stock, coloured him and cut him out. 


Here is the finished card. You can see the whole process in the video below. 


Click HERE to see the video or you can click on the pic:


I have used the following stamps and stencils :
#171 - Moody Kittens
#68 - Housenumbers
#125 - For the record
stencil #58 - Mock-croc

For more information about all the AALL & Create products, please go to :


Thank you for stopping by today ! 


Friday 10 May 2019

Get your happy on

Hello everyone,

It's Friday and that means a new post for Katzelkraft. I have been revisiting all the animals because they are so cute ! For today I made a card :


I used a gel printed piece of paper for the background. This was a mop up page.
I stamped the elephant, coloured him with Copic Markers and cut him out. I also stamped him on the card panel and added the shading with coloured pencils. I glued the coloured image on the panel and lastly added the sentiment. The panel was then glued on to a white card base. 

I used two stamp sets:


Thank you for stopping by today ! 


Thursday 9 May 2019

Come rain or shine

Hello everyone,

Time for my second inspiration piece for the Country View Challenges May Challenge which is all about opposites. I must say, I did struggle with this and I didn't really like my first project. This one is much better; I had a long think about it and came up with rain and sun and this is what it looks like:


We hope you will play along with us because we would love to see what sort of opposites you come up with. You could also win the £20 voucher for the shop ! 

Of course there is a process video. You will find it HERE or you can click on the pic below:


Thank you for stopping by ! 


This week at Vera Lane Studio

Hello everyone,

and Happy Thursday to you ! For this week's Vera Lane Studio project I have made three projects !
This is the first one :


It is a card and I used a gel printed background on which I stuck some washi tape to ground the mushroom and the fairy. These images are new for this week; I printed them and coloured them with Copic Markers. I added one of the tiny words and I think it came out great. 

You'll find the Seated Fairy HERE

image 0


You'll find the Tiny Words HERE


The second project is this one:


It is a page in my journal. I used another gelli printed background but added some dark green paint with a brayer at the bottom for her to stand on. I also added a tiny bit of the same paint at the top. I used a rubber stamp for the the black lines along the edges. The fairy is from the new set Heart Fairies and I paired her with one of the Tiny Words (see above). She was coloured with Copic Markers.

You'll find the Heart Fairies HERE.
image 0
The last of my projects for today is a postcard:


Again this is a gelli printed background. I cut out one of the Fat Cats from the Collage sheet, printed the cupcake from the set Charlie. I coloured the cupcake with Copic and added washi tape and two of the Tiny Words (see above). 

You'll find the Fat Cat Collage sheet HERE

You'll find Charlie and her Cupcake HERE.

Thank you for stopping by today !