Thursday 27 October 2022

This week at Vera Lane Studio

 Hello everyone, 

Happy Thursday ! For today's Vera Lane Studio project I have a postcard to share. It is a postcard from London as our Janet Klein has been visiting London and brought out this set for that especially. 


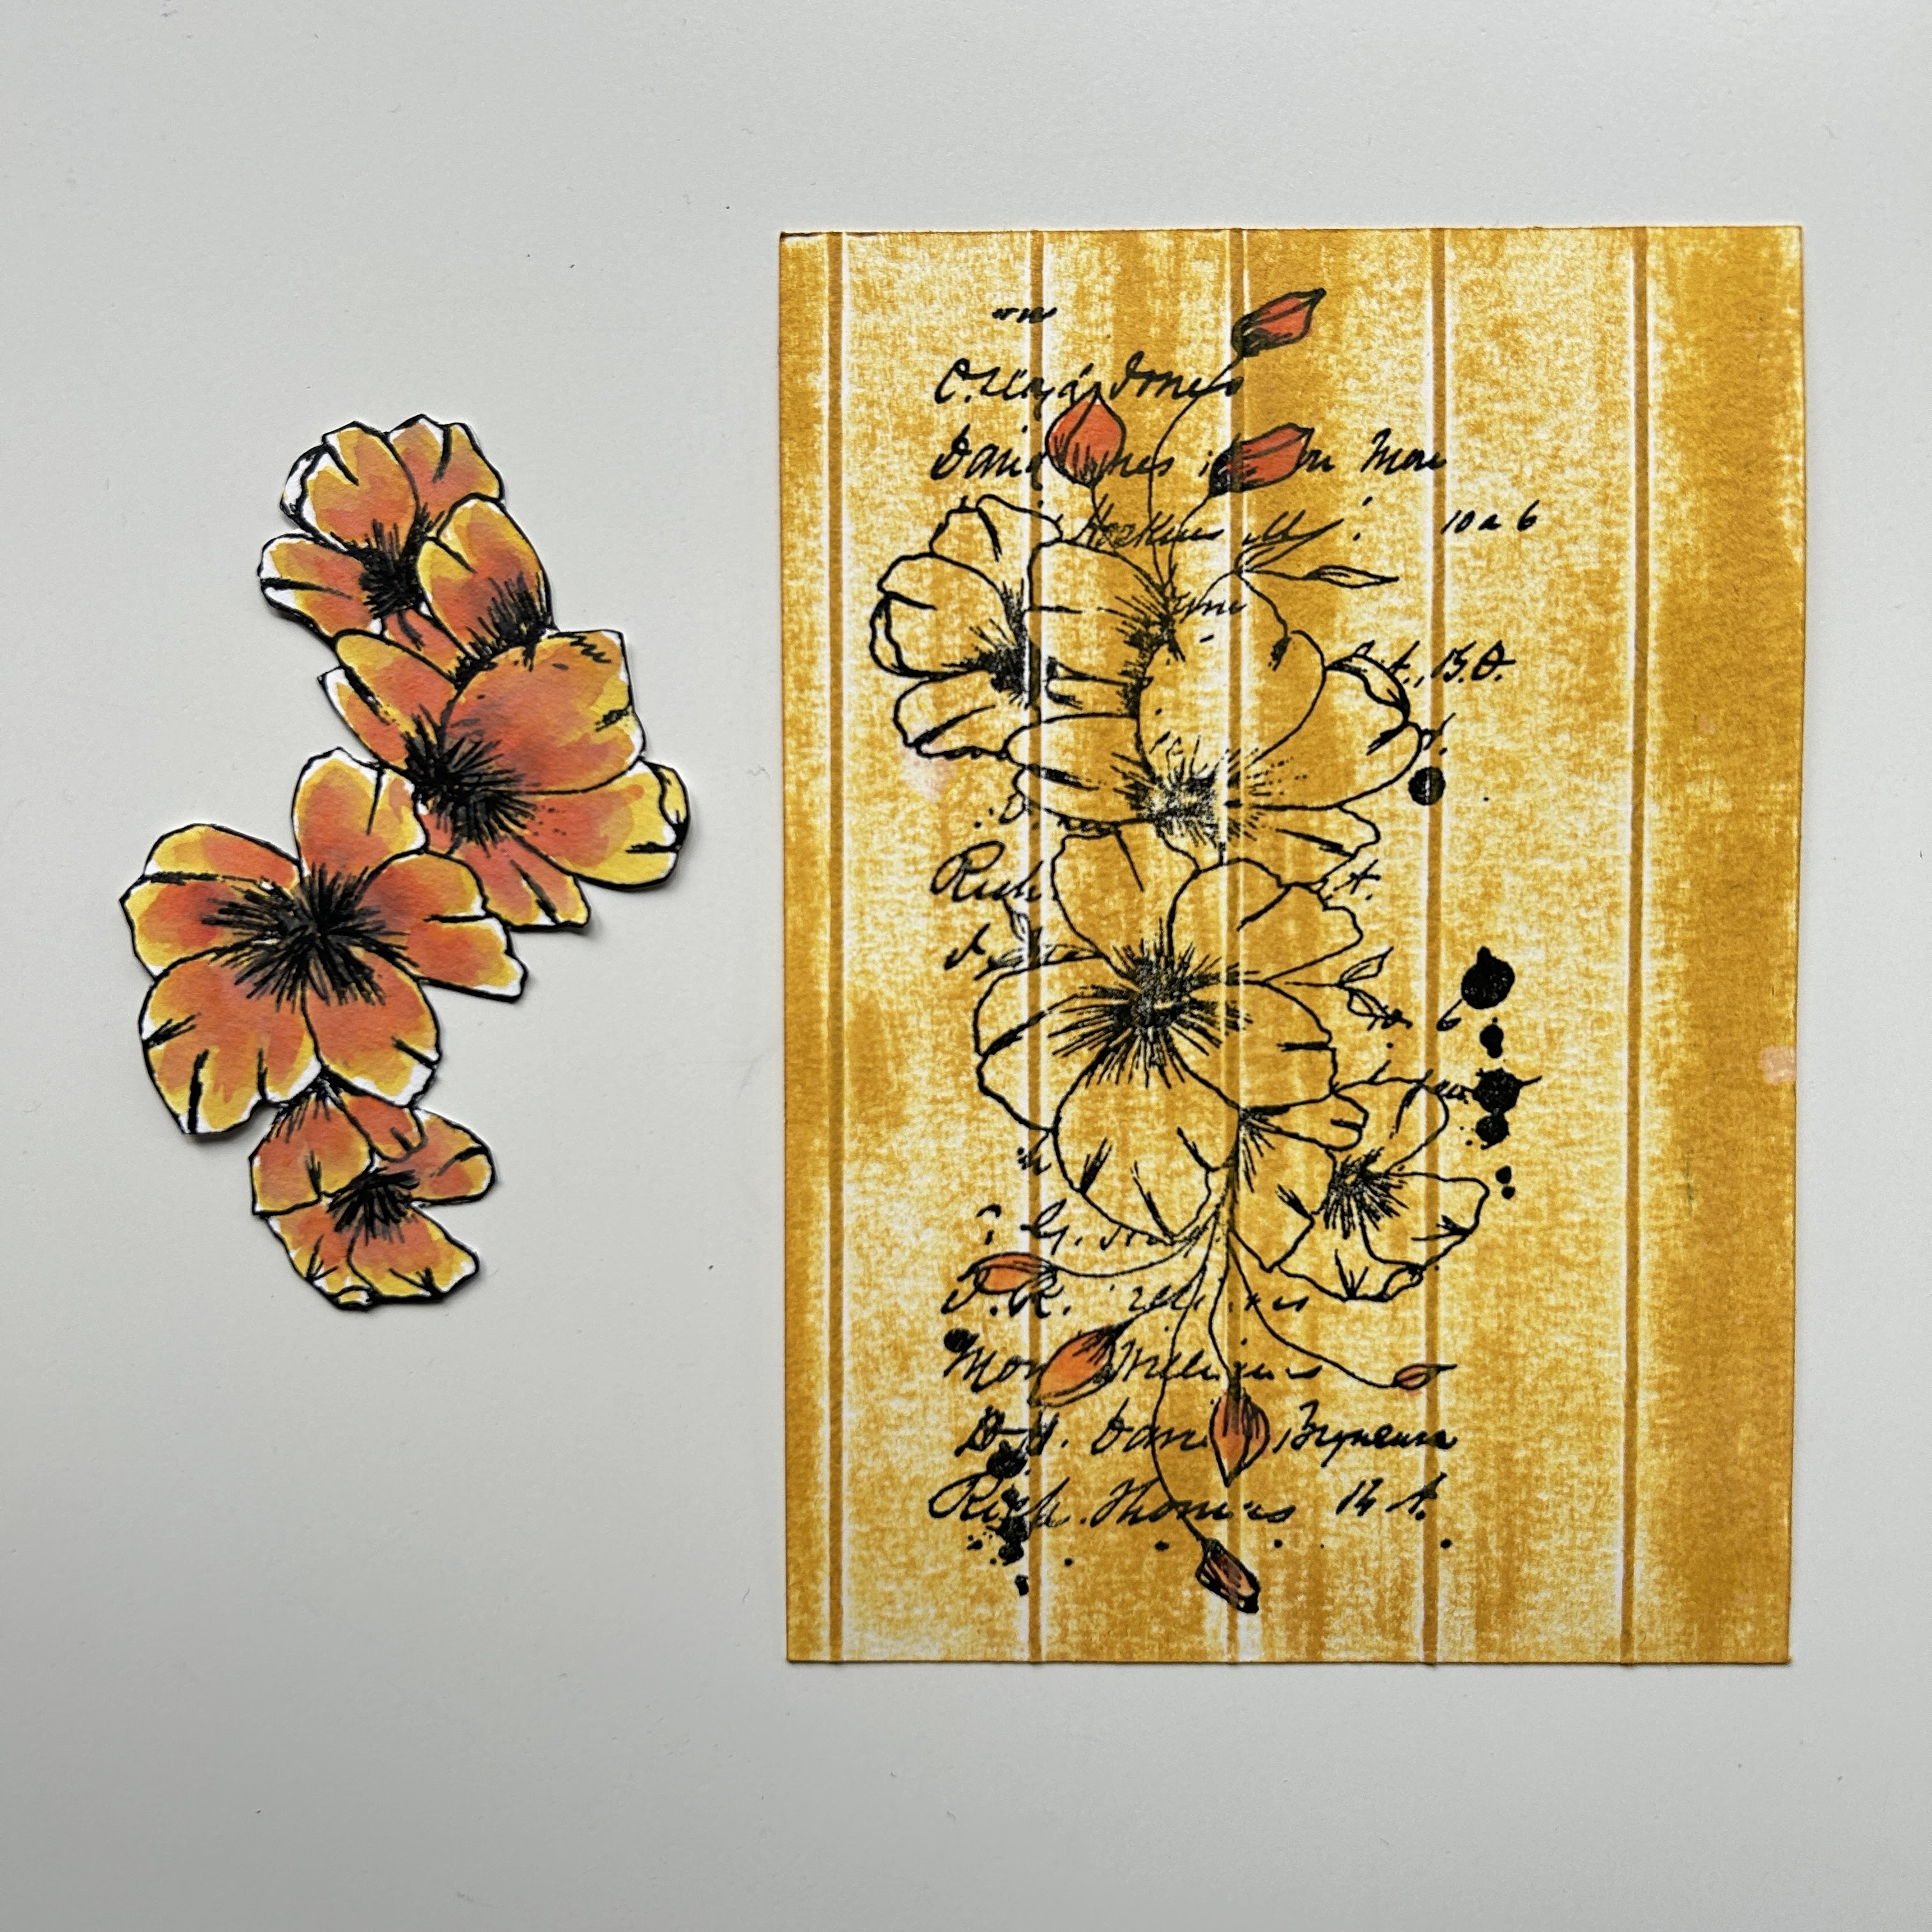
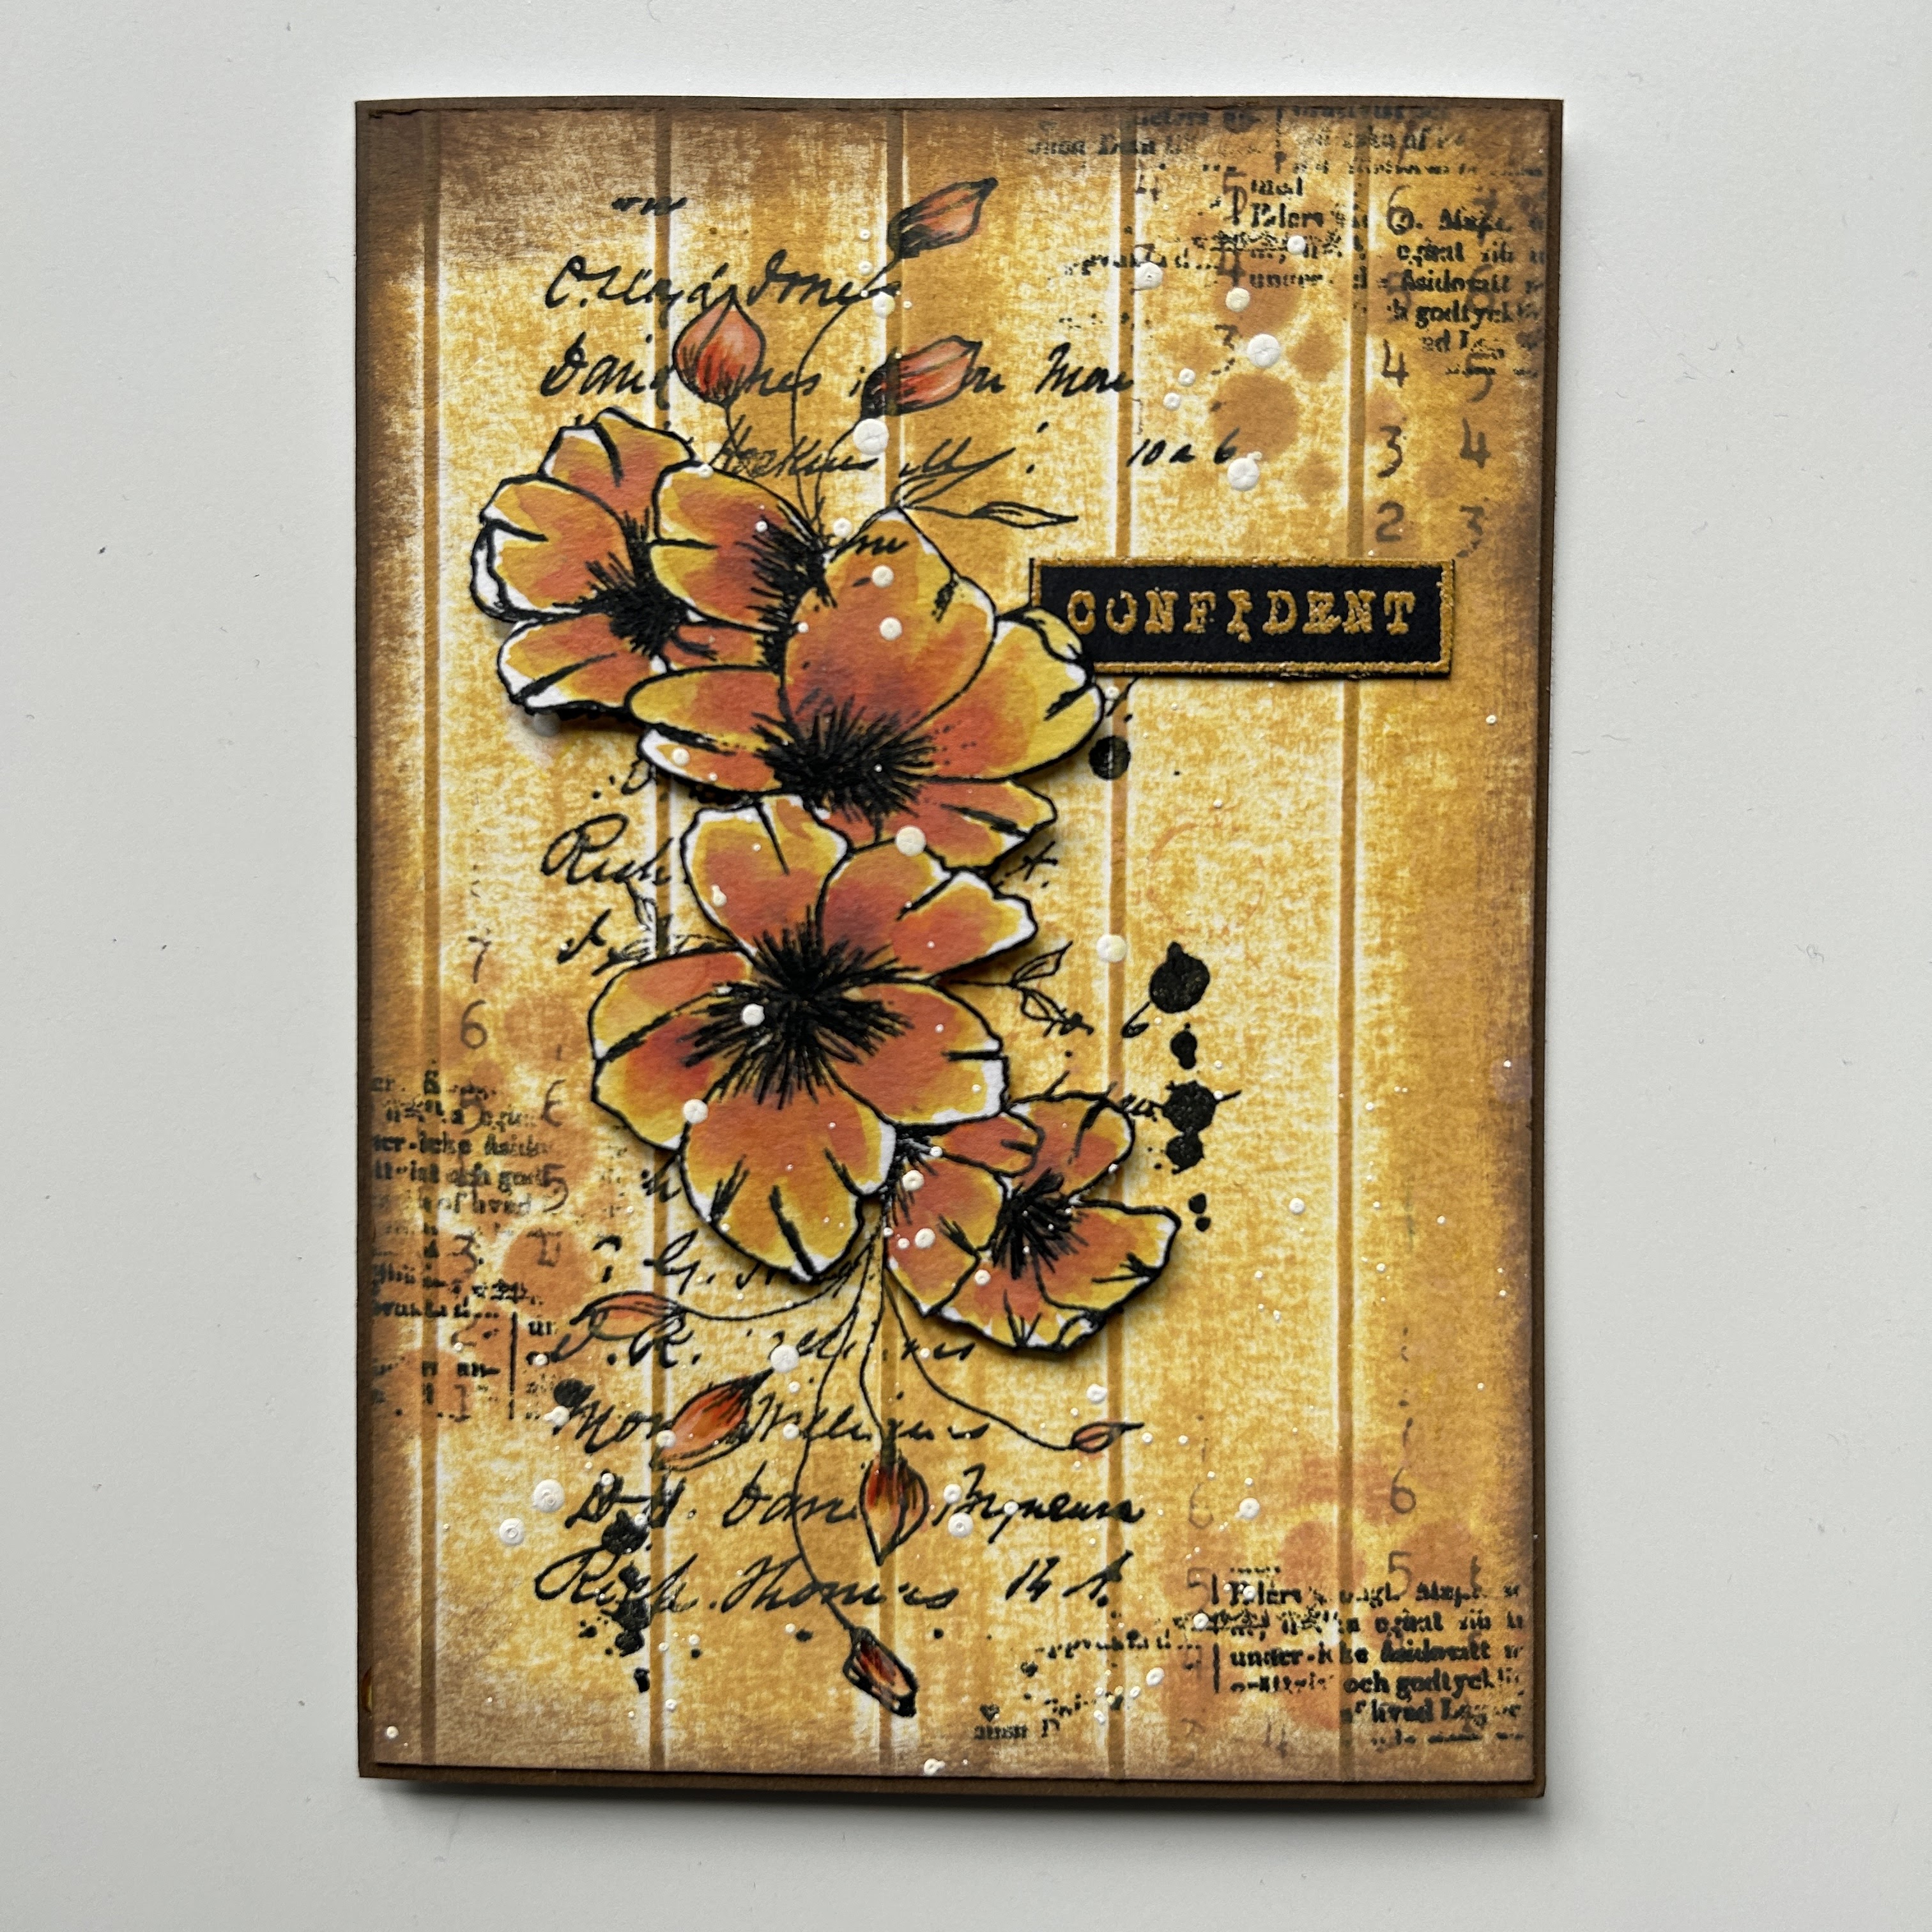
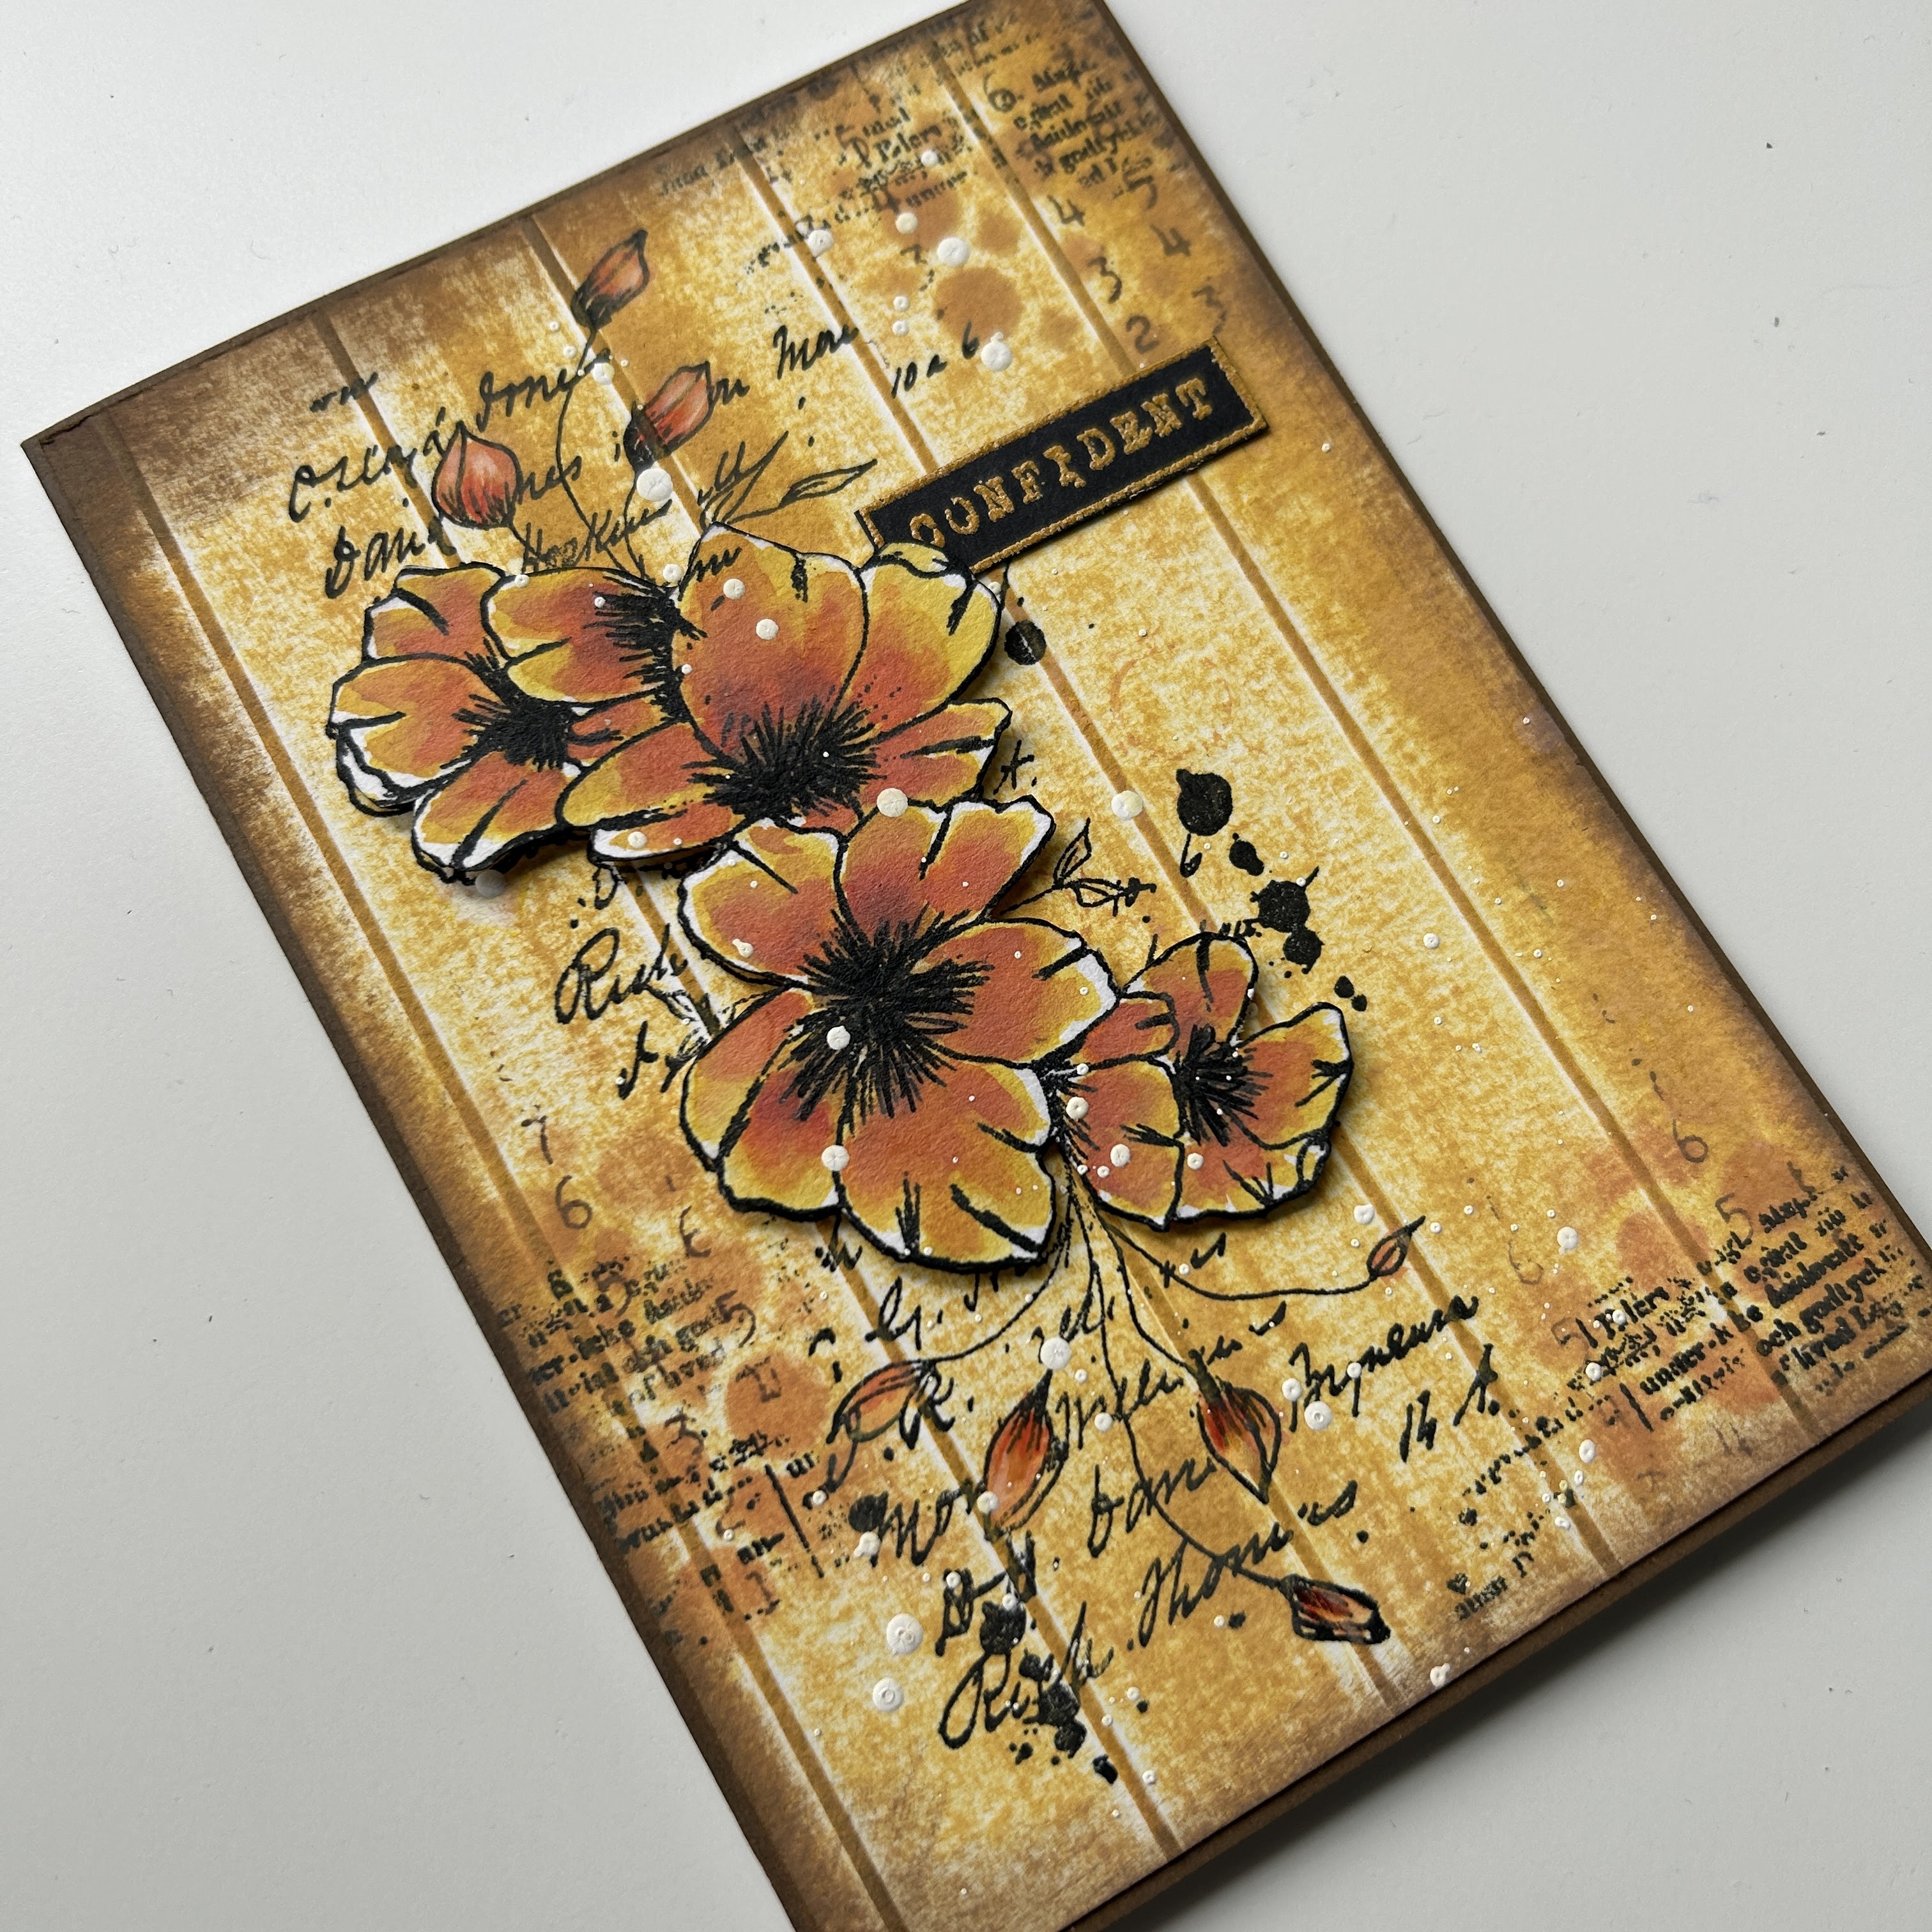
I made the background with a years old stencil by Visible Image which I think fits perfectly. I coloured the images and cut them out then adhered them to the card. I found a postage stamp that worked well colour wise so I decided to use that. I used an AALL & Create stamp by Tracy for the postmark. I stamped it around the edge here and there and added some more stamping with a text stamp by Janet. 
The sentiment is London Slang for a cup of tea and I thought that was quite funny! 
I added some shading under her and Big Ben and that was that !

You find the London Goofball HERE. 

Thank you for stopping by today ! 


Tuesday 25 October 2022

Confident

 Hello everyone, 

For today's AALL & Create project I have made a card with all Tracy Evans stamps. Just the stencil is by Abs. It came out exactly as I wanted but this was the second attempt as the first background was too dark. 


Here's how:


First I used a scoreboard and a scoring tool to make the ridges in the card stock. I then swiped Distress Oxide ink over it to give it some colour and visual texture. I used Fossilised Amber. 
Next I stamped the flower on it. I was worried it wouldn't stamp right because of the texture but it was not problem. 


I had already coloured the flowers for the other background that is now in the bin, but I decided to add some more colour. I painted them with Distress Oxide inks; I used Fossilised Amber, Rusty Hinge and Cracking Campfire. I also coloured the buds on the card. 


I added a little bit of stencilling to add more interest. I used Oxide Ink in Rusty Hinge. 


Some stamping, of course! 


I went around the edges with a blending tool and Distress Oxide ink Ground Espresso to give it a bit more of a vintage feel. I also stuck the flowers on, I used dimensional adhesive. 


Next I stamped part of this stamp and heat embossed it with ochre yellow powder. I then cut the sentiments apart, putting the ones that I wasn't going to use away for later. 


I splattered some white acrylic paint on the panel using a Posca white paint pen and added the sentiment
My white card base was too stark for this card so I took my Ground Espresso Distress Oxide Ink and went around the edges. 


When the ink had dried I glued the card panel to it.   


I have used the following AALL & Create products:

Stencil:
#45 - Digital Bubbles by Autour de Mwa
Stamps:
#304 - Heartfelt by Tracy Evans
#350 - Splattered Numbers by Tracy Evans
#752 - Elegant Stems by Tracy Evans
#754 - Power Of The Word by Tracy Evans

For more information about all the fantastic AALL & Create products and a list 
of international stockists, please visit:


Thank you for stopping by today! 


Thursday 20 October 2022

This week at Vera Lane Studio

 Hello everyone, 

For this week's Vera Lane Studio project I have made a postcard with the newly released "My Vespa". 


How cute is she! I printed her, coloured her with Copic Markers and then cut her out. The background was  made with a gelli plate and an AALL & Create stencil. I added some stamping and doodling and then glued her, the road markings and the sentiment on the card. 

You will find My Vespa HERE.

Thank you for stopping by ! 


Tuesday 18 October 2022

Eat cake!

Hello everyone, 

For today's AALL & Create project I have made a journal page. I had this cupcake stamp for a while but hadn't yet used it. So today was the day! 


Here's how I made this:


Sometimes, when I have been gelliprinting there is a lot of paint left on the plate. So, when this happens I fill in the holes (the areas where there is not paint) with colours that go with what is left on the plate. I then let it dry, add a thin layer of white and pull a print. This cleans the plate and also gives you interesting prints, like this one. 
I tried something new today with this stencil. I dabbed white paint on it, sprayed it with water and printed it on the page. It didn't work as well as I thought it would, so I sprinkled white embossing powder over the wet paint and heat embossed it. 


Next, stamping, using similar colours ink and black. 


I then stamped the cupcakes and the sentiment I was going to use. I also rubbed some black acrylic paint along the edges where the black stamping was, to frame the page. 


Adding some washi tape so the cakes sit on a base and are not floating. 


Watercoloured and ready to be cut out.


All put together and ready! I matted the page on some black card stock, always makes things pop! 


I have used the following AALL & Create products:

Stencil:
#128 - Hexagons & Buds by Bipasha Bk

Stamps:
#646 - Cupcakes by Bipasha Bk
#457 - Background Voices by Bipasha Bk
#383 - Scripted Hexagons by Bipasha Bk
#489 - Wisecracks by Autour de Mwa

Washi tape:

#24 - Power Words by Bipasha Bk

For more information about all the fabulous AALL & Create products and a worldwide list of 
stockists, please visit:


Thank you for stopping by today! 


Thursday 13 October 2022

This week at Vera Lane Studio

 Hello everyone, 

Happy Thursday ! For today's Vera Lane Studio project I have made a postcard with the little Halloween goofs. They are so cute ! 


I made the background with Distress Oxide inks and a blending tool. I toned it down with white acrylic paint and did some stamping using Janet's stamps for AALL & Create. I also printed the AALL & Create Cobweb stencil on the card using black oxide ink. 
I coloured the little peeps with Copics and cut them out. I adhered them onto the postcard with some washi tape and one of the sentiments of the set. 

You will find this set called 'Time for Halloween' HERE

Thanks for stopping by ! 


Tuesday 11 October 2022

Meow..

 Hello everyone, 

For today's AALL & Create GDT post I have made a card with one of Dominic's cats. I am more of a dog person but I do like these stamps. 


Here's how I made it:


I painted a card panel with shimmer watercolours and added some stencilling with white acrylic paint. The paints are not as shimmery as I expected them to be. 


I added some stamping here and there. 


Next I stamped and coloured the cat; I then cut him out. 


When I put the cat on the panel I thought it was too stark a contrast with the pale background so I added some more stencilling in black to balance it a little better. I also drew a line around the edges. 


I also added black washi tape and pink and white splatters. 


I only used part of the sentiment that says: You had me at MEOW. It would have been to m much on this card. Instead I added some of the 'You had me' as a background stamp. Lastly I added some white dots to the black areas of the cat to make it a little less black.


I have used :

Stencils:
#39 - Lotza Dotz by Autour de Mwa
#89 - Dahlias by Autour de Mwa
Stamps:
#338 - Background Noise by Janet Klein
#494 - X or O by Janet Klein
#366 - Roundly by Autour de Mwa
#792 - Had Me At Meow by Dominic Phillips
Washi tape:
#24 - Power Words by Bipasha Bk

For more information about all the AALL & Create products and a list of international stockists, please visit:


Thank you for stopping by today ! 


Thursday 6 October 2022

This week at Vera Lane Studio

 Hello everyone, 

Happy Thursday ! For today's Vera Lane Studio project I have made a double journal spread with the stencil/pigmentpowder technique. I can't get enough of it... 


This is Scorpio, she is not new but her male version is. He came out this week but I prefer the girls.. 
I coloured her with Copics, then cut her out. I used the sentiment that came with the boy version.

You will find girl Scorpio HERE.
You will find boy Scorpio HERE

Thank you for stopping by today ! 


Wednesday 5 October 2022

Tis near Halloween...

 Hello everyone, 

For the second of my projects for Country View Challenges I have made a journal spread. There is still lots of time to participate if you'd like. Just make sure to read the RULES and who knows, you might win a £20 voucher for the shop. 

You'll find all the information about the challenge HERE

I have been enjoying pigment powders in combination with a stencil and for this project I have done that again. Sorry if it gets boring ! 


Here's how:


I decided to use these products for my journal spread. The pigment powders & stencil are not in the photo. 


First I used purple and black pigment powders with a Tim Holtz stencil. I then used a brayer and rolled some paint over the edges. I did this after I took this photos, you can see it in the next photo of the background. 


Next I stamped the moon and coloured it. 


Then the cat..


Here is everything together. I did add more colour to the witches faces, hands, brooms and hadbag after I painted them with clear gesso to get rid of the shiny surface of these paper dolls. 


In the meantime my background had dried and I added some stamping; not too much because I liked the background as it was. 


Then it was a case of putting everything together. 


I added some washitape for them to stand and sit on, some highlights with a white pen/yellow paint pen to mimic the light of the moon. I added some yellow paint around the moon....


and then added the sentiment. 

Thank you for stopping by today ! 


Saturday 1 October 2022

Missed your call...

 Hello everyone, 

For today's AALL & Create project I have made a double artjournal spread. I was supposed to be a single page but this sort of happened and I just went along with it. I really enjoyed this one; Miss Dee cracks me up! 


Here's how I made it:


I used my Dylusions journal for this. It is the 8" x 8" one. I put this stencil on the right hand page; I added some temporary glue underneath because it was not entirely lying flat. 


I sprinkled pigment powders over it, yellow and red for the flowers, teal and green for the leaves. I then spritzed it with water. 


I then took the stencil off and dried it with my heat tool. 


Next I put the stencil back on and went through the holes with a black pen. Not sure if this made it better... 


There was so much ink still on the stencil.... I usually put it on a paper towel but I forgot to put one out so I put it on the left page. I really liked that ! I decided to make it into a double spread. 


Of course it was much to bright for me so I used a brayer and some paint to tone it down. I didn't use white paint this time but something close to the colour of the paper in the book. 


I think putting the paint over the top made the pages more to a coherent whole spread. When the paint was dry I randomly stamped the pages. Not too much as I liked it the way it was. 


Added some washi tape. 


Next I coloured Miss Dee with my Copics and cut her out. 


After putting down some more of the same washi tape I glued Miss Dee and the sentiment into place. I really like the end result. 


Here is the right hand page... 


and the left... 

I have used the following AALL & Create products:

Stencil #138 - Rosy Posy by Bipasha Bk
Washi #32 - Take Risks (light) by Autour de Mwa

Stamps:
#366 - Roundly by Autour de Mwa
#338 - Background Noise by Janet Klein
#758 - Hidden Words by Janet Klein
#759 - Ballerina Dee by Janet Klein

For more information about all the fab AALL & Create products and a list of international stockists, please visit:


Thank you for stopping by !