Saturday 30 April 2016

Happy cat !

Hello everyone,

It is my turn on Roc's blog today but I am a day early because tomorrow (1st of May) there is something exciting happening ! Watch this space !
Anyway, I have a postcard to share,  I hope you like it !


This background was lying around. I love making backgrounds and I collect them all in a little file for when I have not much time of don't feel like getting the paints and inks out... 
This one was made with Brusho's. I came out quite nice I think. I used a flower stencil and sprayed water through it and then mopped up the water with some kitchen paper. Isn't this effect cool? I think Dyan Reavely calls it ghosting and she does it with her Dylusions inks. 
I didn't do much more to the background as I liked it like this. I did add some paper (a page out of a book that I coloured with a copic marker) at the bottom and some washitape over that paper and in the top left corner. White paint splatters and a white line around the card finished off the background. 
I then stamped the cat and the bird, coloured them with Copic markers, cut them out and adhered to the postcard. For the sentiment I stamped 'i'm a happy camper' partly ie.  happy and from the word 'camper' just the first two letters, I then drew the 't' myself to spell 'Happy Cat'. 

I used three of Roc's fabulous stamps:


You can buy Roc's stamps HERE

Thank you for stopping by today and I would love to see you back tomorrow ! 


Friday 29 April 2016

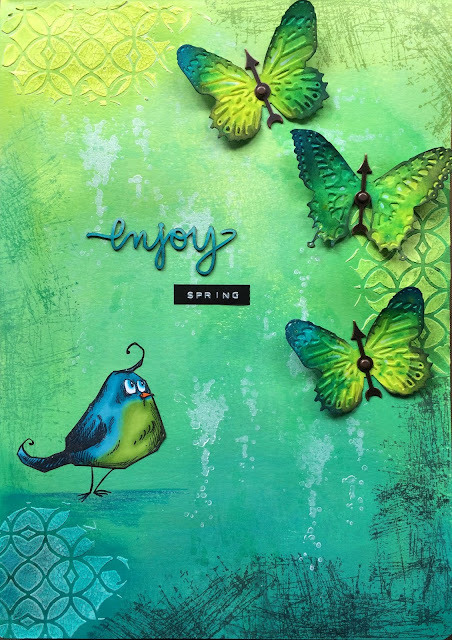
Enjoy Spring

Hello everyone !

For my second project for the Country View Crafts Challenge blog, where the theme is Spring, I have made an art journal page.


I started off by cutting out the butterflies and embossing them with the 'Tim Holtz Sizzix Butterfly duo'. This set consists of a die and an embossing folder. Next I sprayed the butterflies with Dylusions Sprays using the colours 'Fresh Lime' and 'Calypso Teal'. I used a blending tool with Distress Ink (Chipped Saphire) to accentuate the edges of the butterflies. For their bodies I used some Tim Holtz Idea-ology arrows which I attached with a brad from the same set. 
Next I stamped the bird (Bird Crazy CMS212) and coloured him with my Copic Markers. I cut him out and set him aside. (I did cut off his hair and tail curl and his legs; I also stamped him on the background and when you combine the two, hey presto a complete bird). The word enjoy was also coloured with Copics. This is a chipboard. 
The background was painted with Dylysions paints in Fresh Lime and Vibrant Turquoise. I toned it down a little by wiping the page with White Linen Dylusions paints and a baby wipe. 
I then used a Tim Holtz stencil (Lattice work) and some Deco Art Crackle Paste. When this was dry I coloured it with the same paints to make it blend into the page a little more. 
Next I used some stamps from a Stampers Anonymous Stamp set called 'Bitty Grunge' to stamp around the edges and also on the page. I used Archival inks around the edge and white paint in the middle of the page. 
The last thing was to adhere the bird, the sentiment and the butterflies to the page. I used Glossy Accents for this. The word spring was made with a Dymo Labelmaker. 

That was it ! I hope you will play along with us. You have until tomorrow to enter... 

Thursday 28 April 2016

You may say I'm a dreamer...

Hello everyone,

It is my turn over at Katzelkraft today ! I have made a postcard with some of the new release stamps which came out about two weeks ago !


I used a piece of gelli printed paper from my stash as a base for this postcard. First I stamped the background a little and when I was happy with how it looked, I doodled around the edges with a black pen. I stamped the Hippo and the circle onto some white card stock, using a grey StaZon for the circle,  which I cut out and adhered to the card.  The Hippo was stamped with Memento and he was coloured with Copic Markers. I cut him out too and then adhered him on top of the circle. 
The last thing I did was stamp the sentiment, cut it into strips and inked the edged. I then adhered these strips to the card too. 

I used stamps from the following sets : (If you click the names they will take you straight to the shop)


Thank you for stopping by today ! 


Wednesday 27 April 2016

Gentleman

Hello everyone,

and welcome to my blog where today I'll be sharing my challenge which starts today over at  the Stampotique Designers' Challenge blog.
I chose the theme "Masculine" as I really struggle with cards for men. So why don't you show me what you make when you need a masculine card.
I have made a postcard but I don't think it is very 'manly' ! :o)


I started off with a piece of white card stock measuring 6" x 4" and used a Tim Holtz stencil (latticework) and Distress Ink and a blending tool to make the background. I dripped some water on it  and went around the edges with same blending tool. I used Weathered Wood and Chipped Sapphire. 
Next I stamped Pedro and the chandelier straight onto the card. I also stamped Pedro and his hat on a separate piece of card stock and coloured them with my Copic markers. I also coloured the chandelier with my Copics but straight onto the card. Pedro and the hat were cut out and adhered to the card. 
I used a label maker to create the sentiment and stuck it on. 
That was it ! 

I used the following stamps:


I would love it if you played along with us this week so I can learn how to make masculine cards. You could win one of two $30 vouchers at the end of the month.. 
Just remember NO digi's and only one entry per challenge per person... 

Thank you so much for stopping by today ! 

Tuesday 26 April 2016

Inspired by music

Hello everyone,

A little while ago I made a whole batch of samples for Helen & Mark over at Visible Image for their TV appearance on Create & Craft TV on the 16th of April.
Today is the second post where I share some of them; all music inspired.


This first one is a monolith, painted with Dylusions paints. I used some bottle caps to make the rings. I made a new dress for her and added some words to the sentiment that comes with the lady which is "sing". 


This is the back of the monolith.. Same story, just used an additional stamp (all stamps are listed at the bottom of this post) and some model paste through a stencil. 


The background of this card was made with Distress Inks and a blending tool. I added some stencilling and made some lines with a credit card and black paint. The lady and sentiment were stamped over the top. I added some more colour to her dress with a Copic Marker. 


This card was made with pattern paper. I cut a piece to size; slightly smaller than the card. I stamped the lady and the sentiment, doodled around the letters of the sentiment. I did stamp the dress again on some different pattern paper of the same pack to add some interest. The panel was matted on black card stock and adhered to the card. 


This one was made by smoothing the ink over the paper with some acetate. This works by putting your Distress ink pads on your craft sheet (ink down) and spraying with water. Dunk in a piece of acetate and transfer the colour that clings on to the card. I stamped the sentiment 'sing' tone on tone ie. with the same inks and the lady and the other sentiment (from another set) in black Archival ink. I doodled around the panel with a black pen. The panel was then adhered to a card. 


This background had been lying on my desk for ages and I think it was made with Lindy's Stampgang Sprays and Distress Glaze by Tim Holtz. I put the glaze on first through a stencil making these bits waterproof essentially. I then sprayed the ink over top. Where the glaze is the ink doesn't take. 
I used the sound wave stamp that comes with this cool guitar in the same-ish colours as the background. It is very subtle. I used a black pen to go around the circles but didn't like it so repeated the process with a bottle cap and black paint. I also made some lines with a credit card. Lastly I stamped the guitar and used a white pen to colour the letters. The panel was then adhered to a card. 


This one was really quick and easy. I started with a piece of white card stock, used a stencil and Distress ink and a blending tool to do the background. Next I stamped the guitar and coloured the letters with coloured pencils. Lastly I doodled around the panel and adhered it to a card. 


This last one was also made with a stencil and Distress inks and a blending tool. I stamped part of the guitar 3 times at the top and once at the bottom of the card. I coloured the letters with a white pen and doodled faux stitching along the edge. Next I matted the panel on black card stock and adhered it to a card. 

I used the following stamps:


and the fabulous 


Social Media, Blog and monthly Challenge details :

Show & Tell Monthly Challenge details: http://visibleimage.co.uk/challenge 


Monday 25 April 2016

Cheval


Hello everyone,

a short post from me today.. As I was messing about with alcohol inks, I thought of the technique that Diny Sprakel has developed where you use your Copic Markers with stamps and an activator spray. I thought I should work with the Alcohol that you use with alcohol inks and it did.
So I made a quick card....


Stamps are by Katzelkraft... 

Thanks for stopping by ! 


Saturday 23 April 2016

Well behaved women....

Hello everyone,

and welcome to my blog. I have a card to share today. I bought this lovely Carabelle  Studio Stamp set at the Art Specially event last week and hadn't used it yet. So today I grabbed one of my ready made backgrounds and made a card with it...


This stamp set is great. There is the lady in a dress with a handbag and a separate body with just the stockinged legs... such fun! 

I sometimes make a batch of backgrounds and this was one of those where I finger paint a 12' x 12' piece of card stock and then chop it in 6 pieces. They can be used as card toppers or as postcards. I cut this one down somewhat so it fitted onto a card. 

I added a little more stamping to the background but only a little as I liked it as it was. (The lighter polkadots were already there). Next I stamped the lady and the body with arms and stockinged legs on a separate piece of paper and coloured both. I then cut them out and added them together. I also stamped the crown from the same set, coloured it and added it to her head. 
She was placed on some washitape. I added some at the top left of the card as well for balance. 
Next I doodled around the edges and stamped the sentiment which is by VivaLasVegaStamps! and fits this lady perfectly I think. I cut it into word strips, adhered them to the panel, doodled around the strips and lastly adhered the panel to a white card. 

Thank you so much for stopping by today ! 


Friday 22 April 2016

Wanderlust

Hello everyone,

Today it is my turn on the VivaLasVegaStamps! Blog... I have made a postcard with a little step-by-step to show you how I made it. As always I'll start with showing you the finished article.
I suggest you get a nice cuppa and sit down and enjoy !


And here is how I made it :


I finger painted a pre-gessoed piece of card stock with 4 colours of Dina Wakley's acrylic paints and also some white by Americana. 


FInger painting is great fun and you have a lot of control. 


This is how it looked after I finished... 


Next I used a Dylusions Stencil and with the same colours of paint I started stencilling. I used a blending tool for this. 


I did the same with the white paint and this is how it looked. 


I thought it was a little too bright and decided to put a wash of diluted white acrylic paint over the top. I liked this much better. 


Next I used this number stamp and some Archival inks in similar colours to add some interest. 


Here is a close up of how that looks. 


Next I stamped the fence (a complete list of the stamps I used is at the bottom of this post). 
As you see the stamp doesn't quite reach the top and the bottom of the card but with a black pen that is soon corrected... 


Here is how that looks.. 


Next I stamped the Rooster directly onto the card and onto some Mixed Media paper. I also stamped the word Wanderlust and cut it out. I used some of the pink paint to go around the sentiment for extra interest. The Rooster on the MM paper was cut out and glued onto the one on the card. That way your stamped image looks perfect even if you didn't cut it out perfectly. 


And here is the finished result after I glued everything on the card. 


I used the following stamps:


Thank you so much for stopping by today ! 


Wednesday 20 April 2016

We're not in Kansas anymore...

Hello everyone,

and happy Wednesday to you ! It's time for another challenge over at the Stampotique Blog.
Kristen has set the theme this week and she chose, 'TV or movie inspired' and this is what she had to say about her challenge:

"This week I want to see what you can create that is inspired by one of you favourite TV Shows or Movies".

Here's mine :


I chose the Wizard of Oz for my theme. First I heat embossed the sunburst on my page. I used a stencil and smooshed Versamark through it, sprinkled it with clear embossing powder and heated it until it was melted. 
Next I used Distress Inks in the rainbow colours to create the rest of the background. I used a blending tool. I stamped the background a little, not too much as there is so much going on already. 
Dorothy and Toto were stamped on white card stock, coloured with Copic Markers, cut out and adhered on the page. Lastly I typed the quote (which is from the film) and doodled around the words, cut them out and glued them onto the page. 
That was it ! 

Why not play along with us and you might win one of two $30 vouchers at the end of the month, but:

IMPORTANT REMINDER:
Please read ALL RULES on the linkz page before linking your creation.
If you didn't follow the rules posted, you may have been deleted.  


Thanks for stopping by today  !

Saturday 16 April 2016

A postcard just for fun...

Hello everyone,

Just a quick post for a quick postcard. I used some of my new stuff for this. The things I bought last week at the Art Specially Event in the Netherlands.


For the background I used my new mini gelli plate. It is only 3 x 5 inches so quite small. With this gelli plate I also used my new Fresco paints from PaperArtsy. I bought one of the sets which have colours that work very well together.. 
All I did to the background was stamp the "Heart Vine" stamp & coloured in the hearts and stems. I then stamped 'Uncle Buck' and 'Vic' and coloured them both with Copic Markers. Vic is a new stamp by the way. I cut them out and adhered them to the background and added the leash and the collar for Vic. Lastly I added some ground for them to stand on... 
You can find all these stamps HERE.

Thank you for stopping by today ! 

Thursday 14 April 2016

Don't feel like dancing....

Hello everyone,

For my DT post for Katzelkraft I have made a postcard this time...


I started with stamping the background and heat embossing it with clear embossing powder. I then went over the top with a blending tool and Distress Inks in 'Mermaid lagoon' and 'Chipped Sapphire'. I dripped some water over it and mopped it up with some kitchen paper, leaving some lighter spots.
Next I stamped the cat, the hat and the walking stick (this is just the handle of the umbrella which is in the accessories set; I made it longer) I coloured everything with my Copic Markers and cut all the images out. After deciding where I wanted everything I glued the images to the card. Next I used a Copic Marker to draw in the floor the cat is sitting on and lastly I typed the sentiment which is a song title, cut it into strips, adhered it to the card and doodled around the words. That was it !

I used stamps from the following sets :
Click on the links and they will take you straight to the shop ! 


Thank you so much for stopping by today ! 

Wednesday 13 April 2016

Today's hairstyle !

Hello everyone,

The lovely Kathi is our hostess over at Stampotique Designers' Challenge today and she chose the theme 'Crack me up' and this is what she had to say about her challenge:

'Create a humorous project that also has cracked texture'.

So that is what I did. I hope it cracks you up Kathi ! Here is my art journal page:


I used DecoArt Media line products to create the crackled background, starting with black gesso and then scraping Crackle paste over it. Next I used Antiquing creams in the colours Raw Umber and Patina Green. I also used some Cobalt Turquoise Acrylic Paint around the edges of the page and some Interference paint in Gold over the crackles as you can see below.....


I then stamped over the background a little. ( A list of all the stamps I used is at the bottom of this post) I then stamped Moody and coloured her with Copic Markers. I also stamped her directly on the page. After cutting her out I adhered her onto herself so she looks perfect. 
I found some scraps of already coloured paper and cut them into strips. I glued them to the page and then stitched them on as well. 
Lastly I typed the saying that I found on the internet and thought was quite funny, I cut it into strips and adhere it to the page. Lastly I doodled around the words. 

I used the following stamps :

Why not play along with us this week. You could win a $30 voucher for the online store... 
Just remember: NO digi's and only one entry per person per challenge... Good luck and have fun ! 


Tuesday 12 April 2016

This is not a photo opportunity

Hello everyone,

Just a quick post from me today. I have made a card for the challenge over at 'De Stempelwinkel' where the theme this month is 'anything goes'.
So here it is :


On this card I experimented with the Distress Crayons from Tim Holtz and I must say that the jury is still out on whether I like them or not.. I bought the whole set at the Art Specially event this weekend and I'd better like them !!! lol
Anyway on the card I used mostly 'De Stempelwinkel' stamps. The photographer was stamped in a piece of very subtle pattern paper and cut out. I also stamped him on the card so that any imperfection in the cutting out is not visible. 
The sentiment Viva Las Vegas Stamps, I used it because I thought it was funny... 
I distressed the edges and glued the panel onto a white card. 

Thanks for stopping by... 

Stand out !

Hello everyone,

Today I am sharing a few of the card samples I made for the Visible Image show on Create & Craft TV on April 16th.


The background of this first one was lying around on my desk. I used Distress Inks, an acrylic block as a stamp and some water in a spray bottle to wet the block. I then stamped it in different colours on a piece of water colour paper. 
The legs and the sentiment were stamped with Archival Ink in Jet black and I used a white pen to colour the shoes. I restamped the sentiment in pink ink and added some black on the right side of the lines of the 'A' so it looked shaded. I then cut this 'A' out and adhered it over the one in the sentiment. 
Lastly I doodled some lines around the panel and adhered the panel to a white card. 


This card was really simple to make. I used Archival Inks in greens and blues and stamped the sentiment repeatedly. I then used Distress Inks in similar colours and a blending tool to add some colour to the edged of the panel. I then stamped the legs over the top with black Archival Ink. The panel was then adhered to a white card. 


This one was even simpler. I used a stencil, a blending tool and blue Distress Ink to add the circles to a white card panel. The legs and sentiment were stamped over the top using black Archival Ink. 
The panel was then adhered to a white card. 

I used the following stamps:


Social Media, Blog and monthly Challenge details :

Show & Tell Monthly Challenge details: http://visibleimage.co.uk/challenge 


Thank you for stopping by today ! 

Friday 8 April 2016

Published again !

Hello everyone,

I was so happy to learn that my cards made with Stampotique's Moth Fab, which I submitted for the 'A different point of vieuw' part of Stampers's Sampler were published in the Apr/May/June edition ! Yay....


And here are the pictures of the pages :


Thanks for stopping by today ! 

Wednesday 6 April 2016

Cherish

Hello everyone,

It's Wednesday again and the übertalented Arwen is our hostess this week ! Did you know that Arwen has her own line of Stampotique stamps HERE.

She chose the theme "Nature" and this is what she had to say about it:

'Create a project with only nature items in it. No humans, no animals.'

Here is my take on this challenge :


I made this mini journal page on a piece of watercolour paper. The background was done with Distress Inks. I stamped over the top of it with water (that is the slightly lighter lines you can see) and with the same colour inks and a script stamp. 

After it was all dry I Stamped the tree on it and added the ground with coloured pencils and a black pen over the top. Lastly I stuck a Tim Holtz Chit Chat sticker on it and went around with a black pen. 
Nice and easy quick project. 

I used the following stamps:


We would love it if you played along with us and created something with this week's theme . You could win one of the two $30 vouchers at the end of the month. It is not allowed to use digi's and you can only enter once for each challenge. Apart from that, just have fun ! 


Tuesday 5 April 2016

Fancy a cuppa

Hello everyone,

For today's VLVS! Challenge Inspiration I have made a tag. This was a little different for me,  as there are no bright colours on this !


I started with a #8 tag which I cut from a sheet of Tim Holtz pattern paper pad called 'French Industrial'. It was stamped with a coffee ring stamp and Archival ink. ( A complete list of the stamps I used it at the bottom of this post). 
Next I cut a circle from some corrugated cardboard card stock and painted some gesso over it to lighten it a little. I then took my Archival ink pad and dragged it over the edges. 
Next I glued the circle onto the tag and then used my sewing machine to stitch around the edges. I then rubbed the edges with the Archival ink also. 
The lady was stamped on white card stock and coloured with Copic markers. She was cut out and adhered onto the circle. Lastly the sentiment was stamped and the leather cord added through the hole. 

Here is the inspiration board this tag is based on:


The words to go with this : caffeine, coffee, tea, warm drinks, hyper, cups, fancy, stain, brown, vintage, cardboard, tan, brown, black.

Here are the stamps I have used:


I hope I have given you some inspiration to play along !! You might win a grab bag of lovely pink rubber.....


Saturday 2 April 2016

You are my sunshine.

Hello everyone,

I never used to like digital images as I think the resizing and printing is a pain in the neck but Janet Klein of Vera Lane Studios has so many fantastic images I have given in and bought some more which I plan on using too !!!
Then came the problem of the ink smudging.... We used to have an HP inkjet and it was perfect. We used cheap nameless ink in it and it printed the images perfectly and I could colour them with my Copic Markers without the ink smudging. But then it broke and we had to get a new one. We decided to use original ink at least until the guarantee runs out so if it breaks they can't say it was the ink we used... So, I printed my new images and started colouring..... Oh, the smudging was terrible. I tried everything, fixative, heat setting, leaving them for a few days... nothing worked. I got very frustrated as I wanted to be able to just colour the images without having to think about not going over the lines. So in the end I bought a laser printer. I know the toners are expensive but I don't use it that much so the toner should last a long time.
Here is one of the first images I coloured...


Here name is Sunny ! Isn't she cute. I used some bits from another set to use along the edges. 

The background was painted with Dylusions Paints, stencilled over the top with white and I added some black dots. I also stitched around the edges... A ribbon finished it off..

Thank you for stopping by ! 


Friday 1 April 2016

Here comes the sun

Hello everyone,

I have been bursting to tell you that I have been invited to join the Country View Challenge Design Team. Needless to say I happily accepted and for my first post for April's "SPRING" challenge I have made a little MDF panel to hang on the wall. Sit down with a lovely cuppa and see how this came together...


This is the finished project.......
 pan


I started with a piece of MDF which measures 25 x 25 cm or 10 x 10" and 
 painted two layers of Gesso on it


Next I used a Tim Holtz Layering stencil and some modelling paste and dried it with a heat tool. You have to be careful though because if you hold it too close for too long the model paste will start bubbling. 


Next I painted the whole thing with PaperArtsy Freso Finish paints. I used 'Mermaid' 'Beach Hut' and 'Inky Pool'. The 'Inky pool' is the darkest and I used that to accentuate the numbers by painting it on and then wiping some of it off again. 


Here's a close up. 


Next I used some Tim Holtz stamps to add some interest. The harlequins were stamped with a white ink which faded whilst drying so I poured some white embossing powder over them just before it was dry and heat embossed it. In the final version you can see that they are a lot whiter. 


Next I used a flower die to cut some flowers from a piece of white cotton. I cut loads of them... 


Here they all are, ready to be coloured... 


I used Dylusions spray for this... 
After cutting I sprayed them with the Dylusions inks that are in the photo; I did think they were way to bright though, so I sprayed them with the White Linen spray and that toned everything down a bit. 
After drying with the heat tool, I put them together with a brad. 


This is what they looked like.... 


Next I took a scrap of white card stock and used a Copic Marker to draw some horizontal linen on it. I then cut them into vertical 'stems' for the flowers. 
The flowers and stems were then adhered to the panel. 


Here's a close up of the flowers.... 


The last thing I did was stamp the sentiment with Tim Holtz "worn text" alphabet stamps, cut out the words and adhered the strips onto the panel. I added some shading with a charcoal pencil... 

That was it... 


Hope you will join us ! 

I am also entering this into the take it make challenge over at Craftstamper ! Wish me luck !!!