Showing posts with label stitching. Show all posts

Monday, 8 April 2019

Zipp it

Hello everyone,

I was asked to make some samples for the Hochanda TV shows of AALL & Create on April 3rd and of course I made some. It is so exciting to see your samples on TV!

This is the first one I made and it is a tag:


here's how:


I stamped the zip on a piece of paper and coloured in the teeth with a silver metallic marker. I also cut around the teeth to create an opening at the top.


Next I stamped the ladybird on tissue and glued her on a tag. I marked where the opening of the other piece is going. 


Next I painted around the ladybird, adding some shading around her.


I also added some 'stamping' with a stencil to give the tag more interest. The wings of the lady bird were stamped again, cut in the middel to create two wings and then adhered to the bug. I also added a layer of glossy accents. 


Next I added colour to my panel that's going over the top of the tag. 


I took it to the sewing machine and added some stitching. 


I then put it all together. 


I have used the following stamps: 
#147 - Zipp it 
#161 - Ladybug
#146 - Kings and Queens
and stencil:
#45 - Digital Bubbles.

You'll find more information on the fab AALL & Create products here:


Thank you so much for stopping by today ! 


Thursday, 25 January 2018

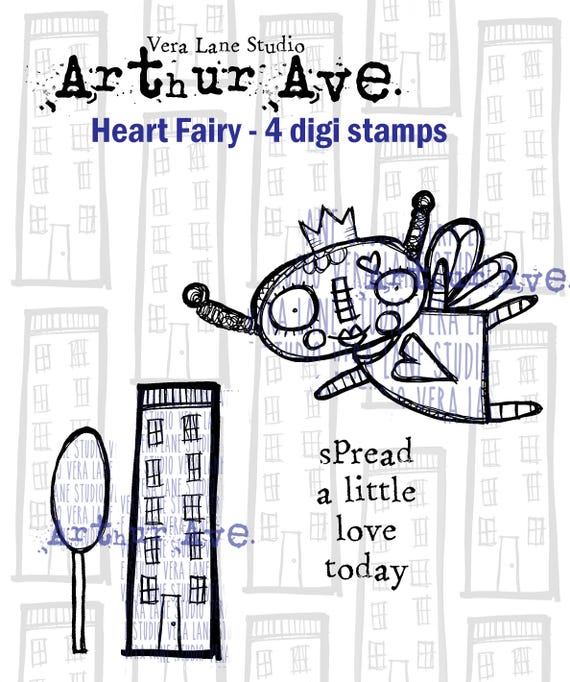
Spread a little love today

Hello everyone,

and welcome to this extra blogpost for Vera Lane Studio. Yesterday we had an extra special release called "Arthur Ave". The images are quite different and quirky ! I love them and I love it especially when I can colour them in funky colours ! I have made an Art Journal page with the "Heart Fairy" set today:


How fab are those images... 

If you are interested in purchasing them then hop over HERE.


Thank you so much for stopping by today ! 

Tuesday, 10 October 2017

Angel x 4

Hello everyone,

For Visible Image I am sharing 4 projects made with the fabulous "Angels" and "Go To Christmas Words sets".


A tag on which I have used lace, stitching, thread, paint, rhine stones, inks and embossing powder... 


A card on a gelli printed background with added Stickles and doodling. 


Another tag made with Distress Oxide inks, embossing powder and rhine stones. The stars are from the 'Universal' set. 


And my favourite because it is so different, with metal flakes, thread, embossing powder, sequin stars and inks. I added some snowflakes from the 'Snow is falling' set here.. 

I have used the following stamps:


Social Media links..
Shop where you will find all our awesome stamps!
Blog see all our latest posts here!
Facebook group join in with the banter and enter our ‘Show & Tell’ Monthly Challenge!
Facebook PAGE …give us a like and enter our weekly giveaways!


You can also follow us on:

Thank you so much for stopping by today ! 


Monday, 16 January 2017

She flies with her own wings.

Hello everyone,

and welcome to my Challenge Inspiration post for VivaLasVegaStamps!   This is the mood board for this month :


The words are : foliage, flowers, weeds, nature, bugsmothsbutterflieswingsnumbersscript, invoice, background stamps, vintage, tan, black, white, brown, distressed, grungy.


and this is what I have made and I think I have used quite a few of the elements mentioned in the words. I just couldn't resist to add a little colour ! 


If you want to know how I made this you'll have to hop over to YouTube 


I have used the following stamps to make this:


I have also used a piece of pattern paper from 7Dots called 'Cloudy' from Nature Walk as the base for my journal page. 

Thank you so much for stopping by today !!! 


Thursday, 20 October 2016

Born to be wild

Hello everyone,

For my DT post for VivaLasVegaStamps! I have made a tag. I had a bit of a struggle with it though as at one point I thought I would have to throw it away !


This tag was cut from a gelli print. I put so much stuff over the top that you can't see the print anymore ! lol. That was the reason I almost threw it away... 
First I stamped the cat on white card stock and coloured her with Copic Markers, then cut her out. Next I added the circles to the tag because I thought the cat didn't stand out enough. 
I took it to my sewing machine and added some stitching. So far, so good. I then started stamping and I think I just stamped too much... I used a load of stamps and inks and ended up using some punchinella and white paint to cover some of it up or at least make it less visible. In the end I think I  do like it. 

I used the following stamps:


Thank you so much for stopping by today ! 


Tuesday, 7 June 2016

Alice in Wonderland

Hello everyone,

and happy Tuesday ! For my post for Visible Image I have made two Alice in Wonderland themed postcards to celebrate the film "Alice through the looking glass" that premiered in the UK on May 27th.


And here they are :


This card was made with Pattern paper as a base. Yes, I know... lazy ! lol But sometimes it is just nice to start with a piece of already lovely paper... I brayered some paint along the bottom and the right edge and added some washi tape. I also took the card to my sewing machine and stitched around the edges. Next I stamped all the stamps from the 'Alice' set and coloured Alice and the slice of pie with my Copic Markers, cut them out and adhered them on the card. I cut the sentiment into strips and adhered that too. That finished the postcard. 


This postcard was made in much the same way. Started with pattern paper, added paint with a brayer at the bottom and the right hand side. Stamped the 'tick tock' straight onto the card with gray Archival Ink and took the same ink pad along the edged of the card. The rabbit was stamped on white card stock, coloured with Copic markers, cut out and adhered to the card. Lastly I stamped the sentiment on white card stock, went around the edges with 2 green Copic Markers and glued that onto the card too. That was it ! 

I used two sets of stamps:


Social Media, Blog and monthly Challenge details :

Show & Tell Monthly Challenge details: http://visibleimage.co.uk/challenge 


Wednesday, 1 June 2016

Magic

Hello everyone,

I have another postcard to share today. I have made this for my monthly DT post for the lovely Roc Nicholas who, as you might know, designs stamps for Stampotique Originals. I have used three of her stamps on this card. They are listed at the bottom of this post.


I made this postcard on a background I had lying on my desk for ages. It was an experiment with lots of model paste and Mica powders. I really like the result, so today I decided to use it. 
I stencilled the polkadots on with white paint and a blending tool. Next I die cut a large circle and then die cut that with one of Tim Holtz' mixed media dies to create the holes. I think that looks pretty cool. I then coloured the cirlcle with Distress Crayons. After adding some washi tape to the card I adhered the circle and took it to my sewing machine and stitched around the edges. 
The rabbit was stamped on white card stock, colours with Copic Markers and cut out. I adhered him to the circle. 
Next I stamped the 'heart vine' stamp and the word 'magic', coloured the hearts and stems and took a dark blue Archival Ink pad around the edges of the card. 

I used the following stamps:

Thank you so much for stopping by today ! 


Tuesday, 5 April 2016

Fancy a cuppa

Hello everyone,

For today's VLVS! Challenge Inspiration I have made a tag. This was a little different for me,  as there are no bright colours on this !


I started with a #8 tag which I cut from a sheet of Tim Holtz pattern paper pad called 'French Industrial'. It was stamped with a coffee ring stamp and Archival ink. ( A complete list of the stamps I used it at the bottom of this post). 
Next I cut a circle from some corrugated cardboard card stock and painted some gesso over it to lighten it a little. I then took my Archival ink pad and dragged it over the edges. 
Next I glued the circle onto the tag and then used my sewing machine to stitch around the edges. I then rubbed the edges with the Archival ink also. 
The lady was stamped on white card stock and coloured with Copic markers. She was cut out and adhered onto the circle. Lastly the sentiment was stamped and the leather cord added through the hole. 

Here is the inspiration board this tag is based on:


The words to go with this : caffeine, coffee, tea, warm drinks, hyper, cups, fancy, stain, brown, vintage, cardboard, tan, brown, black.

Here are the stamps I have used:


I hope I have given you some inspiration to play along !! You might win a grab bag of lovely pink rubber.....


Friday, 13 November 2015

Keep calm.. you might just receive this card !

Hello everyone,

I have made a postcard today, just for fun. I've used one of the birds from Katzelkraft and two more stamps of one of the latest Christmas stamp set.


So, here's how I made it. I took a piece of postcard sized card stock and stamped the starry circles with Versamark ink and white embossed them.
Next I coloured the background with Distress Inks going from  Tumbled Glass via Broken China and Faded Jeans to Chipped Sapphire at the top. The white embossing stands out beautifully like that. 
Next I stamped the background, just a little and made the snowbanks out if torn card stock that was heat embossed with glittery embossing powder on the torn edges. I then stitched around the edges of the card with the sewing machine. 
The bird and hat were stamped on white card stock and coloured with Copic Markers, cut out and adhered to the postcard. Lastly I stamped the sentiment, cut it apart and adhered that too.

If you would like to receive this postcard in the mail, just leave me a comment and I will draw a name out of the hat on the 1st of december ! Good luck ! 

Thank you so much for stopping by !