Showing posts with label Sizzix dies. Show all posts

Monday, 1 June 2020

Summer fields

Hello everyone,

It is the first of June today and that means there is a new challenge over at Country View Challenges.
The theme is "Summer fields" and I have made a set of three ATC's. Of course there is a video tutorial too over on my YouTube channel.


We would love it if you played along with us. Just make sure to read the rules on the Country View Challenges page before doing so. 

You'll find the video HERE or you can click on the picture and go via that to my YouTube Channel; just click YouTube at the bottom. 


Thank you for stopping by today ! 


Sunday, 27 November 2016

Embrace the journey

Hello everyone,

Today I have an art journal spread to share.

A little while back I won a die to make a Christmas ornament in a give away by Monika Gulya's and although I like the idea I always try to use my stash in different ways. So in this journal I have used three die cuts from the die that I won.


I started out with die cutting three of the Christmas Ornaments and glued them on my pages with Gel Medium. I then used Distress Crayons to colour the pages. After I had finished I rubbed the ornaments with a wet cloth to make them more visible. I then stamped and stencilled the background using Tim Holtz stamps and stencils.  I chose the old man for my main image because I think he must have travelled a lot in his life and fitted the sentiment I chose fabulously ! 
After gluing him down I added a little shading under him to make sure he wasn't floating. 

Thank you so much for stopping by today. 

Thursday, 17 November 2016

Always know in your heart..

Hello everyone,

I watched a video from the very talented Jenn Engle on YouTube and she used a die cut over another piece of paper to add texture to her art journal. I thought this was so cool that I had to try it out too.
If you want to see Jenn's video click HERE 


I diecut the flourishes first in opposite corners and then adhered it to another page. I then added a layer of gesso.
Unlike Jenn I didn't use any paint in this page. I coloured it with Distress Crayons only. I have had these for ages and I don't really use them. I scribbled them on and then smudged them with my fingers.  I sealed the page by rolling gel medium on to the gelli plate and 'printing' it onto my page. I then did some random stamping. 
I chose my main image, stamped her, coloured her lightly and cut her out. I adhered her on some washi tape so she isn't floating. The sentiment was stamped, cut into strips and adhered also. Lastly I doodled around the page and the words and that was it ! 
All the supplies I used are by Ranger/Tim Holtz. 

Thank you so much for stopping by today ! 


Wednesday, 1 June 2016

Magic

Hello everyone,

I have another postcard to share today. I have made this for my monthly DT post for the lovely Roc Nicholas who, as you might know, designs stamps for Stampotique Originals. I have used three of her stamps on this card. They are listed at the bottom of this post.


I made this postcard on a background I had lying on my desk for ages. It was an experiment with lots of model paste and Mica powders. I really like the result, so today I decided to use it. 
I stencilled the polkadots on with white paint and a blending tool. Next I die cut a large circle and then die cut that with one of Tim Holtz' mixed media dies to create the holes. I think that looks pretty cool. I then coloured the cirlcle with Distress Crayons. After adding some washi tape to the card I adhered the circle and took it to my sewing machine and stitched around the edges. 
The rabbit was stamped on white card stock, colours with Copic Markers and cut out. I adhered him to the circle. 
Next I stamped the 'heart vine' stamp and the word 'magic', coloured the hearts and stems and took a dark blue Archival Ink pad around the edges of the card. 

I used the following stamps:

Thank you so much for stopping by today ! 


Friday, 29 April 2016

Enjoy Spring

Hello everyone !

For my second project for the Country View Crafts Challenge blog, where the theme is Spring, I have made an art journal page.


I started off by cutting out the butterflies and embossing them with the 'Tim Holtz Sizzix Butterfly duo'. This set consists of a die and an embossing folder. Next I sprayed the butterflies with Dylusions Sprays using the colours 'Fresh Lime' and 'Calypso Teal'. I used a blending tool with Distress Ink (Chipped Saphire) to accentuate the edges of the butterflies. For their bodies I used some Tim Holtz Idea-ology arrows which I attached with a brad from the same set. 
Next I stamped the bird (Bird Crazy CMS212) and coloured him with my Copic Markers. I cut him out and set him aside. (I did cut off his hair and tail curl and his legs; I also stamped him on the background and when you combine the two, hey presto a complete bird). The word enjoy was also coloured with Copics. This is a chipboard. 
The background was painted with Dylysions paints in Fresh Lime and Vibrant Turquoise. I toned it down a little by wiping the page with White Linen Dylusions paints and a baby wipe. 
I then used a Tim Holtz stencil (Lattice work) and some Deco Art Crackle Paste. When this was dry I coloured it with the same paints to make it blend into the page a little more. 
Next I used some stamps from a Stampers Anonymous Stamp set called 'Bitty Grunge' to stamp around the edges and also on the page. I used Archival inks around the edge and white paint in the middle of the page. 
The last thing was to adhere the bird, the sentiment and the butterflies to the page. I used Glossy Accents for this. The word spring was made with a Dymo Labelmaker. 

That was it ! I hope you will play along with us. You have until tomorrow to enter... 

Friday, 1 April 2016

Here comes the sun

Hello everyone,

I have been bursting to tell you that I have been invited to join the Country View Challenge Design Team. Needless to say I happily accepted and for my first post for April's "SPRING" challenge I have made a little MDF panel to hang on the wall. Sit down with a lovely cuppa and see how this came together...


This is the finished project.......
 pan


I started with a piece of MDF which measures 25 x 25 cm or 10 x 10" and 
 painted two layers of Gesso on it


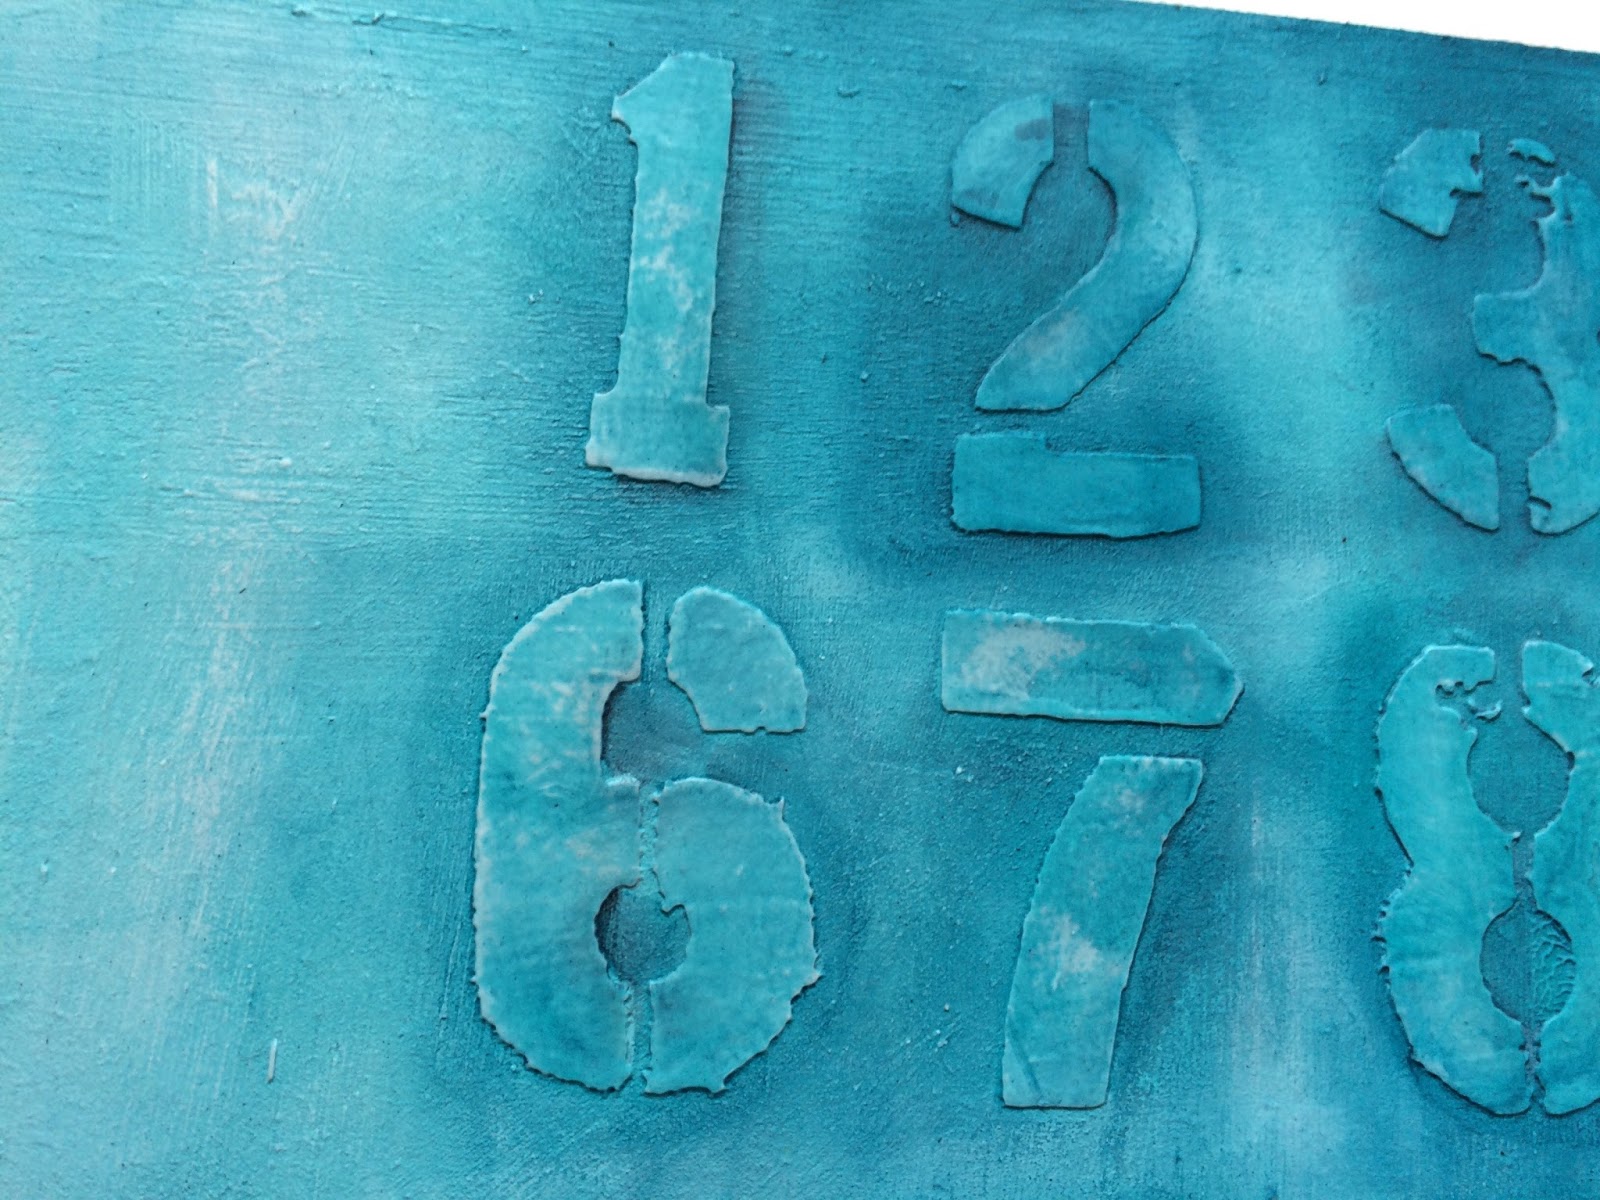
Next I used a Tim Holtz Layering stencil and some modelling paste and dried it with a heat tool. You have to be careful though because if you hold it too close for too long the model paste will start bubbling. 


Next I painted the whole thing with PaperArtsy Freso Finish paints. I used 'Mermaid' 'Beach Hut' and 'Inky Pool'. The 'Inky pool' is the darkest and I used that to accentuate the numbers by painting it on and then wiping some of it off again. 


Here's a close up. 


Next I used some Tim Holtz stamps to add some interest. The harlequins were stamped with a white ink which faded whilst drying so I poured some white embossing powder over them just before it was dry and heat embossed it. In the final version you can see that they are a lot whiter. 


Next I used a flower die to cut some flowers from a piece of white cotton. I cut loads of them... 


Here they all are, ready to be coloured... 


I used Dylusions spray for this... 
After cutting I sprayed them with the Dylusions inks that are in the photo; I did think they were way to bright though, so I sprayed them with the White Linen spray and that toned everything down a bit. 
After drying with the heat tool, I put them together with a brad. 


This is what they looked like.... 


Next I took a scrap of white card stock and used a Copic Marker to draw some horizontal linen on it. I then cut them into vertical 'stems' for the flowers. 
The flowers and stems were then adhered to the panel. 


Here's a close up of the flowers.... 


The last thing I did was stamp the sentiment with Tim Holtz "worn text" alphabet stamps, cut out the words and adhered the strips onto the panel. I added some shading with a charcoal pencil... 

That was it... 


Hope you will join us ! 

I am also entering this into the take it make challenge over at Craftstamper ! Wish me luck !!!