Tuesday 31 March 2020

Birthday Wishes

Hello everyone,

Welcome to this week's AALL & Create Guest Design Post. I have made a very simple card this time.


And here is how:


First, I put the Daisy stamp in my stamping tool and inked it up with Distress Oxide inks in the colours Broken China, Mustard Seed and Weathered wood. I spritzed the stamp with water and stamped. I then added dark grey ink with a marker in the centre of the flower as it lost all definition. 


Next I used Broken China and a water brush to colour in the flower; I also added some orange to the heart of the flower. 


Next I used a graphite pencil to add some definition to the lines near the centre of the flower.


I then stamped the details of this stamp on a piece of card that I coloured with the left over ink on my craft sheet after colouring the flower. 


I added the details here and there on the card and doodled around the edges and the sentiment. 


I have used the following stamps:

#266 Daisy Elegance by Tracy Evans
#281 Happiness & Nature by Tracy Evans

For more information about all the fab AALL & Create products please visit:


Thank you for stopping by today ! 


Thursday 26 March 2020

This week at Vera lane Studio

Hello everyone,

Happy Thursday, I hope you are all well.
For this week's post I have made a tag and a postcard. The tag was made with this week's release called 'Be You' and the postcard with one of the rats from the set 'Oh rats' that was released last week.


This tag was cut from a piece of paper that I painted pink stripes on. I added a little bit of stamping with pink ink too. She was coloured with Copics, coloured pencils and cut out. I adhered her to the tag and added the sentiment. With a graphite pencil I added some shading under her and the sentiment. You will find this set HERE


How cute is he ! lol. He looks a little lost. I cut a piece of pattern paper to the size 6"x4" and added some paint with a brayer. The rat was coloured and cut out; I used Copic Markers and coloured pencils. I then cut him out and adhered him on the card after adding som washi tape for him to sit on. I used a pencil to add some shading under the words and the rat. Lastly I added some ink with a blending tool along the edges of the card.

You will find Oh rats HERE

Thank you so much for stopping by today ! 


Wednesday 25 March 2020

Usual Suspect

Hello everyone,

For today's VivaLasVegaStamps! DT post I have made a mini journal page.


And here's how In made it:


I tore a page out of my journal and cut is slightly smaller. I coloured it with Distress Oxide Inks by dunking it in pools of ink and water. Drying in between layers. I then sprayed water over it and dried again. Next I did some stamping in the same colours. 


Next step: Adding some stencilling with an UmWow stencil and white paint. I also drew around the hearts with a white paint pen and added some splatters. 


I thought it needed some black so I added more stamping. That was my background done. 


I stamped this doggie and coloured him with my Copics. I only added shading because I wanted him to be a white dog. 


I adhered him on the page and added some washi tape for him to sit on. The sentiment was added and doodled around. Lastly I glued the page back into my journal. 


I have used the following stamps:

Other materials:

Distress Oxides:
Mustard Seed, Spiced Marmelade, Chrushed Olive and Broken China. 

UmWow stencil : Chunky Heart

Versafine Clair ink. 
Copic Markers 
washi tape

Thank you for stopping by today ! 


Tuesday 24 March 2020

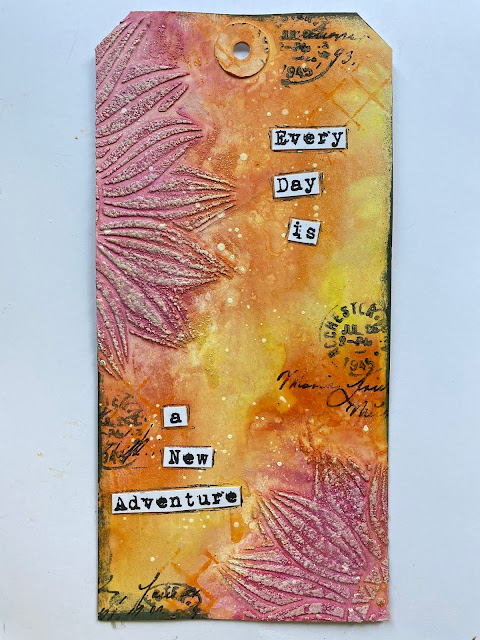
Every day is a new adventure

Hello everyone,

For today's AALL & Create Guest Design post I have made a mixed media tag.


And here is how I made it:


First I put Sandpaste on my gessoed tag. I was not impressed with the result but decided to keep going to see if I could save it. 


Next I used Distress Oxide Sprays to add colour. I used : 
Squeezed Lemonade, Spiced Marmelade and Picked Raspberry.


I used a brayer with white paint to tone it down a little. I always forget how bright these sprays are. Next I added some stamping. 


Some more stamping and I got the sentiment ready. 


I wanted to add a focal image but after I finished making the background I thought it was nice as it was so I decided to just add the sentiment. 

I have used :
Stamp #266 Daisy Elegance by Tracy Evans
#302 Going Postal by Tracy Evans
Stencil #77 Sunflower power by Olga Heldwein

for more information about all the AALL & Create products please visit:


Thank you so much for stopping by today ! 

Thursday 19 March 2020

This week at Vera Lane Studio

Hello everyone,

Happy Thursday!

For today's Vera Lane Studio project I have made a card and a postcard with the same set "Alice".


This CaS card was made by printing a stencil onto the card front. I rub a stencil with Distress Oxide ink, spray it with water and print. I then added the washi tape and the strip of pattern paper. Next I coloured and cut out the rabbit and the sentiment and adhered them to my card. 
You'll find the rabbit and Alice in the SHOP


This Alice card has a design paper base on white I added paint and inked up the edges. I die cut a doily and adhered it. Alice was coloured and cut out and I then typed the sentiment, I added some doodles and that was that ! 

You'll find Alice and the rabbit in the SHOP.

If the images are sold out in the shop, please contact the owner Janet and she'll make them available again. 

Thank you so much for stopping by ! 

Wednesday 18 March 2020

I'm not afraid of storms

Hello everyone,

welcome to today's project for VivaLasVegaStamps! which is a mini journal page.


I made the background with acrylic paint and a stencil on the gelli plate. 


I added shading in  the circles with a coloured pencil and some blending solution. 
The boy was coloured with Zig Clean Real Brush markers. 


I have used the following stamps:


Other materials:
Gel press plate by Gelli Arts
"Amsterdam" Acrylic paints 
Distress oxide inks
Archival ink
Zig Clean Color Real Brush Markers
Coloured pencils

Thank you so much for stopping by today !


Tuesday 17 March 2020

Favourite tales

Hello everyone,

for today's AALL & Create Guest Designer Project I have decorated a mini notebook.


And here's how:


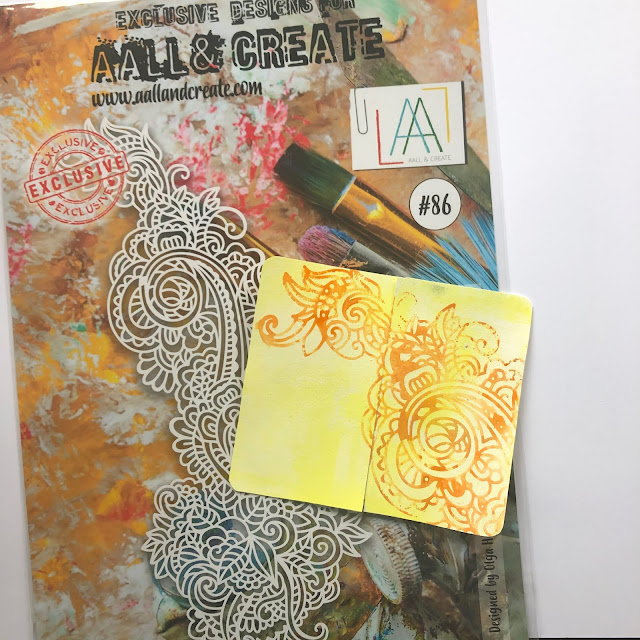
I cut two pieces of mixed media paper which are the same size as the cover of the little notebook I was going to use. I used a brayer and yellow and whit acrylic paint to add colour. Next I added Distress Oxide Ink in Carved Pumpkin onto the stencil,  spritzed it with water and printed it onto my cover. 


I added  a tiny bit of stamping..


Stamped the image that I was going to use, coloured her with Copic Markers and cut her out. I also stamped some butterflies on the back cover an used pencils to colour those in. 


After cutting out the girl I adhered her to the front cover on top of a strip of washi tape. I added some pieces of this fab die cut shape and also a clippings sticker by Tim Holtz which I coloured and adhered onto some bandage and then onto the front cover. 


Lastly I glued both covers onto the book. I had already glued some washi tape over the spine. 


I have used the following AALL & Create products:

Stamps:
#310 - Bubble block 
#299 - Tremendous Friend

Stencil:
#86 - Twirling tendrils

Die:
#13 - Bursting buds

For more information about all the fabulous AALL & Create products as well as a worldwide list of stockists, please visit:

www.aallandcreate.com/boutique 

Thank you for stopping by today.


Friday 13 March 2020

A look in her eyes

Hello everyone,

Today I have an art journal page to share. I made this as a second inspiration piece for the 'the eyes have it' challenge over at Country View Challenges. Please play along with us but read the rules before doing so. They are up on the CVC website.


Of course there is a YouTube tutorial too. You'll find it HERE or you can click on the picture below.


Thank you for stopping by today ! 


Thursday 12 March 2020

This week at Vera Lane Studio

Hello everyone,

Happy Thursday !

For today's Vera Lane Studio Project I have made a journal spread and a postcard.


This AJ spread was really simply made. I took a stencil, inked it up with Distress Oxide Inks, sprayed it with water and printed it on my pages. I added some washitape and then coloured Willy Wonka, cut him out and adhered him and the sentiment on the page. I didn't think it needed anything else....

You'll find Willy in the SHOP


This postcard has a gel print as a base. I added paint where the rag doll was going to go to make him stand out better. I randomly stamped the card and added the washi tape and the doodling. 
Next I coloured the rag doll, cut him out and adhered him. The sentiment is from one of Janet's stamp sets by AALL & Create. 

You'll find the ragdolls HERE

Note: if any of the images is sold out in the shop, contact the owner Janet and she'll make them available again. 

Thank you so much for stopping by ! 


Tuesday 10 March 2020

Home is where your stuff is

Hello everyone,

For today's AALL & Create Guest Design team project I have made a card. I was supposed to be CaS but I don't think it is .... lol. I like it though, so that's OK.


And here is how I made this:


I smeared Distress Oxide Inks in the colours Cracked Pistachio, Broken China and Dusty Concord over the Totally Dotty stencil and spritzed it with water. I then printed it onto this piece of card stock. 


Next I stamped this house and the sentiment of the Homebody stamp set and coloured the house with Copic Markers and added shading with coloured pencils. Oh, and I stamped the word 'home' in the roof space of the house. 


I then put it all together. The house is standing on a piece of designer paper. Very simple card but with great effect I think. 


I have used the following AALL & Create products:

Stamp set #283 - Homebody by Janet Klein
Stencil #87 - Totally dotty by Autour de Mwa

For more information about all the fabulous AALL & Create products and a worldwide stockist list, please visit:

www.aallandcreate.com/boutique 

Thank you for stopping by today !