Showing posts with label postcard. Show all posts

Thursday, 22 August 2024

This week at Vera Lane Studio

 Hello everyone, 

For today's Vera Lane Studio project I have made a postcard with the newly released "Ribbit'. 


I printed and coloured the images. I die cut the card with an AALL & Create die set and coloured it with Distress Oxide Inks and a blending tool. I used orange, yellow, green and blue and then splattered some water on it; it bleached the spots where the water is. I then heat embossed one of Janet's stamps with white powder. After I cut out the images I placed them on the card and glued them down. The heart with the wings is from a set of ephemera by Janet for AALL & Create. Lastly I cut the bigger card in yellow and used it as a mat.

You will find the frogs HERE

Thank you fro stopping by. 


Thursday, 15 February 2024

This week at Vera Lane Studio

 Hello everyone, 

Happy Thursday! For today's project for Vera Lane Studio I have made a postcard with the set 'February's heart'. She is so cute! 


I printed the images and coloured them with Copic Markers; I then cut them out. For the background I smooshed Distress Oxide ink on my craft sheet, spritzed with water and dunked my card into it. I used Picked Raspberry and Spiced Marmelade. I added some stencilling and stamping and washi tape. All by Janet for AALL & Create. I then placed the images on the washi tape and added the sentiment from the set. 

You'll find February's Heart HERE or HERE

Thank you for stopping by today ! 


Thursday, 30 November 2023

This week at Vera Lane Studio

 Hello everyone, 

For today's Vera Lane Studio post I have made a postcard with the newly release Ski-son which means (after googling, lol) Ski Season. I really do live under a rock most of the time.. 


This very simple card was made by blending yellow, orange white and blue inks. I used Distress Oxides for the colours and Hero Arts Unicorn white pigment ink. The snow is just two torn pieces of card placed over each other. I then printed the images, coloured them and cut them out. I added them to the scene; I had planned to do some stamping too, but I liked the simplicity of the background so I decided to leave it that way. I did stamp the sentiment which comes from one of Janet's stamp sets for AALL & Create called Snow Angel (#943). 

You'll find this lovely girl HERE

Thank you for stopping by ! 


Thursday, 9 November 2023

This week at Vera Lane Studio

 Hello everyone, 

For today's Vera Lane Studio post I have made a postcard with the newly released set 'Marie Curie'. I have opted for clean and simple today, at least as c&s as it gets for me !! 


I added some stencilling to a 6 x 4 card and splashed some blue and brown ink on it. I also added some washi tape (AALL & Create by Janet) and then printed, coloured and cut Marie out. I added her to the card and that was that ! 

You'll find Marie HERE

Thank you for stopping by today! 


Thursday, 28 September 2023

This week at Vera Lane Studio

 Hello everyone,

For today's Vera Lane Studio project I have made a postcard with the lovely Frida Dee.


After printing Frida I coloured her and cut her out. This background is a gelliprint made with acrylic paint and a stencil. I added a tiny bit of stamping and some doodle lines and placed Frida and the sentiment on the card. 

You'll find Frida Dee HERE

Thank you for stopping by! 


Saturday, 25 February 2023

You just have to care

 Hello everyone, 

Today I am sharing the second of my "Be sentimental" projects for February's challenge over at Country View Challenges. On this postcard I have used a sentiment I found on the internet and typed it on my old typewriter. It's very sentimental! 

We hope you will play along with us and maybe you will be the one to win the £20 voucher to spend in the shop! Just make sure to read the RULES


Here's how I made this. 


Coloured my piece of watercolour card with Distress Inks. I smooshed them onto my craft sheet, spritzed with water and dunked my card into it several times, drying in between layers, until I was happy.


Next I used these Katzelkraft background stamps and stamped the background randomly using the same Distress Inks and a grey and black Versafine Clair. 
Country View Crafts have a good selection of Katzelkraft stamps.


Next as always I toned it down with white acrylic paint and a brayer. 


I used a very old stamp for the main image. I stamped her on the card and onto some watercolour paper. 


I coloured the strands of her hair outside of the face straight on my card and the rest on the seperately stamped one. I then cut around the face on the right and around the hair on the left getting a complete image again by gluing it down onto the stamped image on the card. 


Next I added some Tim Holtz washi tape to sort of ground her. Not sure that was the right thing to do.. 
I also typed my sentiment en cut it into strips and glued it onto the card. 


Lastly, I went around the words and around the edges of the card with a graphite pencil and matted the panel onto some black card stock to make it pop! 

Thank you for stopping by today ! 


Tuesday, 10 January 2023

Annoying you...

 Hello everyone, 

Welcome to my blog where today I am sharing a postcard that I made for AALL & Create. 


Here's how:


I made a background on watercolour paper with Distress Oxide inks. I used Tumbled Glass and Broken China. I also used a brayer to add some white paint over top.


Using this cat with the fishbowl as a focal point. I was going to use part of the bad cats sentiment but decided against it later. 


Bit of stamping here and there. The circles were embossed with white powder. I also stamped the cat on the card so I got all the little marks around it. I can't cut those out.. 


Added some orange and white splatters and some washi tape. The cat was cut out together with the little fish on the side. I coloured them with watercolour markers. 


In the end I decided on this sentiment, but only because I actually do not really like cats....lol I am a dog person.  


And here it is all together. I added some orange with a watercolour marker on the bottom of the words. 


I have used :

Stencil #136 - Bug Hotel by Autour de Mwa
Washi tape #19 - Wishy Washi
Stamps:
#787 - Valentine Dee by Janet Klein
#457 - Background Voices by Bipasha Bk
#625 - Vine by Tracy Evans
#366 - Roundly by Autour de Mwa
#793 - Bad Cats Club by Dominic Phillips

For more information about all the fabulous AALL & Create products, please visit:


Thank you for stopping by ! 


Wednesday, 1 June 2022

Talking to the stars

 Hello everyone, 

Today is the 1st of June and I will be going on my holidays ! Yay ! I did manage to make a postcard for the new challenge over at Country View Challenges though. The theme is star shapes/astronomy and was set by the lovely Sue. Here's it is:


If you would like to see how I made this postcard then please head over to my YouTube channel


or click on the picture below:


We would love for you to play along with us but make sure to read the rules first, you'll find them on the Country View Challenges blog 


Thanks for stopping by ! 


Thursday, 10 March 2022

This week at Vera Lane Studio

 Hello everyone, 

For today's Vera Lane Studio post I have made a postcard with the newly released 'The Wizard'. Doesn't he look dapper ! 


I printed and coloured him and cut him out. I found this background in my stash. It was made with alcohol inks and a stencil. I used a brayer and toned it down with some white paint. I put down some washi tape and accentuated it with a graphite pencil, stamped the background here and there and I then placed him and the sentiment of the set on it. I also inked the edges of the card. 

You'll find the Wizard HERE.

Thank you for stopping by! 


Wednesday, 16 February 2022

Exotic

  Hi Everyone, 

For today's VivaLasVegaStamps! project I have made a postcard! 


And here's how I made it:


First I dunked the card in to Distress Oxide inks that I smooshed on my craft sheet. I did add some water too. 


Next I stamped the background and inked the edges of the card. 


I then stamped the focal image on the card because the one I stamped to colour, I cannot cut out perfectly so I just glue it over the top of this one. Looks perfect ! 


Here I have glued the coloured and cut out image over the top of the one on the card. 


I have used the following stamps: 


I also used:
Distress Oxide Inks
Copic Markers
Clippings sticker
Washi tape

Thank you so much for stopping by today ! 


Tuesday, 18 January 2022

Drink coffee and raise chickens

 Hi everyone, 

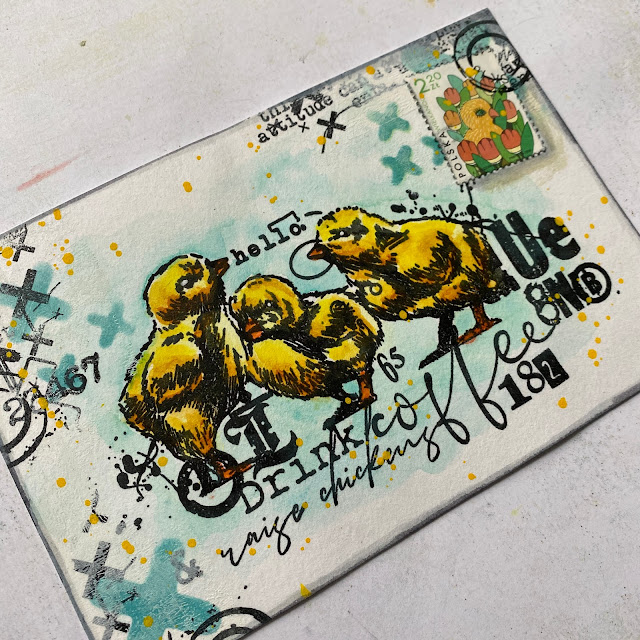
For today's AALL & Create GDT post I have made a postcard. I love watercouloring but usually grab my Copics when I have to colour something. This time I thought I would take a little time and use my watercolours. I enjoyed it very much. 


Here's how I made it:


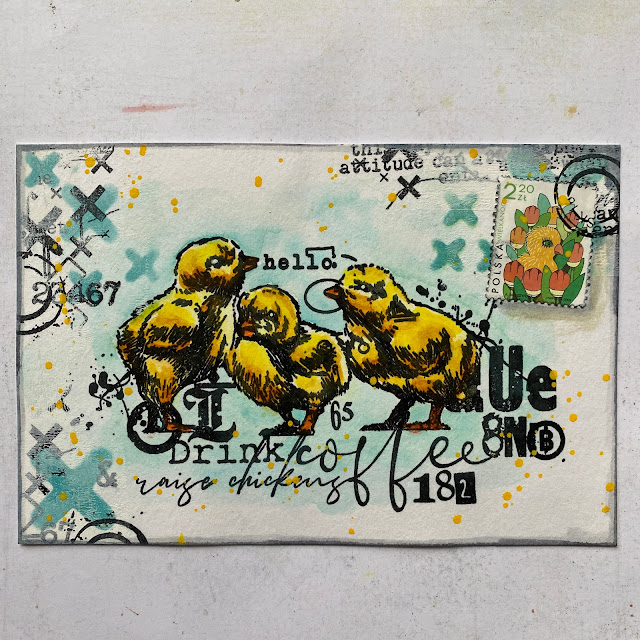
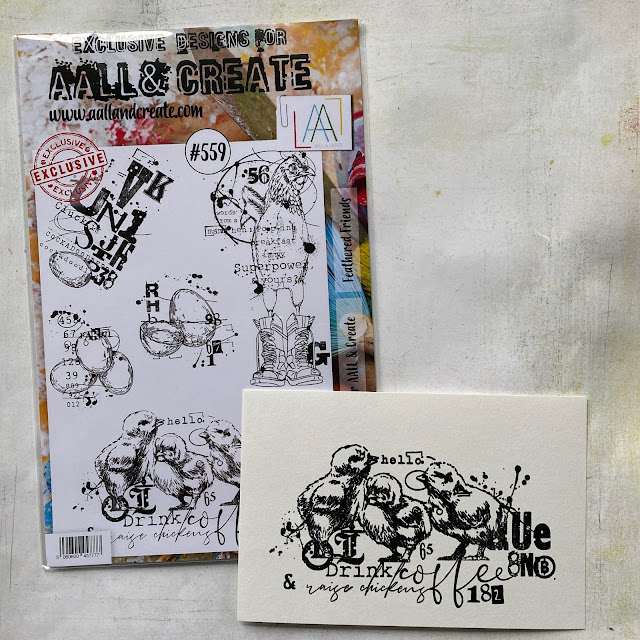
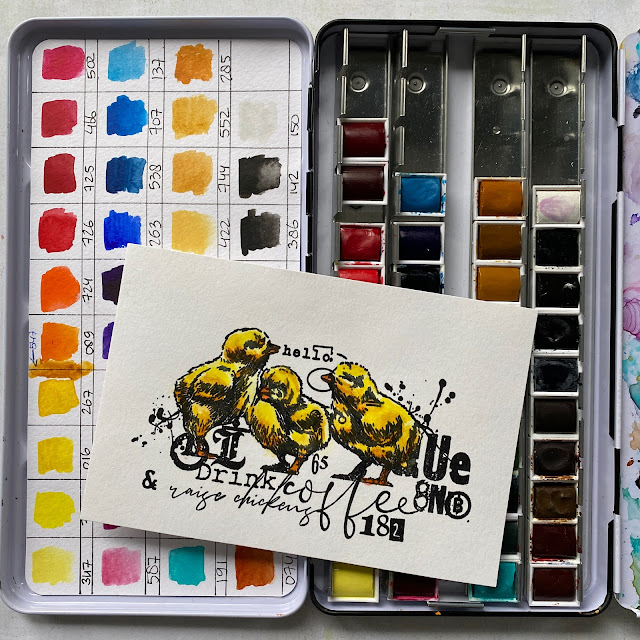
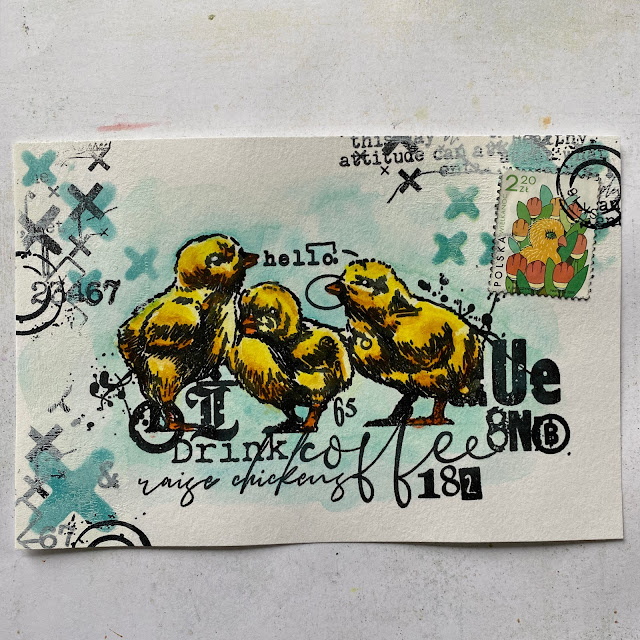
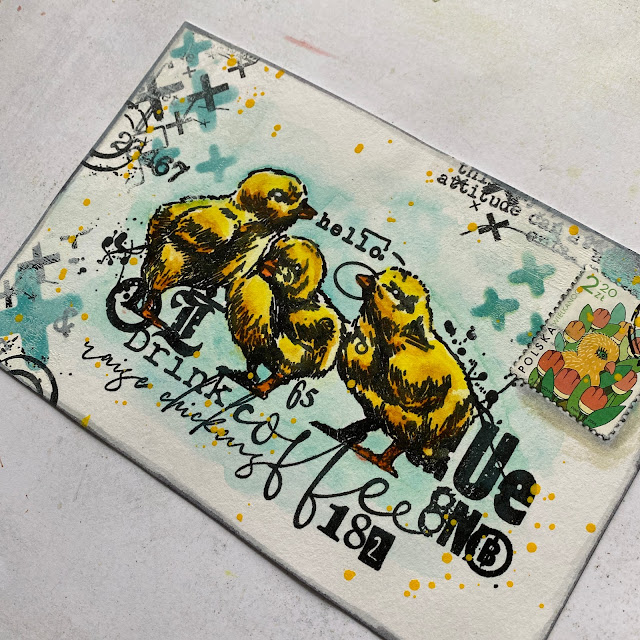
First I stamped this cute chick image on a postcard size piece of watercolour paper. 


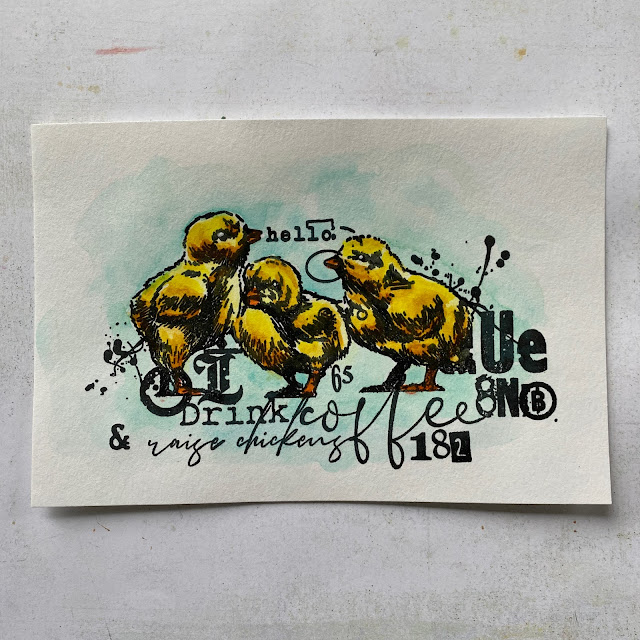
I then painted the chicks with three shades of yellow. I used an orangy yellow for the feet and beaks. 


I used a turquoise wash around the chicks to make them stand out more. 


Next I added some stencilling using Distress Oxide ink in Broken China. 


I then stamped parts of this stamp over the stencilling and brayered some white paint over it to tone it all down a little. 


Because it is a postcard I wanted to add a postage stamp and I found this one in my stash. It has a chick on it.. so fun! I used one of Abs' wisecracks circle stamps to 'stamp' the postage stamp. I also used it in two different places on the card for balance. 


Lastly I added yellow paint splatters and added some grey watercolour around the edges of the card to frame it. 


I used the following materials:

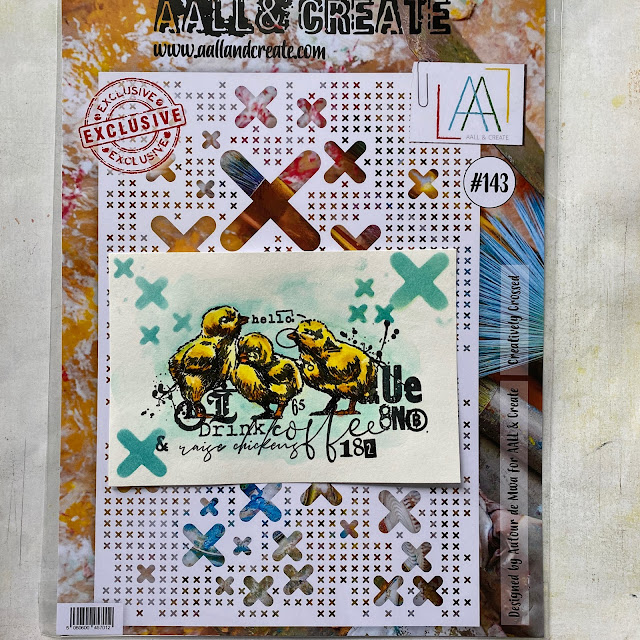
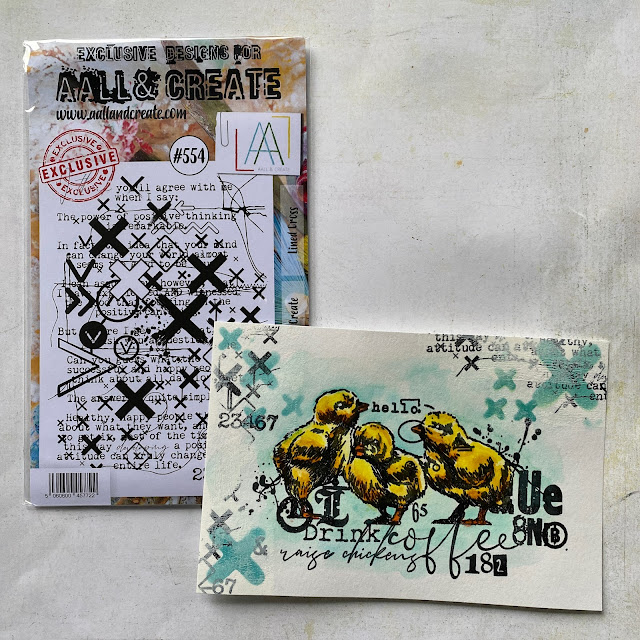
Stencil : #143 - Creatively Crossed by Autour de Mwa
Stamps:
#554 - Lined Cross by Bipasha Bk
#489 - Wisecracks by Autour de Mwa
#559 - Feathered friends by Bipasha Bk

For more information about all the fabulous AALL & Create products, please go to :


Thank you so much for stopping by today ! 


Thursday, 6 January 2022

This week at Vera Lane Studio

 Hello everyone, 

Happy Thursday and happy New Year too. For the first VLS post for this year I have made a postcard. 


I made the background with Distress Oxide inks and AALL & Create stamps. I also used white acrylic paint and a brayer to tone everything down.
This lovely girl is representing the star sign 'Aquarius' and I printed, coloured and cut her out. I adhered her to the card and added one of the sentiments of the set. Lastly I added some graphite pencil here and there. 

You'll find this new set HERE.

Thank you for stopping by today ! 


Thursday, 18 November 2021

This week at Vera Lane Studio

 Hello everyone, 

For today's Vera Lane Studio project I have made an ATC and a postcard. 


How cute are this gnome and his pet sheep? I printed them, coloured them and cut them out. I used a background from my stash and added some stamping and a piece of washi tape to put them on. I glued them down, the gnome in front of the sheep and added the sentiment. Judging by their facial expressions they don't agree with it... lol

You'll find the Gnomes and Sheep HERE


This postcard was made with the set "Starlight' that came out a little while ago. 
I printed, coloured and cut her out. I found this background in my stash and added some orange ink to it. I also rolled some white paint over it and stamped it randomly. I added some splatters and some washi tape, some doodling lines and a punched out scallop. I then placed her on top. The sentiment was matted on black card and adhered too. 

You'll find Starlight HERE

Thank you for stopping by ! 


Thursday, 16 September 2021

This week at Vera Lane Studio

 Hello everyone, 

Happy Thursday and welcome ! I have made a postcard and a book mark/tag for this weeks Vera Lane Studio post. The postcard is not quite what I wanted it to be but these things happen, right?


So, this postcard was made with the newly released set called 'sit down'. I coloured her and didn't really like it so I thought to make it into a vintage project but I don't think I quite succeeded. 

If you would like to have a more successful go with this set you will find it HERE


I do like this book mark/tag though. These seagulls crack me up. I coloured him and cut him out. The background is a strip of left over gelli print from my stash. I added some washi tape (designed by Janet for AALL & Create) and glued him over the top. I then added the sentiment that is some Tim Holtz Clipping stickers and drew some eyebrows on him. lol 
Keep an eye on him, he is after your chips/French Fries.. or doughnut! 

You'll find him and his friends HERE.

Thanks for stopping by today !