Showing posts with label alcohol inks. Show all posts

Thursday, 23 June 2022

This week at Vera Lane Studio

 Hello everyone,

Happy Thursday ! For today's project for Vera Lane Studio I have made a 6" x 6" journal page. I have used and older image from the set 'Wanderlust'. 


First I coloured the girl with my Copic Markers and cut her out. I then made the background using an AALL & Create stencil and alcohol inks on the gelli plate. When it was done I thought it was so nice that I didn't really want to add anything to it. So I left it as it was. I cut a circle from vellum with a die to make her stand out a little more, added a stamp and a clippings sticker. 
Lastly I added the sentiment and used a marker to add some shading here and there. 

You'll find this fabulous travelling girl HERE

Thank you so much for stopping by ! 


Thursday, 10 March 2022

This week at Vera Lane Studio

 Hello everyone, 

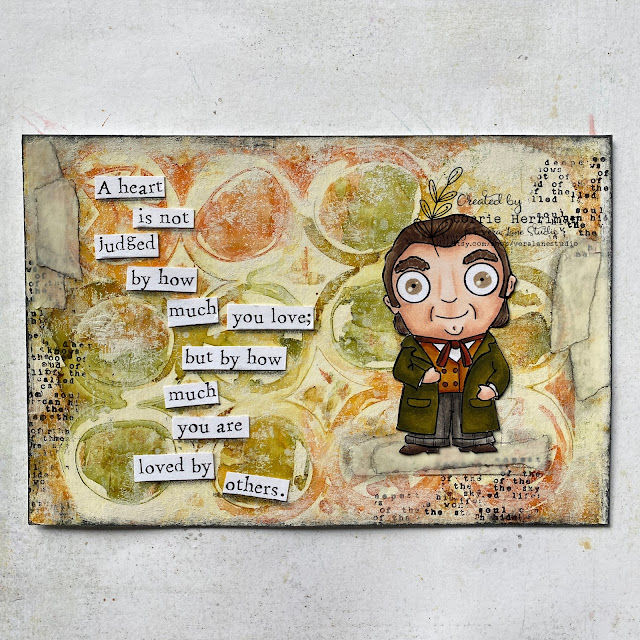
For today's Vera Lane Studio post I have made a postcard with the newly released 'The Wizard'. Doesn't he look dapper ! 


I printed and coloured him and cut him out. I found this background in my stash. It was made with alcohol inks and a stencil. I used a brayer and toned it down with some white paint. I put down some washi tape and accentuated it with a graphite pencil, stamped the background here and there and I then placed him and the sentiment of the set on it. I also inked the edges of the card. 

You'll find the Wizard HERE.

Thank you for stopping by! 


Tuesday, 27 April 2021

Birthday wishes

 Hello everyone,

Welcome to my blog where today I am sharing a card that I made with a new stencil by Bipasha Bk for AALL & Create. I wanted this to be the main feature. 


and here is how I made this:


To make a background like this you start with putting your stencil of choice on your gelli plate. A stencil with lots of open spaces works best. 


Take your alcohol ink (or Copic Refills will work too) and add the desired colours to the stencil.  I used green in the leaf areas and two shades of pinks for the flowers. It doesn't have to be too precise. Let this dry. 


When it is dry pull off the stencil. It will look like this. You then use a brayer and put a thin layer of acrylic paint over it. I used white but you can use any light colour. 


You then put your paper on the gelli plate and take a print. 


I really like how this came out. 


I then stamped this butterfly to go on my card. I chose this one because it was the smallest and I wanted the stencil to shine! 


I coloured the butterfly and cut it out. I also stamped a sentiment. 


Before putting the butterfly on the panel I added a little white paint over the area where I wanted it to go so it would stand out a little more. I matted the sentiment on black card and adhered that too. 


I then glued the panel onto a white card base. 


I have used the following AALL & Create products:

Stencil #127 - Bloomed Roses by Bipasha Bk
Stamp set #451 - In the bucket by Tracy Evans
Stamp set #449 - Through the meadows by Tracy Evans

For more information and a list of worldwide stockists, please visit:


Thank you for stopping by today ! 


Thursday, 4 March 2021

This week at Vera Lane Studio

 Hello everyone, 

For this weeks Vera Lane Studio project I have made a book mark and two ATC's. 


The bookmark was made with the this week released set 'Coffee, tea, books'. It is all one layer except for the sentiment. I resized and printed the images, piling them on top of each other, then coloured everything including the background with my Copic Markers. 
You'll find this set HERE.


These two ATC's were made with the Collage sheet 'Flower Girls'. I accidentally cut the second one too small but only noticed after I finished them. So I decided to leave it. 
The backgrounds were made with alcohol inks on the gelli plate. The Sentiments are Tim Holtz small talk stickers. 
You'll find the collage sheet HERE

Thank you for stopping by today ! 


Tuesday, 2 March 2021

Embrace love

Hello everyone, 

For today's AALL & Create GDT post I have made a card. I have used an older stencil and one of Tracy's brand-new stamp sets. 


and here is how:


I made a gelli print with this stencil and alcohol inks. This is great fun but makes a terrible mess of your stencils.. 
You put the stencil on your gelli plate, drop the alcohol ink over the top, I used a green and a blue, use a brayer to roll over the stencil. Wait till it is dry, then take off the stencil. Brayer on a thin coat of whit paint and take a print. 


Next I stamped this large heart on the card with Versafine Clair and heat embossed it with clear powder. 


I then coloured in the heart using water colour markers. I added some grey around the heart to make it stand out more.  I used the big stamp from the set to add some random stamping too. 


I stamped the word love from the same stamp set on black card stock with Versamark ink and heat embossed it with white powder because I wanted it to go with the piece of washi tape I chose. 


Here you see it finished. I added some doodling with a black pen too and I really like how it came out. 


I have used the following AALL & Create products:
Stencil #78 - Cloister Grille by Olga Heldwein
Washi tape #6 - Crafty by Autour de Mwa
Stamp set #453 - Heart Grunge by Tracy Evans

For more information about all the fabulous AALL & Create products, please visit:


Thank you for stopping by today ! 


Tuesday, 9 February 2021

Fly again

 Hello everyone, 

For today's AALL & Create Guest DT project I have made a card with very few supplies to show that you don't need the whole collection and the kitchen sink to make a card. 


and here's how:


I made this background with a gelli plate, this stencil and alcohol inks. If you don't have alcohol inks you can use Distress  Oxide inks and use the stencil to print on the paper by rubbing the ink pads over the stencil, spritzing with water and pressing onto the paper. 


Next I used the stamp in the left bottom corner to stamp randomly over the card. I used Distress Oxide inks for this. 


Next I stamped the butterfly from the same set and stamped it on the card and on a separate piece of card stock. 


I coloured the butterfly with Distress Oxide inks and cut it out. I will glue this one over the stamped one on the card.


Lastly I added some text stickers by Tim Holtz to spell 'you will fly again'. I matted the card on some blue paper and then adhered it to my card. 


I have used only 1 stencil and 1 stamp set for this card:

#39 - Lotza Dotz by Autour de Mwa
#392 - Memento More by Olga Heldwein

For more information about all the AALL & Create products, please visit:


Thank you for stopping by today !


Friday, 30 August 2019

Carte Postale

Hello everyone,

and welcome to my last post for Katzelkraft. I have decided to step down from the team because I have taken on so much in the last few years that crafting has become a full time job. I never wanted this to happen so I decided it was time to step down from some teams, Katzelkraft being one of them.

For today I have made a postcard with Yupo paper and alcohol inks. I always forget I have those because I grab acrylic paints almost every time !


After putting the alcohol inks on I waited for it to go tacky and added some metal foil; it sticks where the ink is not quite dry. I also stamped the flower head from set KTZ219 with gold paint. You can only see it when you tip the card.


I stamped the bird on white card stock and coloured him with Copic Markers, adding shading with coloured pencils. I also stamped him on the card. 
The sentiment was stamped straight on the card. I also doodled around the bird and the edge of the card with black and white pens and added some shading under him. 


I used the following stamps:


Thank you so much for stopping by today !


Friday, 6 July 2018

Happy life

Hello everyone,

and welcome to my weekly Katzelkraft post. I have made a postcard this time.


The background was made with alcohol inks. I just put them on some Yupo paper and then put some blending solution over the top and blew the colours around using a straw. 
When the ink had mostly dried I added some foil in gold. It sticks to the bits that haven't quite dried and the effect is great I think. You can see it better in the photo below. 


Next I stamped the dog, the balloon and the string. The balloon and the dog were stamped both on the card and on white card stock, the string just on the card. I coloured the images with Copic markers, cut them out and adhered them to the card. 

The sentiment is a very old rub on from Tim Holtz. I was amazed it still worked ! lol 

I also added some 'ground' under the dog with a marker and that finished the postcard. 

I used the following stamps:

Thank you for stopping by !


Saturday, 2 June 2018

I am home...

Hello everyone,

welcome to my blogpost for UmWow Studio. I totally love the Tiny Houses Mash chipboards and couldn't resist using them again... I made three ATC's on Yupo Paper and made the background with alcohol inks.


I have left the chipboard in its natural form as I like how this looked. 


After the alcohol background had dried I applied some gold foiling. I saw Vicki Papaioannou do this on YouTube but I didn't have as many sticky areas on the ATC's... It was also alsmost impossible to photograph.. but what you do is apply foil to areas that have lots of ink. These areas stay very sticky and are a good base for foiling..


I also added one stamp to ground the houses on and some gold coloured washitape. 


You can just see the gold foil in the top left corner... 


I have used these chipboards:


You will find them HERE.

Thank you so much for stopping by today !