Showing posts with label Versafine. Show all posts

Tuesday, 2 March 2021

Embrace love

Hello everyone, 

For today's AALL & Create GDT post I have made a card. I have used an older stencil and one of Tracy's brand-new stamp sets. 


and here is how:


I made a gelli print with this stencil and alcohol inks. This is great fun but makes a terrible mess of your stencils.. 
You put the stencil on your gelli plate, drop the alcohol ink over the top, I used a green and a blue, use a brayer to roll over the stencil. Wait till it is dry, then take off the stencil. Brayer on a thin coat of whit paint and take a print. 


Next I stamped this large heart on the card with Versafine Clair and heat embossed it with clear powder. 


I then coloured in the heart using water colour markers. I added some grey around the heart to make it stand out more.  I used the big stamp from the set to add some random stamping too. 


I stamped the word love from the same stamp set on black card stock with Versamark ink and heat embossed it with white powder because I wanted it to go with the piece of washi tape I chose. 


Here you see it finished. I added some doodling with a black pen too and I really like how it came out. 


I have used the following AALL & Create products:
Stencil #78 - Cloister Grille by Olga Heldwein
Washi tape #6 - Crafty by Autour de Mwa
Stamp set #453 - Heart Grunge by Tracy Evans

For more information about all the fabulous AALL & Create products, please visit:


Thank you for stopping by today ! 


Tuesday, 28 January 2020

You and me

Hello everyone,

For today's AALL & Create GDT post I have made a journal page. I thought I'd revisit Abs' idea of going with a round piece of paper. It is fun to do something different every now and then.


And here is how I made it:


I started out with this stencil and gesso to create a resist. You can't actually see it in this photo so I took one at and angle:


This is what it looks like. I worked on watercolour paper by the way. 


I used a blending tool and Distress Oxide inks with water to get this result. I used Broken China, Mustard Seed and Carved Pumpkin. You can see how the gesso resists the ink. 


I love this stamp set and had to use it yet again for the background. I used the same Oxides and a black Versafine ink for this. 


Next I cut this die and added little pieces of it on my circle. I also went around the edges with black paint, mostly where the black stamping is. 


My focal point & sentiment. I already stamped 'you+me' from set #125 that I used for the background. I coloured the images with Copic Markers, cut them out and adhered them onto my page. I matted the you+me on black card and used it as a base for the two bears to stand on. 


I really like how this turned out. My favourite colours too! (Well, at this moment...lol).


I have used the following AALL & Create materials:

Stencil:
#84 - Profusion by Olga Heldwein

Die:
#13 - Bursting buds by Bipasha BK

Stamps:
#125 - For the record by Aida Domisiewicz
#249 - Dog toys by Janet Klein
#250 - Lift me up by Olga Heldwein

For more information about all the fabulous AALL & Create products including a full list of stockists worldwide, please visit:


Thank you for stopping by today ! 


Wednesday, 22 January 2020

Well behaved women..

Hi everyone,

For my second January post for VivaLasVegaStamps! I have made an artjournal spread.


Here's how:


First I applied Distress Oxide inks over gessoed pages. I used pieces of cut and dry foam for this but you could also use a blending tool or blending brushes. 


Next I placed a stencil over the top and rubbed the ink with a dry piece of kitchen towel. I wanted it lighter  but not white. If I had used a baby wipe it would have taken all the ink off. 


Next I stamped the background randomly with the same Oxide inks,  a Versafine black and a grey StaZon. No reason for the inks apart from them being within reach or the colour I wanted. 


I forgot to take a picture when I was colouring, but you get the idea. I stamped the naughty lady and the gentleman and coloured them with my Copic Markers and cut them out. I added some washitape to the page to stand them on and glued them down. The sentiment was stamped on white card stock, cut into strips and adhered on the other page. I then doodled around the strips with a black pen.


I have used the following stamps:


Other materials:
Distress Oxide inks:
Broken China
Peacock Feathers
Twisted Citron
Mustard Seed
Carved Pumpkin
Worn Lipstick

Versafine Onyx Black
StaZon Dove grey
Gesso
Copic markers
Black pen

Thank you so much for stopping by today ! 


Tuesday, 23 April 2019

Bug

Hello everyone, 

I was asked to make some samples for the Hochanda TV shows of AALL & Create on April 3rd and of course I made some. It is so exciting to see your samples on TV! 


This cas postcard was really simple to make. 


I used the sewing lines stamp from set #147 to stamp the front of the card. I used yellow and black inks. 


I then stamped the ladybug on a piece of card stock that I had coloured with the same yellow ink. 


I added shading, cut her out and adhered her to the card. I matted the sentiment and glued it on the card as well. Lastly I matted the card on black card stock. 


I used the following stamps:

#161 - Ladybug
#147 - Zipp it


You'll find more information on the fab AALL & Create products here:


Thank you so much for stopping by today ! 


Saturday, 20 April 2019

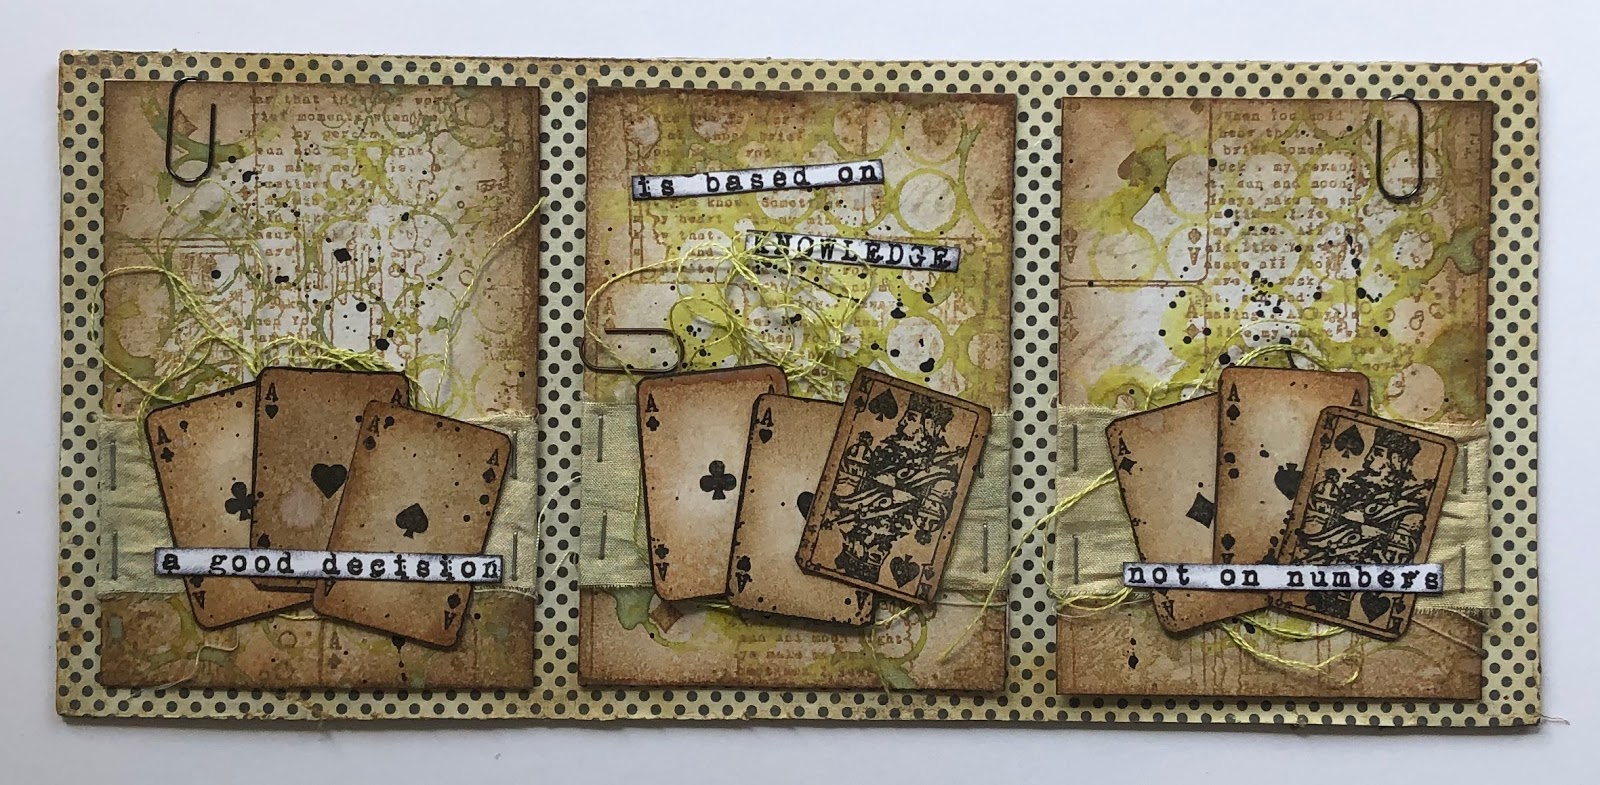
A good decision....

Hello everyone, 

I was asked to make some samples for the Hochanda TV shows of AALL & Create on April 3rd and of course I made some. It is so satisfying to see your samples on TV! 

Today I am sharing a trio of ATC's.


and here's how:


I started with partially stamping this stamp on three ATC's. The paper I used is from an old Tim Holtz paper pad. 


Next I stamped the cards from the same stamp on a different paper from the same paper pad. 


I inked all the edges and then added 'stamping' with this stencil and Peeled Paint Distress Oxide Ink. I smooshed it onto the stencil, sprayed with water and printed it onto the ATC's. 


Next I added pieces of sari ribbon and used a tiny attacher by Tim Holtz to staple it to the cards. I added some embroidery thread and put the cards on top. They were inked along the edges as well. 


I used one of the sentiment from the Ladybug stamp as I thought it was quite apt to go with the playing cards. I also added some Tim Holtz paperclips for a bit more interest. The cards were then mounted on a piece of card board that i covered in patterned paper. 


I have used the following stamps:

#146 - Kings & Queens
#161 - Ladybug

Stencil: 

#45 - DIgital bubbles


You'll find more information on the fab AALL & Create products here:


Thank you so much for stopping by today ! 


Tuesday, 9 April 2019

In order to grow...

Hello everyone, 

I was asked to make some samples for the Hochanda TV shows of AALL & Create on April 3rd and of course I made some. It is so exciting to see your samples on TV! Here's one of them:


There are no WIP photos as this was really easy to make. 


I stamped the flower with VersaMark and heat embossed it with white powder. I then watercolored the flower and the area around the flower. I added stitching with my sewingmachine and lastly added the sentiment and glued the panel on a white card. 


I have used stamp set:

#183 - Bouquet Small 


You'll find more information on the fab AALL & Create products here:


Thank you so much for stopping by today ! 


Wednesday, 20 March 2019

Be Happy

Hello everyone, 

I was asked by Abs to make some samples with the new release stamps for the AALL & Create Hochanda shows ! Of course I couldn't say no to that ! 

This is the last of 6 samples I made and it is a postcard:


I really like making vintage things as well so that is what I did. Unfortunately I got carried away and forgot to take WIP photos.... 

I started with a piece of Mixed media paper and used Distress Oxides in Ground Espresso and Antique linen smooshed onto my craft sheet and dipped the card in it until I was happy. 
I did some stamping with the same Ground Espresso and then took Crushed Olive and used it to rub over the Lushy Leafy stencil and printed it on the card. 
I also used that to colour the Lady bug, the sentiment (Both stamped on book pages) and the edges of the card. 
I doodled around the edges with a pencil. 


I have used the following AALL & Create materials:

Stamp #161  Ladybug
Stamp #142 Edison Game
Stamp set #125 For the Record
Stencil #80 Lushy Leafy

You'll find more information about the AALL & Create products here:


Thank you so much for stopping by today ! 

Sunday, 17 March 2019

Illustrate your life

Hello everyone, 

I was asked by Abs to make some samples with the new release stamps for the AALL & Create Hochanda shows ! Of course I couldn't say no to that ! 

This one is a tag and it is quite clean and simple:


And here's how I made it:


I stamped the image twice, once with VersaFine ink which is nice and black and once with Memento because I wanted to colour the pencils with my Copics and Memento is good for that. I also stamped the right hand side once more with Memento to use as sentiments. 


After colouring the pencils and some of the words I cut everything out and adhered it to the tag at the bottom.


I matted the words on black card stock as well the whole tag. I added a ring around the whole which I coloured with my Copic Markers too. I couldn't resist gluing the words back on crooked ! 


I have used the following AALL & Create materials:

Stamp #165 - Numbered pencils by Tracy Evans.

You'll find more information about the AALL & Create products here:


Thank you so much for stopping by today !