Showing posts with label Pan Pastels. Show all posts

Thursday, 5 May 2022

This week at Vera Lane Studio

 Hello everyone, 

For today's Vera Lane Studio I have made a 6" x 6" journal page with the Gemini set that came out this week. 


I printed and coloured the images with Copics, then cut them out. The background is made with a gelli plate and a stencil with Pan Pastel. This is a really fun technique where you put the stencil on the gelli plate, use the Pan Pastels to colour in different areas of the stencil. You then roll over a thin layer of white acrylic paint and print.
 I didn't add any stamping because I thought it was rather nice just as it is. 

You will find the set 'Gemini' HERE. 

Thank you for stopping by! 

Sunday, 1 May 2022

By the light of the moon

 Hello everyone, 

Today is the 1st of May and that means a new challenge over at Country View Challenges and the theme was set by the lovely Rachel and it's all about cats & dogs this month. 

I am a dog person but for the first project this of this challenge I have used a cat in a journal page. The stamps I used are by Lavinia and AALL & Create. 


Isn't this cat stamp fabulous! 


I have made a process video, you'll find it on my YouTube Channel 


I will be back soon with another project! Please play along with us but before you do please read the rules on the Country View Challenges blog. Link above. 


Thursday, 24 June 2021

This week at Vera Lane Studio

 Hello everyone, 

Happy Thursday ! Today I am sharing two journal pages that I have made for Vera Lane Studio. The first one has the new set 'Toucan do it' that came out this week. The second is an older set called 'Marine Mammals'.


This page is 6"x6" and the background was made with a gelli plate, an AALL & Create stencil and Pan Pastels. You can get really cool results with Pan Pastels. Just not easy to remove from your plate. I used vegetable oil which takes it off in no time. You can also use baby oil. Just wipe the oil off after. 
The Toucans were printed, coloured and cut out. I didn't add anything to my background apart from a few pieces of washi tape and some black lines because I liked it as it was. I added the sentiment that came with the set and was that ! :o)

You'll find this set called 'Toucan do it" HERE.


This mini page was made with a gelli print (a regular one with paint) from my stash. I added stamping and framed the painted area with black lines. I stuck down some washi tape and then coloured the fish. I cut him out and adhered him and the sentiment on my background. 

You'll find the fish and his mates HERE. 

Thank you for stopping by today ! 

Saturday, 30 March 2019

Imagination rules the world

Hello everyone,

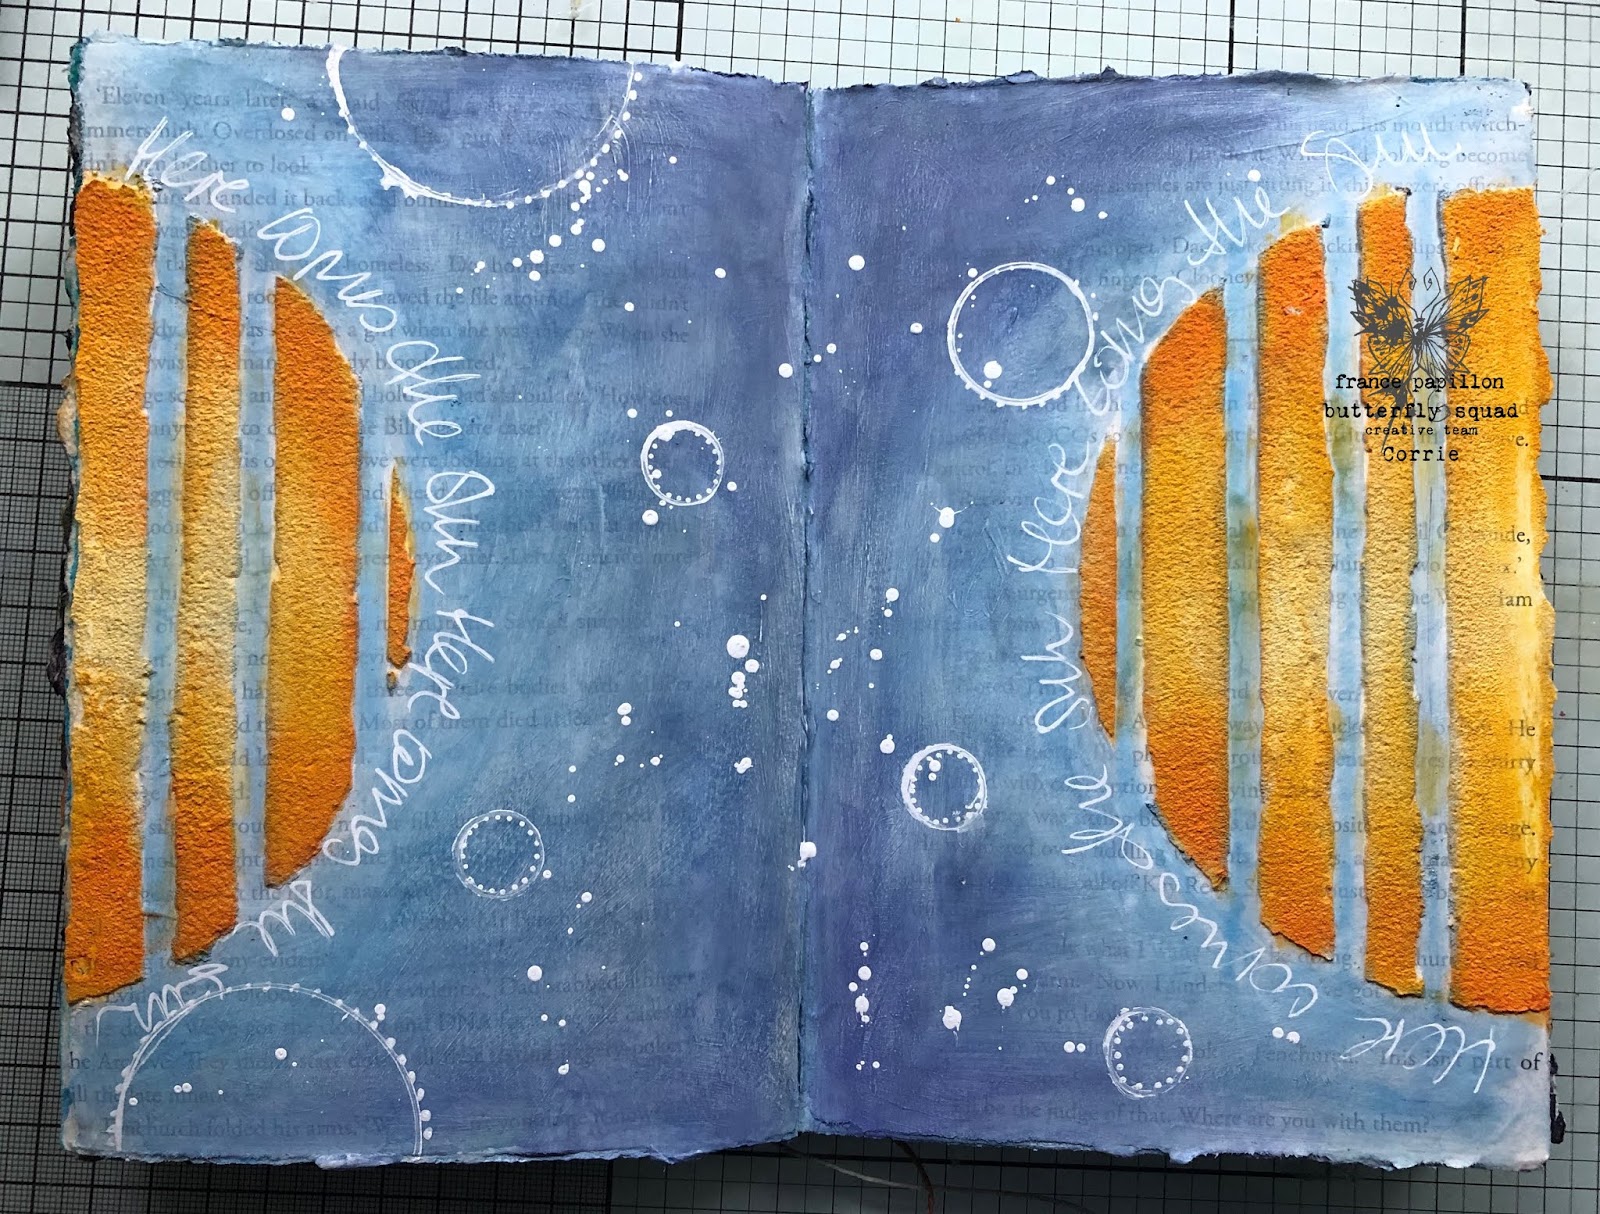
Last week I decided to play along in the 'A layer a day' challenge over at France Papillon's FB page. The theme was 'Here comes the sun" and I must admit I did struggle with this one. In the end I think it all came together though...


This is the result and here is how I made it: 


Now, you know how everybody always tells you to not waste anything. I painted some leftover ugly blue paint over these pages and have been looking at them for the past 2 years, I think. Today I decided to use them but because it was so ugly I glued book pages over the top. So, I wonder if it is not better just to throw the leftover paints ! Anyway, I then added a thin layer of DecoArt White Gesso over the pages. 


For the second layer I added some DecoArt Sandpaste through France's 'Torned Circle' stencil. 


Layer 3: I painted the pages, not the sand paste, with a watered down layer of DecoArt Chalky Finish paint in the colour 'Serene'. 


Layer 4: I dug my Pan Pastels out of the depths of my stash because I haven't used them in years.. and then disaster struck. I tried to spray on some fixative but it didn't spray, it dribbled so it made a mess. I managed to save it by spreading it over the page with my fingers. 


Layer 5: I did some journaling, some doodling using France's 'Circles' stencil and some splattering. 


Layer 6: I added loads of stamping with purple, blue and black Archival inks. I used stamp sets : Perfect Words, 1800 and How shat I put it and I doodled some black lines along the edges. By this point I thought I was finished......


...but I didn't like it that much, it was missing something... So I added a lizard from the 'Creepers and Crawlers' set. 

So the blue and purple represents the sky and the half yellow/orange circles are the sun! Yes, you need imagination to see it ! The journaling is just the theme that I wrote a few times going with the curve of the circles. I added the world stamp from the 1800 set and the lizard is just there because, like me, he likes to sit in the sun ! 

Thank you so much for stopping by today ! 


Thursday, 1 December 2016

Jingle your own damn bells! A NEW VIDEO !

Hello everyone,

Today there is a new challenge starting over at Country View Challenges. The theme was chosen by the lovely Doreen and it is Christmas ! Now I am no big fan of Christmas and probably look a little like this dog when the day arrives....
We would love it if you played along with our challenge. Every month there is a GBP 20 voucher to the shop to be won ! Just make sure to read the rules before you play ! Good luck.


I have filmed the process (not the colouring of the images) and if you are interested in how to make this then here is the link:


I have used PanPastels for the background, stamps by Visible Image, Stampers Anonymous/Tim Holtz, VivaLasVegaStamps and Stampotique Originals.. 

If you like me to keep making these process videos then please SUBSCRIBE to my channel... 

Thank you so much for stopping by today ! 


Wednesday, 2 November 2016

Starry night

Hello everyone,

It is week 2 of Stampotique's 'Outer Space' (#260) challenge; you still have time to play along. You could win a $30 voucher for the shop. Make sure to read the rules over at the SDC blog HERE though.

I while ago I became a member of the Dutch Artjournal Group on FB and the first thing I did with them was make a little journal. I used old book pages for the inside and today I tested it to see if the pages would stand up to my way of journaling... and they did ! Yay !


So this is what I did. First a layer of gesso which I dried with my heat tool. Next I made the moon and the sky with Pan Pastels... I hadn't used these in ages and came across them looking for something else... lol After I used a fixative over the top to make sure it stayed put I got some white paint, thinned it down with water and with a brush I made the splatters to represent the stars. I also added some with a white paint pen. These three little cute guys were stamped both on the page and on some marker paper. I coloured them, cut them out (even the little antennas) and adhered them to the ones on the page. The sentiment was typed on my old typewriter and hey presto, that was it. Quick and easy ! 

I used 3 stamps for this : 


Thank you so much for stopping by today ! 

Wednesday, 9 December 2015

Alphabets

Hello everyone,

and happy Wednesday. This is the last challenge for this year for Stampotique. Where did the time go? Seems like only last week that it was Christmas. Anyway, this week's hostess is Claudine and the theme is "Alphabets".  Here's what she said :


"Use your alphabet stamps or images to create a letter of the alphabet" 


So I created the "C" for Corrie or (wonky) Chandelier lol....


I started with a piece of Mixed Media paper on which I drew the "C". I used one of those cardboard letter that are used to make words in interior design and drew around it. I then cut it out so I had a 'stencil'. I put this 'stencil' on my paper and stamped the flowers through the hole. I also stamped the flower twice on masking paper so I could stamp them behind each other. When the "C" was full I took the mask off and coloured everything in. I used Copic Markers and Pencils. 
Next I coloured the background with my Pan Pastels. I hadn't used them in ages so that made a nice change. I then used two different stencils and a background stamp to make it all a bit more interesting. I did use the "C" that I cut out to mask off the coloured "C" on my page as not to get any ink on it. 
I then decided to stamp the chandelier, thinking I would use my home made stamp positioner but still didn't use it so it got on there wonky ! Never mind.... I coloured it with pencils and I used a white paint pen for the candles. I then I stamped Mela, coloured her, cut her out and adhered her to the page. Lastly I drew two black lines around the page. 

I used the following stamps:

Carol's flower small
Journey collage
Mela 
Gothic Chandelier

Why not play along with us this week. You could just win yourself $30 worth of Stampotique stamps. Just remember, only one entry per person per challenge an no Digi's. Have fun ! 

Tuesday, 7 July 2015

Freaky

Hello everyone,

I have an art journal to share with you today. I made this for my DT post for Lost Coast Designs.


I used Model Paste, gesso and Pan Pastels for the background which was then randomly stamped. The word 'freaky' was done with a stencil which was given to me as a present ! (Thanks, you know who you are  ! I love it) The clown was stamped on white paper, coloured with Copic Markers, cut out and adhered to the page on top of a few bits of washi tape. The same washi tape was also used in the top left corner.

Stamps used:


Thanks for stopping by ! 

Wednesday, 24 June 2015

Better the devil you know.

Hello everyone,

and happy Wednesday. Another Challenge over at the Stampotique Designers' Challenge blog and the theme is 'Give wings' set by the lovely an talented Astrid. 
This is what she said about her challenge :

'Every stamper has a little Frankenstein in them. Give a stamp without wings a pair of them. Have fun creating!!'

So I have made an art journal and this is it :


This page started out as a complete disaster. I painted the page red as that is the colour I associate with the devil... It looked dark and awful, lol, even after stencilling the chevrons with white paint over the top.
So I painted gesso over it and when that was dry I used Pan Pastel over the top. You can still see the red and the chevrons through it here and there. This was a bit more to my liking and I continued stencilling with red ink, stamping with white and black ink, spattering white and black ink and doodling around the page. Next I stamped Minky Girl on the page and put some washi tape where her feet were going to go. I also used some of the same tape randomly on two other places. 
I also stamped Minky on white card stock and coloured her in with Copic Markers. I drew her some horns that I slid into her head, lol...
The wings were stamped on white card, silver embossed and coloured in with a red marker; I later sprayed a red Star burst spray over the top. I cut them out and decided also to cut them down as they were a bit big for little Minky. I also clear embossed Minky. Everything was then assembled on the page. The sentiment was made with sticky letters. 

I used the following stamps:


Thank you so much for stopping by today ! Why not play along with us and you might win $30 worth of Stampotique stamps ! Just remember NO digi's and only one entry per person per challenge ! Good luck ! 

Thursday, 9 April 2015

Cirque


Hello Everyone !

Today for my DT post for Katzelkraft I have a postcard to share. I love making postcards. They are small so quite easy to do.

This is the finished project :


I would like to share how I made this so here goes :


I started with a piece of white cardstock.


I coloured it with Pan Pastels and used a spray fixative to make sure it stayed put.


Next I did some background stamping and stencilling.
I also went around the edge with a grey inkpad.


I then glued some bits of book paper and some pattern paper randomly on the card and stamped the two images I was going to use. The word cirque was clear embossed.


I then stamped the main image again with memento Ink as I was going to colour him with Copic Markers.


Here is the coloured result. It was then cut out and glued on the card.


And here is the finished result agin.


I used the following stamps:
KTZ67


I also used one stamp of this set:


Thank you so much for stopping by !

Hope you like it !


Wednesday, 11 March 2015

Star Light....

Hello fellow Crafters,

It is Wednesday and that can only mean one thing : A new Challenge over at the Stampotique Designers's Challenge blog. 

But wait, there is something else..... It's my birthday ! Yay !
I will be spending a few days with my sister in law & brother in law which will be nice !

Anyway today's host is the lovely Carol and she wants us to use one or more stars. This is what she said:

"Feature stars this week, one or more on your arty creation. As part of your background or a main feature it's up to you. Just Have fun with the challenge." 

I have made an art journal for Carol's Challenge. 


I tried to create a night sky and used Pan Pastels for this. I stamped the background, although you can't really see that and used a stencil and a whit chalk ink, which was subtle but not as subtle as in the photo. When the ink had dried I used a fixative also to fix the white ink as I wanted to put a layer of clear gesso on. If you don't use a fixative the ink will smear. (I needed the gesso so that I could shade the stars after I glued them on.) 
I drew a star and cut it out five times out of Pattern paper (Bo Bunny - C'est la Vie). I glued them on the page with gel medium and then shaded them with Big Brush Markers. I also used a white paint pen to draw some more stars. 
The rabbit was stamped on white card stock and coloured with Copic Markers, cut out and adhered on some washi tape. I made the sentiment with my old typewriter. 
That was that ! 
I used stamps from the new release:

Why not play along with us this week and maybe you will win one of the two $30 vouchers at the end of the month. Just remember, no digi's and only one entry per person per challenge.

Thank you for stopping by ! 

Hope I gave you some inspiration !