Friday, 30 September 2016

And the winner is ....

Hello everyone,

A while ago I had a give away on my blog here and today I have picked a winner !!! So, in case you have forgotten, it is all about this postcard:


The response on my blog was a little disappointing with not even 20 people leaving a comment. So I decided to add the people that left a comment on FB as well. 


As always I did it the scientific way :


Wrote everybody's name down on strips of paper....


Folded all the strips... 


Closed my eyes and picked one ! 

Congrats Jo !! Please PM me your address and this postcard will be on it's way to you !! 

Thank you so much for stopping by today ! 


Thursday, 29 September 2016

Hello friends

Hello everyone,

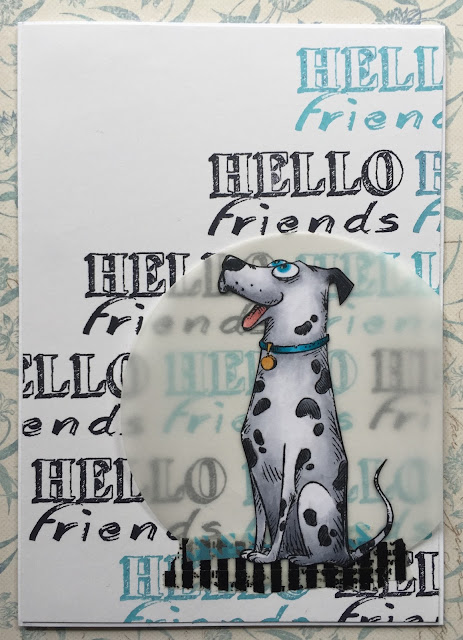
Today I have a card to share that I made for Katzelkraft. It is a little simpler than my usual stuff but sometimes I quite enjoy making clean and simple cards. So here it is:


First of all I stamped the dog and coloured him with Copic Markers. I then cut him out and set him aside while I made the rest of the card. 
On a white panel I stamped the sentiment 'hello friends' with Aquamarine and Jet Black Archival inks. I didn't measure this but just did it by eye. 
Next I cut a circle our of vellum and added the washi tape to the bottom for the dog to sit on. 
I then glued the dog on the circle and the circle to the panel, making sure to only have glue behind the dog so it doesn't show through the vellum.
I then adhered the panel onto a white card. 

I used the following stamps :


Thank you for stopping by today ! 


Wednesday, 28 September 2016

Stampotique Challenge #258 - favourite quote

Hello everyone,

and welcome to the first week of a new Challenge. It is all about your favourite quote the next two weeks. I've chosen one of my favourites to go on my tag but there are many more that I really like..
There is lots of inspiration on the Designers' Challenge Blog and you can also find the rules for taking part there.

So here is mine:

This tag was cut out of white card stock. I started with stamping the girl with Memento Ink and then coloured her with Copic Markers. Next I gessoed carefully around her and when that had dried I used Distress Crayons (and no, I am still not keen on them) and a baby wipe to colour the background. 
Next I dipped a stamp in water, stamped it on the tag and then mopped up the water. It leaves a bleached imperfect impression of the stamp: perfect ! 
I also added some script and white paint splatters. 
The quote was typed on my typewriter, cut into strips and glued onto the tag. 
That was it ! 

I used the following stamps:

Thank you so much for stopping by today ! 


Tuesday, 27 September 2016

Music

Hello everyone,

For today's Visible Image DT post I have used a whole lot of their lovely stamps. I have made an art journal page and here it is:


This is of course another gelli printed background. I have made loads so you'll probably see a lot more... 
Anyway I started with stamping the circles; the big ones were stamped with different colours of Archival ink that sort of matched the background. The small circles were heat embossed with fine white WOW embossing powder. The little stripey bits were stamped with black archival ink. Next I stamped the gentleman with the saxophone, also used black Archival Ink. 
The sentiment was stamped on white card stock and cut apart, glued onto the page and doodled around. I also doodled around the page. I used a white gel pen to colour the little dots in the stamp. 
I still thought it lacked something at this point, so I decided to use part of the sentiment and stamp it inside the big circles. 
And that finished the page ! 

I used the following stamps : 
(these links take you straight to the shop :o) )


Thank you so much for stopping by today ! 

Social Media, Blog and monthly Challenge details :


Show & Tell Monthly Challenge details: http://visibleimage.co.uk/challenge 


Monday, 26 September 2016

We could be heroes - a new art journal page & VIDEO

Hello everyone,


I have another Video to share today ! I have used one of the stamps I designed for VivaLasVegaStamps! for this... I hope you hope over and check it out ! Link down below !


This art journal page was made on a mop up from residue paint on a gelli plate.... cool eh ? 

And here is the video :


I hope you enjoy it ! If so, please subscribe and give me a thumbs up ! 

Thank you so much for stopping by today ! 

It's mailart Monday !!!

Hello everyone,

and welcome to Mailart Monday !


For this post for VivaLasVegaStamps! I have made an envelope. I also took some photos along the way to show you how to make this:


I used the gelli plate and some of the techniques I learned in Birgit Koopsen's workshop. 

Here's how:


First, mask off the bit where the address has to go. I used some all over sticky post-it note for this. It did come off every time I printed but I just stuck it back on. 


Next, paint.. not too much and 2 or 3 colours. I used 2 yellows and an orange..


Roll them out with a brayer..


And print your envelope. This is the first layer.


I used the leftovers on the plate to do the back of the envelope. 


Next more paint, in darker or contrasting colours. Add texture with stamps, bottle caps etc.. 


I printed this on the right hand side of the envelope.. I continued doing this with different colours all over the envelope until I was happy.. 
Make sure, when using stamps to wash them straight after use as you don't want dried paint on them. 


This is the envelope after I finished printing.. (front)


And here is the back. 


Now for the stamping. The world is your oyster really, use what you like, where you like. I chose some Banksy inspired stamps. 


As you can see Salvador Dali did't stamp very well but this is easily rectified with a black marker. I used a Faber Castell Pitt artist pen, big brush.. 


et voila ! fixed ! 


Next I did some doodling with black and white pens and also some more stamping which I forgot to photograph but I am sure you got the idea ! 

And here is the finished envelope again front and back.


I hope you enjoyed my tutorial. I have compiled a list of all the stamps I have used for this:


Thank you so much for stopping by today ! 


Friday, 23 September 2016

Capture the moment

Hello everyone,

and welcome to September ! September already... where did summer go?

It is time for a new challenge over at the Country View Challenges Blog and Jennie has chosen the theme 'Travel'. I struggled a little with this as I didn't want to go down the plane, train and automobile route. I settled for an art journal piece with a camera because we all take photos on our travels to keep the memories alive.
I have made a little photo tutorial so you can see how this came together. I will start with the finished piece:


And here is how I made it :


I started with a piece of Mixed Media paper approx. size A5.


With a stencil and a pallet knife I added some model paste.


This is what that looked like.


Next I took out my paints....


And painted the page with it. I added a bit of Quinacridone yellow over the top of the pink and orange. It made it a little warmer. 


Next, some antiquing cream. Not to make it old and worn but to accentuate the texture of the modeling paste. 


Like this... 


Next stamps. I used Visible Image Stamps for this. This camera stamp is fabulously detailed and VI stamps stamp like a dream....


After adding some background stamping I took my trusty paint pen and added....


splatters.... 


I then stamped the camera and got totally carried away with adding shading to it with coloured pencils. Needless to say I didn't take any more photos... apart from the finished piece :


I changed my mind about the quote because I didn't like it on the white paper so I stamped it straight on the page and added some white pen to accentuate it. I also added some thread behind the camera which is adhered on the page with dimensional tape. 

That was it ! I hope you will play along with us.. you have all month ! 

Thank you so much for stopping by today ! 


Wednesday, 21 September 2016

Don't bug me baby !

Hello everyone,

and welcome to week 2 of the 'put a bug on it' challenge over at the Stampotique Designers' Challenge blog. For this week I have made a quick postcard.


I've only used two stamps for this. 
It is a gelli printed piece of paper on which I stamped the flower twice with versa mark ink and heat embossed both images with fine white WOW embossing powder. 
The hearts on the card were made with home made 'tools' ie. foam stickers on a piece of card board that I use as stamps on the gelli plate after applying the paint and before printing. 
I found the definition of the word bug in the dictionary and cut it out. I glued it on the bottom of the card so the caterpillar could sit on it. He was stamped on white paper and coloured with Copic Markers. The sentiment was done on my old typewriter. A few white paint splatters finished it off. 

I used the following stamps:

Thank you for stopping by today ! 


Monday, 19 September 2016

A zebra with a top hat & a new video !

Hello everyone,

and welcome my blog. I have a card to share today !


This was really quick and easy to make. 
On watercolour paper stamp and white emboss a background stamp. Mine is by Penny Black and it is quite old. Looks like old wallpaper, very cool.. 
Than paint you watercolours over the top. Add some background stamping and stamp the main image and the sentiment on book paper. Adhere to your panel. Add some doodling et voila ! as thy say in France. 

I have filmed how I made this so instead of reading this you could actually watch me do it ! 

Here it is :


Hope you enjoy ! If you do, please give me a thumbs up and subscribe to my channel ! 

Thank you so much for stopping by today ! 


Thursday, 15 September 2016

La vie Parisienne

Hello everyone,

For my DT post for Katzelkraft I have made a card. It has a gelli printed base; I am totally addicted to gelli printing !!!


On this gelli print I did some background stamping and I also added the swirl on the left. I used VersaMark ink and white WOW embossing powder for this. The two animal figures were stamped separately on white paper and cut out. I adhered them to the card, added the sentiment and a white line around the card ....et voila ! 

I used the following stamps :

Thank you so much for stopping by today !! 


Wednesday, 14 September 2016

Itsy bitsy spider

Hello everyone,

and happy Wednesday ! Today, a new challenge starts over at the Stampotique Designers's challenge blog. It's #257 and the theme is 'Put a bug on it'. We would love it if you played along with us but before you do make sure to read the rules on the SDC blog.
Here's my mini art journal.


For these pages I used a  6 x 6 gelli plate to print both sides. I started with the orange base and then overprinted the left with pink and the right with blue. I added some texture to the plate before printing. 
Next I used some background stamps, some with Archival ink in the same sort of colours. I also stamped with Versamark and then heat embossed with WOW fine white embossing powder. 
The sentiment was stamped straight on the page with alphabet stamps and doodled around with a white paint pen. I used the same paint pen to add some splattering. 
Spider girl was stamped on the page and on white cardstock. I coloured her, cut her out and then restamped her a third time on post it paper. I stuck the post it paper on some polka dotted pattern paper and cut out the dress which I then adhered on top of the coloured girl; I did add some shading to her little dress. The whole thing was then glued on top of the stamped image on the page. 
A line around the pages finished it off. 

I used the following stamps:


Thank you so much for stopping by... 


Tuesday, 13 September 2016

Glimmer of light - a Visible Image Monolith

Hello everyone,

and welcome to my blog where today I'll be sharing a monolith for Visible Image.
I think these are so versatile, you can decorate them any way you want...


I gessoed this freestanding Monolith first and then glued some pieces of book text on it. I then painted it with Acrylic paints. I used yellow, orange, pink and white. Next I stamped the background with a variety of stamps and Archival Inks in the same colours as the background. The black script stamp I did later. 


You can still read the book title here.... (something wicked this way comes). Next I stamped the Moth both on the Monolith and on Bristol Card stock. I coloured the one on the card stock with watercolours and then heat embossed it. The body with clear powder, the wings with holographic powder.  You can see it in the detail photo below. I also stamped the skeleton on the back of the monolith and used a white pen to highlight him here and there. I then decided it didn't have enough white so I filled in the circles with white paint and stamped a text stamp over the top. 


The moth was adhered on top of some thread for more interest. 

I used the following stamp sets :

and 

Thank you so much for stopping by today ! 
Social Media, Blog and monthly Challenge details :


Show & Tell Monthly Challenge details: http://visibleimage.co.uk/challenge 


Monday, 12 September 2016

I'm not all here, an art journal video tutorial.

Hello everyone,

I have made an art journal just for fun and filmed the process.
I would love it if you hopped over to YouTube and watched it AND subscribed to my channel !
Here is the spread I made :


If you are interested in how I made this then have a look at my video:


Thank you so much for stopping by today !